Dinner

This soup uses fresh, healthy ingredients that shine in the fall. - 1 tablespoon olive oil - 1 medium onion, diced - 2 cloves garlic, minced - 2 medium carrots, diced - 2 stalks celery, diced - 1 medium sweet potato, peeled and cubed - 1 cup butternut squash, cubed - 1 cup green beans, trimmed and cut into 1-inch pieces - 1 zucchini, diced - 1 can (14 oz) diced tomatoes - 4 cups vegetable broth - 1 teaspoon dried thyme - 1 teaspoon ground cumin - Salt and pepper to taste - Fresh parsley or basil for garnish Each ingredient brings unique benefits to the table. - Olive oil adds healthy fats and flavor. - Onion and garlic boost heart health and add depth. - Carrots provide beta-carotene for good vision. - Celery helps hydration and has low calories. - Sweet potato offers fiber and vitamins A and C. - Butternut squash is rich in antioxidants and potassium. - Green beans are low in calories and full of vitamins. - Zucchini adds hydration and is high in vitamin C. - Diced tomatoes are packed with lycopene, good for the heart. - Vegetable broth is low in calories and adds flavor. - Thyme and cumin provide flavor and health benefits too. These ingredients are easy to find in fall. Look for squash, sweet potatoes, and beans at local farmers' markets. Fresh herbs may be available too, adding a lovely touch to your soup. This soup is not just comforting but also nourishing. You can find the full recipe in the article. To make your Fall Harvest Vegetable Soup, start by gathering all your ingredients. This will save you time later. Here’s how to chop and prep the veggies efficiently: - Onion: Dice it small. This helps it cook faster and blend with other flavors. - Garlic: Mince it finely for strong flavor. - Carrots & Celery: Cut them into small, even pieces. This ensures they cook at the same rate. - Sweet Potato & Butternut Squash: Peel and cube them. Aim for 1-inch pieces for quick cooking. - Green Beans: Trim the ends and cut into 1-inch pieces. - Zucchini: Dice it into small pieces to add texture. The order of adding ingredients is key. Start with onion and garlic, then add the root veggies, and finally the softer ones. This helps build layers of flavor. For the best results, use a large pot or Dutch oven. These retain heat well. Set your stove to medium heat. - Heat the olive oil: Wait until it shimmers, then add the onion. - Cook time: The total time is about 45 minutes. Once the soup boils, lower heat and let it simmer for 20-25 minutes. - Signs your soup is done: Check the veggies. They should be tender but not mushy. A taste test is the best way to know if it’s ready. Follow these steps for a warm, comforting bowl of soup that truly captures the essence of fall. For the full recipe, check the earlier section. - How to enhance flavor with spices and herbs: Adding dried thyme and ground cumin gives your soup depth. Fresh herbs like parsley or basil add brightness. Feel free to experiment with your favorites. - Techniques for a creamier texture (if desired): To create a creamy feel, blend a portion of the soup after cooking. You can use an immersion blender or a regular blender. This adds richness without heavy cream. - Using leftover vegetables effectively: Don’t toss old veggies! Dice them and toss into your soup. This minimizes waste and adds unique flavors. Just chop them small, so they cook evenly. - Overcooking vegetables: Cooking too long makes veggies mushy. Aim for tender but firm. Check regularly to keep their color and crunch. - Not seasoning adequately during cooking: Season in layers. Add salt and pepper at different steps to build flavor. A little taste test along the way helps too. - Skipping the sautéing step: Sautéing onion and garlic first is key. This step builds a flavor base. Don't rush it; let them soften before adding other ingredients. For the full recipe, check the detailed steps to create this comforting soup. {{image_2}} You can change up the vegetables in this soup based on what you like or have. Try using: - Sweet potatoes instead of regular potatoes - Kale or spinach for extra greens - Bell peppers for a pop of color You can also add protein to make it heartier. Great options include: - Canned beans like chickpeas or kidney beans - Lentils for a boost of fiber - Shredded chicken or turkey for meat lovers If you want a vegan or gluten-free soup, stick with beans and veggies. Use a gluten-free broth to keep it safe for all diets. To spice things up, you might want to add some heat. Consider: - A pinch of red pepper flakes - Diced jalapeños for a kick If you love herbs, try these: - Fresh thyme or rosemary for depth - Basil for a sweet note For a creamy twist, blend a portion of the soup and return it to the pot. You can also add a splash of coconut milk for richness. Feeling adventurous? Try an Asian-inspired version. Add: - Miso for a savory depth - Fresh ginger to brighten the flavors These variations make the soup exciting and perfect for any palate. Check out the Full Recipe to see how you can mix and match flavors! To store your Fall Harvest Vegetable Soup, let it cool first. Transfer the soup to airtight containers. You can keep it in the fridge for up to four days. If you want to save it longer, freeze it. Use freezer-safe bags or containers. This way, you can enjoy it later without losing flavor. When you reheat your soup, do it gently. Use a pot on low heat. Stir often to keep it smooth. If it seems too thick, add a splash of broth or water. This will help restore the texture. The soup's shelf life is about four days in the fridge and up to three months in the freezer. Always check for any off smells or changes in color before eating leftovers. Freezing soup in portions is a smart move. Use small containers or freezer bags. This makes it easy to grab a single serving for lunch or dinner. Just remember to label the bags with dates. If you have a busy week ahead, make the soup on the weekend. You can have warm meals ready in no time. Just reheat as needed. You can also use this soup in other dishes. Try adding it to pasta or grain salads for a health boost. You can even blend it into a sauce for a new twist on your favorite pasta dish. For more ideas, check out the Full Recipe for inspiration. What can I substitute for vegetable broth? You can use water with a bit of seasoning. Add herbs like thyme or bay leaf. Another option is to use chicken broth if you are not vegetarian. This adds a nice depth of flavor to the soup. How can I make this soup spicier? To add heat, sprinkle in some red pepper flakes or a dash of hot sauce. You can also add diced jalapeños or serrano peppers for a fresh kick. Start small and taste as you go to reach your desired spice level. Can I use frozen vegetables in this recipe? Yes, frozen vegetables work well! Just make sure to thaw them first. This can save time and still give you a tasty soup. They may also add a nice texture and flavor to your Fall Harvest Vegetable Soup. Recommended sides to pair with the soup Pair this soup with crusty bread or a fresh salad. A warm piece of sourdough is perfect for dipping. You can also serve it with a light cheese platter for variety. Presentation tips for serving Serve the soup in a deep bowl for a cozy feel. Use a ladle to pour it gently. You can also add a drizzle of olive oil on top for an elegant touch. Ideal garnishes to enhance flavor and look Chop fresh parsley or basil for a pop of color. You can also use a sprinkle of grated cheese. A few croutons add crunch and look nice too. Caloric breakdown of a serving One serving has about 150 calories. This varies with ingredients, but it's a healthy choice. It’s packed with nutrients and low in calories. Health benefits of seasonal vegetables Seasonal vegetables boost your immune system. They provide vitamins, minerals, and antioxidants. Eating them can help you stay healthy during the colder months. Dietary information for common allergies This soup is naturally vegan and gluten-free. Always check labels on canned tomatoes for gluten. For nut allergies, ensure your broth is nut-free. In this article, we explored how to make a delicious Fall Harvest Vegetable Soup. We reviewed the important ingredients, their nutrients, and how to prep them. The step-by-step instructions make cooking simple, while our tips help you avoid common mistakes. You also learned about variations to suit your taste. Lastly, we discussed storage and meal prep options for easy future meals. Enjoying this soup can bring warmth and healthy choices to your fall days. Dive into your cooking, and have fun experimenting with flavors!
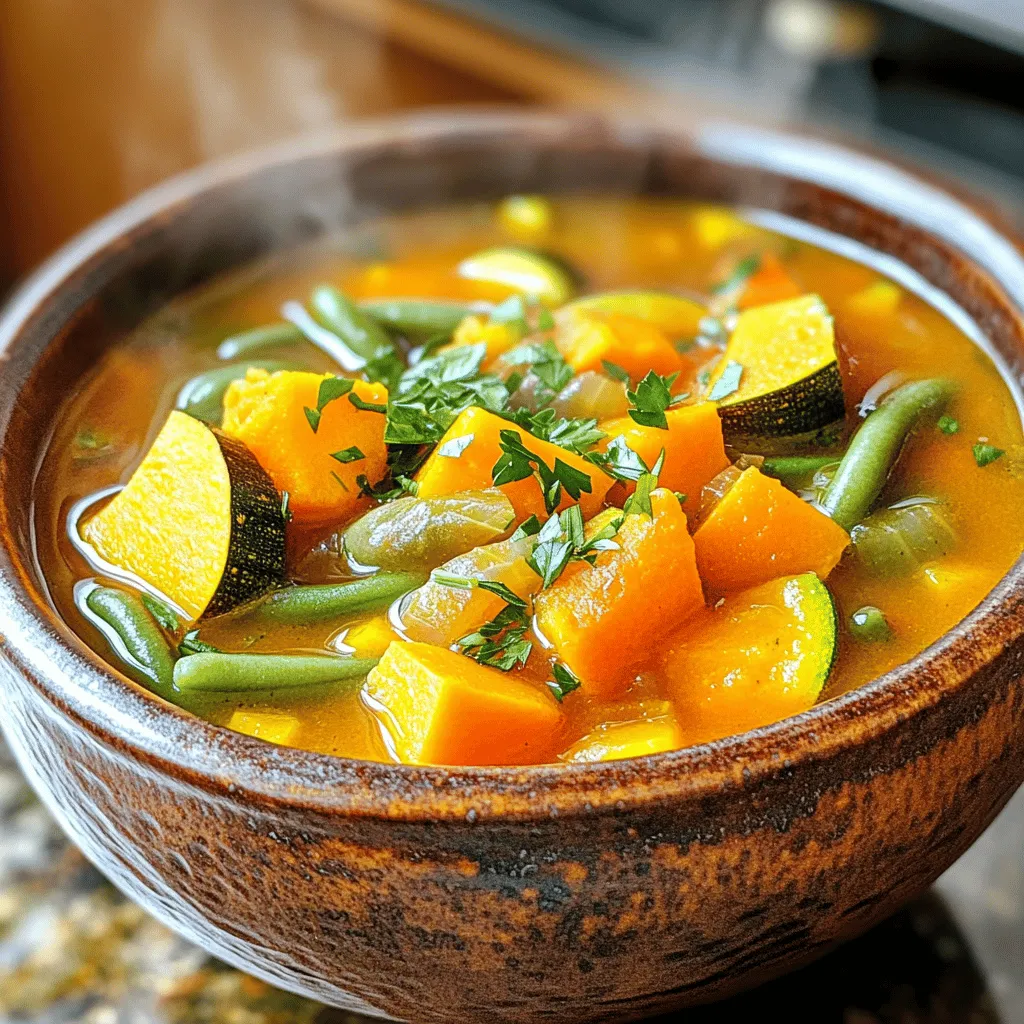
Fall Harvest Vegetable Soup Nourishing Seasonal Delight
As the leaves shift to warm hues and the air turns crisp, there’s nothing like a warm bowl of Fall Harvest Vegetable Soup to embrace
- 4 boneless, skinless chicken thighs - 1 cup buttermilk - 1 cup all-purpose flour - Seasonings: - 1 teaspoon garlic powder - 1 teaspoon onion powder - 1 teaspoon smoked paprika - 1 teaspoon cayenne pepper (adjust for spice level) - 1 teaspoon salt - 1/2 teaspoon black pepper - 1/2 cup hot honey - 1 tablespoon olive oil - Fresh parsley for garnish Baked Crunchy Hot Honey Chicken has an amazing taste. The buttermilk makes the chicken tender and juicy. The coating holds onto the chicken well. The mix of spices adds warmth and flavor. Cayenne gives a nice kick, but you can change it to your liking. The hot honey glaze ties everything together. It adds sweetness and spice. Drizzling it on during the last few minutes of baking creates a sticky finish. Fresh parsley brings color and freshness to the dish. For the full recipe, check the link above. This dish is great for family dinners or a fun gathering. You will love how easy it is to make. Plus, it looks beautiful on the plate! To start, grab a medium bowl and pour in 1 cup of buttermilk. Add the 4 boneless, skinless chicken thighs, making sure they are fully submerged. Cover the bowl with plastic wrap and place it in the fridge. For the best flavor, marinate the chicken for at least 1 hour. If you have time, marinating overnight gives even better results. Next, preheat your oven to 425°F (220°C). This temperature is key for a crispy texture. While the oven heats, line a baking sheet with parchment paper. This step keeps the chicken from sticking and makes cleanup easier. Now, let’s make the coating. In a large bowl, mix together 1 cup of all-purpose flour with the seasonings. You will need 1 teaspoon each of garlic powder, onion powder, smoked paprika, and cayenne pepper. Also, add 1 teaspoon of salt and 1/2 teaspoon of black pepper. Whisk these ingredients until they are well combined. Once your chicken is marinated, it’s time to coat it. Remove the chicken from the buttermilk, letting any extra drip off. Dredge each piece in the flour mixture, pressing down to create a thick coating. Place the chicken on your prepared baking sheet. Drizzle 1 tablespoon of olive oil over the chicken. Bake it in the preheated oven for 25-30 minutes. You want it golden brown and crispy. Always check that the internal temperature reaches 165°F (74°C) for safe eating. In the last 5 minutes of baking, drizzle the hot honey over the chicken. This step is important because it allows the glaze to caramelize. This caramelization adds a sweet and spicy layer to the chicken that is hard to resist. Make sure to watch it closely to avoid burning. For the full recipe, check out the complete instructions above. Enjoy your delicious Baked Crunchy Hot Honey Chicken! To get a great crunch, start with dry chicken. Pat the chicken with paper towels before marinating. This helps the coating stick well. When you coat the chicken, press firmly into the flour mix. This step ensures a thick, crunchy layer. If you like heat, use more cayenne pepper. Start with one teaspoon and taste. You can always add more, but you can't take it out! If you want less heat, use half a teaspoon. You can also swap cayenne for smoked paprika for a milder flavor. For sides, try creamy coleslaw or roasted veggies. These add color and texture to your plate. Serve the chicken on a rustic platter. Drizzle extra hot honey on top for a sweet touch. Fresh parsley adds a nice pop of green and makes the dish look appealing. For the full recipe, check out the complete guide above. {{image_2}} You can switch chicken thighs for breasts if you want a leaner option. Chicken breasts will cook faster but may be less juicy. If you don't have buttermilk, mix milk with vinegar or lemon juice. This creates a similar tangy flavor for marinating. Want to boost the taste? Add herbs like thyme or rosemary to your coating mix. You can also spice it up with cayenne or paprika. For honey, try mixing different types like clover or wildflower. Each honey brings a unique flavor to the dish. If you want a crisper texture, try air frying. It uses less oil and cooks faster. Baking gives a tender chicken, while grilling adds a nice smoky taste. Use a grill pan for the stovetop if you prefer indoors. Each method offers a tasty twist on this dish. To keep your Baked Crunchy Hot Honey Chicken fresh, start by letting it cool. Place the chicken in an airtight container. This helps lock in moisture. You can store it in the fridge for up to four days. If you want to keep it longer, consider freezing it. Use a freezer-safe container or heavy-duty freezer bags for best results. When you're ready to enjoy leftovers, you want them crispy again. The oven works best for this. Preheat your oven to 375°F (190°C). Place the chicken on a baking sheet lined with parchment paper. Heat for about 15-20 minutes. This method helps keep the chicken crunchy. Avoid microwaving, as it can make the chicken soggy. If you must use a microwave, place a paper towel on top to help absorb moisture. Yes, you can freeze Baked Crunchy Hot Honey Chicken! Start by wrapping each piece in plastic wrap. Then, put them in a freezer-safe bag or container. Make sure to squeeze out air before sealing. The chicken can last in the freezer for up to three months. When you're ready to eat, thaw it overnight in the fridge. Reheat in the oven for that crunchy texture you love. Yes, you can prep this dish ahead of time. Start by marinating the chicken in buttermilk. This step adds flavor and keeps the meat moist. You can marinate for up to 24 hours. After marinating, coat the chicken but do not bake it yet. You can store the coated chicken in the fridge for a few hours before baking. Just allow it to sit at room temperature for about 15 minutes before putting it in the oven. This helps with even cooking. Great sides make this dish even better. Here are some popular options: - Creamy coleslaw - Garlic mashed potatoes - Roasted vegetables - Baked beans - Cornbread These sides add nice flavors and textures. They also balance the spicy sweetness of the chicken. The key to juicy chicken is checking the internal temperature. Chicken should reach 165°F (74°C) for safe eating. Use a meat thermometer to check the thickest part of the chicken. If you don’t have one, cut into the chicken. The juices should run clear, and the meat should not be pink. Always check multiple pieces to be sure. Enjoy your Baked Crunchy Hot Honey Chicken with confidence! For the full recipe, check out the main article. Baked Crunchy Hot Honey Chicken combines simple ingredients, flavors, and techniques. You learned about marinating, coating, and baking to get the perfect crispy dish. We discussed tips to adjust spice levels and enhance flavors, plus ideas for sides. This dish is both fun and easy, making it great for any meal. With these steps and insights, you can create a tasty favorite that everyone will love. Enjoy your cooking adventure and make it your own!
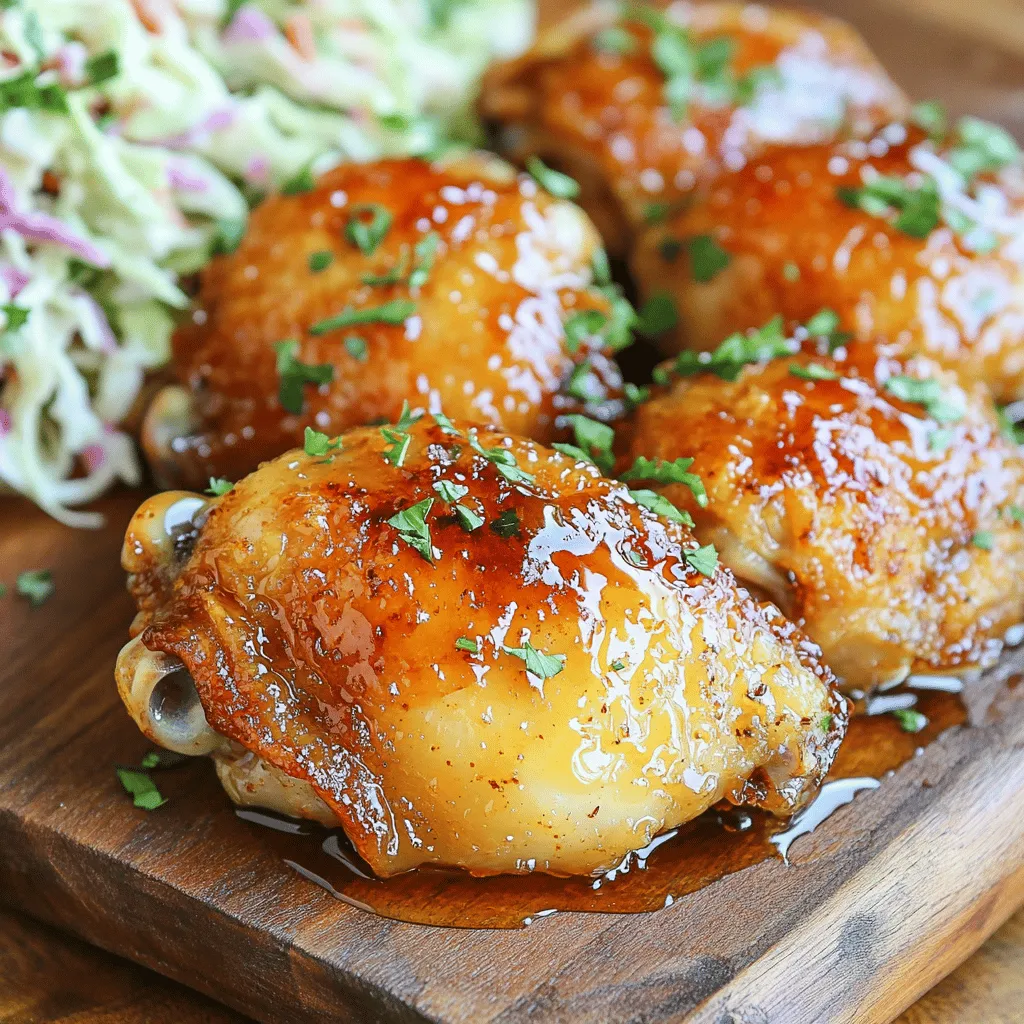
Baked Crunchy Hot Honey Chicken Irresistible Flavor
Craving a dish that’s both sweet and spicy? Look no further! My Baked Crunchy Hot Honey Chicken promises a crispy exterior bursting with flavor. With
- 1 lb beef chuck, cut into 1-inch cubes - 2 tablespoons vegetable oil - 1 onion, diced - 2 garlic cloves, minced - 3 carrots, sliced - 2 celery stalks, chopped - 4 cups beef broth - 2 cups water - 1 can (14.5 oz) diced tomatoes, with juices - 1 cup green beans, trimmed and cut into 1-inch pieces - 1 cup corn kernels (fresh, frozen, or canned) - 2 medium potatoes, diced - 1 teaspoon dried thyme - 1 bay leaf - Salt and pepper to taste - Fresh parsley, chopped (for garnish) When I think of my mom's soup, I remember how it warmed my heart and soul. The beef chuck gives the soup a rich flavor. It’s key to cut it into 1-inch cubes for even cooking. The vegetable oil helps to brown the beef and adds a nice depth. Onions and garlic bring a sweet aroma. Diced onion makes the soup feel hearty. Minced garlic adds just the right kick. Carrots and celery add color and nutrition. They also provide a nice crunch if you don’t overcook them. The liquid ingredients are very important. Beef broth acts as the base, giving a robust taste. Adding water helps balance the flavors. Diced tomatoes add a touch of acidity and sweetness, which brightens the soup. You can't forget the vegetables. Green beans and corn provide sweetness and texture. Diced potatoes make the soup filling. They soak up the flavors and become creamy. For seasoning, thyme and bay leaf bring warmth and earthiness. Salt and pepper are essential for enhancing the flavors. The fresh parsley on top gives a lovely pop of color and freshness. This blend of ingredients creates a cozy, hearty dish. If you want the complete recipe, check out Mom's Hearty Vegetable Beef Soup. - Heat vegetable oil in a large pot or Dutch oven. - Sear beef cubes until browned on all sides. Start by heating the oil over medium-high heat. You want the pot hot enough to sear the beef. Add your beef cubes in a single layer. Searing locks in flavor and adds a nice crust. Cook the beef for about 5 to 7 minutes. Once done, remove the beef and set it aside. - Remove beef and sauté diced onion and garlic until translucent. - Add carrots and celery, cooking until softened. In the same pot, add your diced onion and minced garlic. Sauté until the onion turns translucent, about 3 minutes. The smell will be amazing! Next, toss in your sliced carrots and chopped celery. Cook these for about 5 minutes until they soften. This builds the base flavor for your soup. - Return beef to the pot, add broth, water, tomatoes, green beans, corn, and potatoes. - Stir in thyme, bay leaf, salt, and pepper. Now it’s time to bring everything together. Return the seared beef to the pot. Add 4 cups of beef broth and 2 cups of water. Then, toss in the can of diced tomatoes, green beans, corn, and diced potatoes. Don’t forget your thyme, bay leaf, salt, and pepper. Stir everything well to combine. - Bring to a boil, then reduce heat and simmer for 1.5 to 2 hours. - Adjust seasoning as necessary and remove bay leaf before serving. Bring the soup to a boil. Once boiling, reduce the heat to low and let it simmer. This is where the magic happens! Simmer for about 1.5 to 2 hours. The beef will become fork-tender. Before serving, taste your soup and adjust the seasoning if needed. Ensure you remove the bay leaf before ladling the soup into bowls. This method creates a warm, hearty meal that feels like a hug in a bowl. For the full recipe, check out the details above. Enjoy your cooking! - Use homemade beef broth for better taste. Homemade broth gives a fuller flavor. You can simmer beef bones and veggies for hours. This deepens the taste and makes the soup richer. - Add a splash of Worcestershire sauce for depth. This adds umami and a hint of tang. Just a little turns a good soup into a great one. - Cut vegetables evenly for uniform cooking. This helps all veggies cook at the same rate. You want them tender, not mushy. - Simmer until beef is fork-tender for the best texture. Slow cooking brings out the flavors. When the beef falls apart easily, it's done. - Ladle into deep bowls and garnish with fresh parsley. A sprinkle of green looks nice and adds freshness. - Serve with crusty bread for a complete meal. The bread is perfect for dipping and adds a nice crunch. Enjoy every bite! {{image_2}} If you need a gluten-free option, it's easy to adapt this soup. Use gluten-free broth as your base. Check all condiments too, like Worcestershire sauce, to ensure they fit the diet. This way, everyone can enjoy a warm bowl without worry. For a tasty vegetarian version, swap the beef for hearty mushrooms. Use vegetable broth instead of beef broth. This mix keeps the soup rich and flavorful while making it meat-free. You still get all the warmth and comfort of my mom's old-fashioned recipe. If you like a bit of heat, add chili flakes or diced jalapeños. Start with a small amount and taste as you go. This adds a spicy kick that makes the soup exciting. Spice can transform the flavors and make each bite thrilling. You can find the full recipe with these variations included. Store any leftover soup in an airtight container. It keeps well in the fridge for up to 3 days. This way, you can enjoy it again without losing flavor. If you want to save some for later, freeze it. Use individual containers to store portions. This soup stays fresh in the freezer for up to 3 months. Just make sure to label each container with the date. When you're ready to enjoy the soup again, reheat it on the stovetop or in the microwave. Heat it until it is warm all the way through. Stir it well to make sure everything heats evenly. Prep time is about 20 minutes, with a total cooking time of 2 hours 30 minutes. This soup needs a little time to develop its great taste. You can start by chopping the veggies and beef. Then, let the soup simmer until the meat is tender. This time allows all the flavors to mix well. Yes, feel free to use stew meat or even chicken as a substitute. If you like, try turkey or pork too. Each option gives a different flavor. Just make sure to adjust cooking time as needed. The key is to have meat that cooks well in soup. Absolutely! It's a hearty, nutritious soup that kids usually enjoy. The mix of veggies and tender beef makes it tasty. Kids love the colorful vegetables too. Plus, it’s easy to eat. You can add fun toppings like cheese or croutons to make it more exciting for them. Consider serving with crusty bread, a side salad, or sandwich halves. These sides complement the soup well. The bread is great for dipping. A fresh salad adds crunch and color. Sandwich halves can make it a whole meal. Enjoy your soup with these tasty options! You can create a hearty vegetable beef soup with simple ingredients. We covered the main components like beef, vegetables, and broth. You learned step-by-step cooking tips and how to store your soup. Remember, you can customize it for your taste or dietary needs. Don’t hesitate to experiment with flavors or textures. Enjoy warm bowls of comfort that also give nutrition. This soup is perfect for family meals or cozy nights in. Happy cooking!
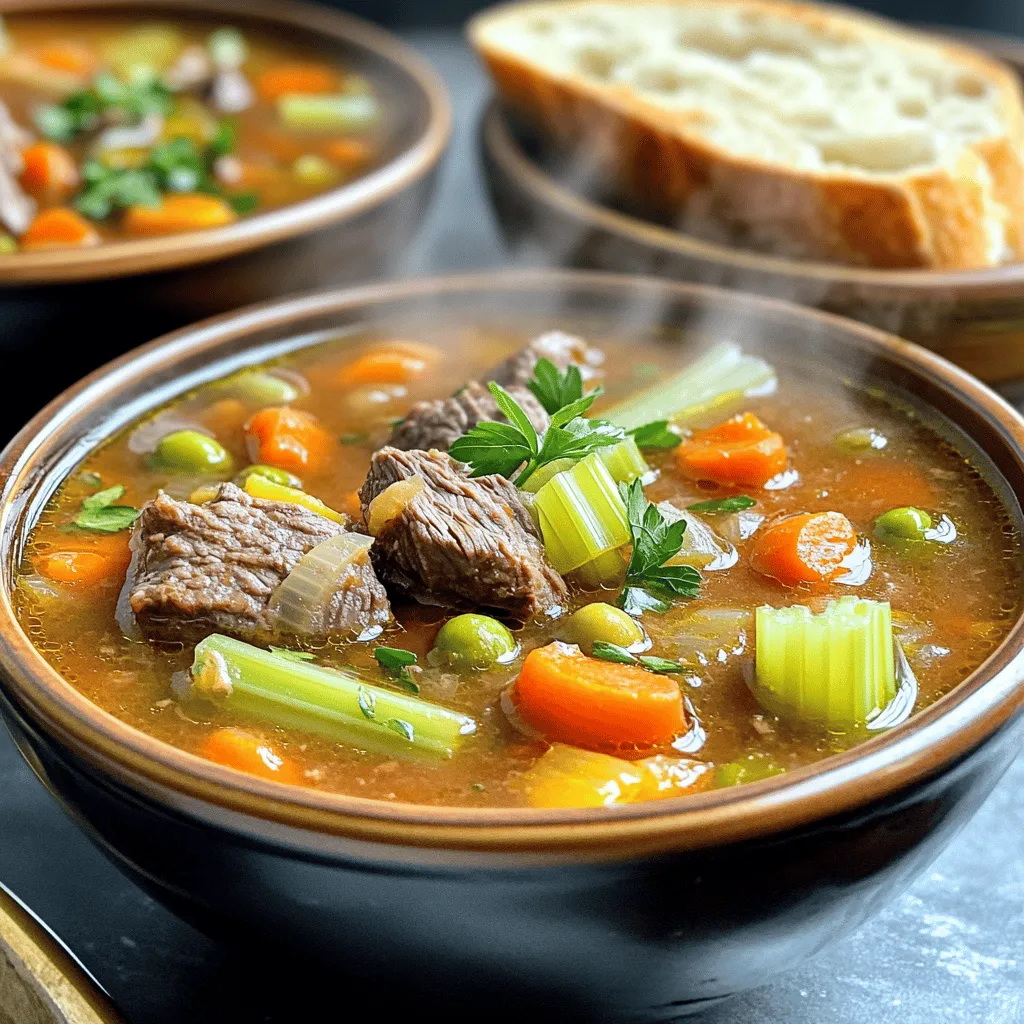
My Mom’s Old Fashioned Vegetable Beef Soup Delight
There’s nothing quite like a steaming bowl of my mom’s old-fashioned vegetable beef soup. This recipe isn’t just about comfort; it’s a blast from the
- 4 boneless, skinless chicken thighs - 2 tablespoons Greek yogurt - 2 tablespoons olive oil - 1 tablespoon lemon juice - 4 cloves garlic, minced - 2 teaspoons dried oregano - 1 teaspoon ground cumin - 1 teaspoon smoked paprika - Salt and pepper to taste - 1 large cucumber, diced - 1 medium tomato, diced - 1 red onion, thinly sliced - Fresh parsley, chopped for garnish - Feta cheese, crumbled (optional) - 4 whole wheat pita breads When I make One Pan Chicken Gyros, I start with the main ingredients. The chicken thighs are key. They stay juicy and tender. I mix Greek yogurt, olive oil, and lemon juice in a bowl. This marinade adds flavor and moisture. Next, I add garlic, oregano, cumin, smoked paprika, salt, and pepper to the mix. Garlic gives a nice kick, while oregano and cumin add depth. These flavors work well together. I let the chicken soak in this mix for about 30 minutes. While the chicken marinates, I prepare the fresh additions. Dicing cucumber and tomato is easy. I slice the red onion thinly. These veggies add crunch and freshness. I keep chopped parsley for garnish. Feta cheese is optional, but it adds a creamy touch. Finally, I warm the whole wheat pita breads. They are soft and perfect for holding all the delicious fillings. With these ingredients ready, I know I am set for a tasty meal! {{ingredient_image_1}} - Combine Greek yogurt, olive oil, lemon juice, minced garlic, oregano, cumin, smoked paprika, salt, and pepper. - Add chicken thighs and coat thoroughly; refrigerate for at least 30 minutes. Marinating the chicken is key to flavor. The Greek yogurt adds creaminess and tang. The olive oil helps keep the chicken moist. Lemon juice brightens the taste, while garlic, oregano, cumin, and smoked paprika give depth. Letting the chicken sit in this mix allows the flavors to blend. - Heat skillet over medium heat and cook marinated chicken for 7-8 minutes on each side until golden brown. - Remove from skillet and rest before slicing. When you cook the chicken, be sure the skillet is hot enough. This helps achieve a nice sear. You want it to be golden brown on both sides. Letting it rest afterward is important. This keeps the juices inside, making it tender and juicy when you slice it. - Sauté diced cucumber, tomato, and sliced onion in the same skillet for 3-4 minutes. Use the same skillet for the vegetables. This way, you get the leftover flavors from the chicken. Sauté them just until they soften a bit, but keep them crisp. It adds a fresh crunch to the gyros. - Warm whole wheat pita breads in a pan or microwave (15-20 seconds). Warming the pita makes it soft and pliable. You can use a dry pan or the microwave. Just 15-20 seconds is all you need. This helps the pita hold the filling without tearing. - Slice rested chicken thighs and place in warm pita with sautéed vegetables. - Add crumbled feta and parsley for garnish. To assemble, slice the rested chicken into strips. Take a warm pita, fill it with the sautéed vegetables, and add the chicken. Crumbled feta and fresh parsley on top add a nice touch. - Serve immediately with extra Greek yogurt for dipping. Enjoy your gyros right away. The extra Greek yogurt on the side is great for dipping or drizzling. This adds creaminess and a little tang to each bite. To get the best flavor, marinate your chicken thighs. Use Greek yogurt, olive oil, lemon juice, minced garlic, oregano, cumin, and smoked paprika. This mix adds depth and moisture. Cover the chicken and let it sit in the fridge for at least 30 minutes. For even better results, marinate it overnight. This allows the spices to soak in deeply and makes the chicken tender. To cook the chicken without drying it out, use medium heat. Sear each side for about 7-8 minutes. The chicken should be golden brown and reach 165°F inside. Let it rest for a few minutes before slicing. This keeps the juices locked in. For the veggies, sauté diced cucumber, tomato, and onion in the same skillet. Cook for just 3-4 minutes. You want them soft but still a bit crunchy. To warm pita bread, a quick stove method works best. Place them in a dry pan over low heat for 30-60 seconds on each side. Alternatively, microwave them for 15-20 seconds. This keeps them soft and pliable. If you want extra softness, wrap them in a damp paper towel while microwaving. This adds moisture and makes them even more enjoyable. Pro Tips Marination Magic: Allow the chicken to marinate for at least 1 hour, or overnight if possible, to enhance the flavors and tenderness of the meat. Use Fresh Herbs: Substitute dried oregano with fresh oregano for a more vibrant flavor profile in your gyros. Perfectly Warm Pita: For the best texture, heat your pita bread in a skillet with a little olive oil instead of the microwave. Extra Toppings: Experiment with additional toppings like kalamata olives or tzatziki sauce for a delicious twist on your gyros. {{image_2}} For a tasty twist, you can swap chicken thighs for chicken breast. This will give you a leaner meal. Turkey is another great choice. It has a similar taste and cooks well. If you prefer a vegetarian option, try chickpeas. They pack a protein punch and work great in gyros. Halloumi cheese is another fun choice. It grills nicely and adds a rich flavor. Want to make your gyros even better? Try adding spices like coriander or chili powder for extra heat. A touch of tahini can also bring a nice creaminess. Fresh herbs can brighten the dish. Mint and dill are perfect choices. They add freshness and go well with the other flavors. Don't forget about toppings, too! Sliced olives and pickled red onions can add zest. You can serve gyros in many ways. Want a lighter meal? Try a salad base instead of pita. Just layer the cooked chicken and veggies on your greens. For sides, Greek salad is a great match. It’s fresh and pairs perfectly with the gyros. Tzatziki sauce is another classic option. The coolness of the yogurt contrasts nicely with the spices in the dish. To store leftover chicken gyros, place them in an airtight container. This keeps the flavors fresh. You can store them for up to three days. Marinated chicken lasts longer than cooked chicken. Marinated chicken can stay fresh for up to two days, while cooked chicken is best within three days. For reheating chicken and vegetables, use a skillet over medium heat. This method helps retain the food’s flavor and moisture. Heat for about five minutes until warmed through. When reheating pita, use a dry pan or microwave for 15-20 seconds. This keeps the pita soft and tasty. Yes, you can freeze chicken gyros! To freeze, place the cooked chicken and vegetables in airtight bags. Squeeze out extra air before sealing. For pita, wrap each one in foil or plastic. When ready to eat, defrost in the fridge overnight. Then, reheat in a skillet or microwave before serving. To marinate chicken for gyros, mix Greek yogurt, olive oil, lemon juice, minced garlic, oregano, cumin, smoked paprika, salt, and pepper. This mix gives the chicken great flavor and keeps it tender. Coat the chicken thighs well. Let them sit in the fridge for at least 30 minutes. For more flavor, you can marinate for longer. Yes, you can make these gyros ahead of time. You can marinate the chicken a day before. Just keep it in the fridge. You can also chop the veggies and warm the pita ahead of time. Store everything separately until you are ready to eat. This way, the gyros stay fresh and tasty. If you need a substitute for Greek yogurt, try sour cream or plain yogurt. You can also use dairy-free yogurt made from almond or coconut milk. These options work well, but keep in mind they may change the flavor a bit. Choose a thick yogurt for the best result. You can tell when the chicken is fully cooked by checking its color. The meat should be golden brown and no longer pink inside. The best way is to use a meat thermometer. It should read 165°F (75°C) for safe eating. Let it rest for a few minutes before slicing to keep it juicy. Yes, there are gluten-free options for pita. Look for gluten-free pita bread at the store. Many brands use rice flour or chickpea flour. You can also make your own gluten-free pita at home using almond flour or coconut flour. This way, everyone can enjoy the gyros. In this post, I detailed how to make delicious chicken gyros. You learned about key ingredients like chicken thighs, yogurt, and spices. I provided steps for marinating, cooking, and assembling your gyros. Plus, I shared tips for perfect pita and various flavor options. Enjoy crafting your gyros, and don’t hesitate to get creative! You can adjust flavors and ingredients as you like. These gyros can be a fun and tasty meal for any occasion.
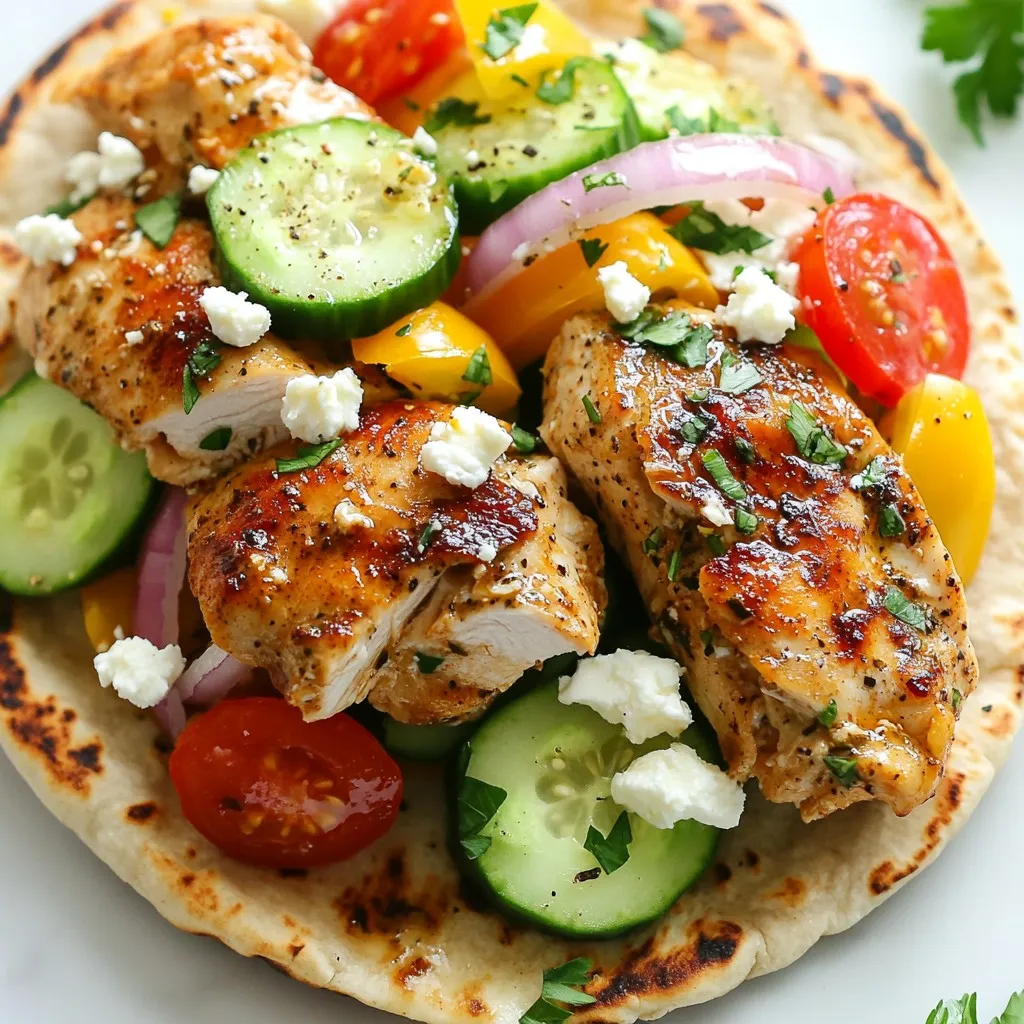
One Pan Chicken Gyros Flavorful Meal in Minutes
Looking for a quick and tasty dinner option? My One Pan Chicken Gyros are just what you need! With simple ingredients and bold flavors, you
The key to tasty Mediterranean chicken tacos is fresh ingredients. Here’s what you will need: - 2 boneless, skinless chicken breasts - 1 tablespoon olive oil - 1 teaspoon garlic powder - 1 teaspoon onion powder - 1 teaspoon smoked paprika - 1 teaspoon dried oregano - Salt and pepper to taste - 1 cup cherry tomatoes, halved - 1 cucumber, diced - ½ red onion, finely chopped - ½ cup feta cheese, crumbled - 1 cup Greek yogurt - 1 tablespoon lemon juice - 6 small whole wheat or corn tortillas - Fresh parsley, chopped (for garnish) When you marinate the chicken, it absorbs all those yummy flavors. The tomatoes, cucumber, and red onion add a fresh crunch. And the feta cheese gives a nice creamy touch. Want to kick up the flavor? Consider these suggestions: - Add a pinch of cumin or coriander for extra depth. - Top with olives or avocado slices for more richness. - Use fresh mint or dill for a refreshing twist. These options can elevate your tacos and make them even more exciting. To make these tacos, you will need some basic tools: - Grill or stovetop grill pan: This helps to get nice grill marks on the chicken. - Mixing bowls: You’ll need these for marinating and mixing your toppings. - Utensils: A brush for the marinade and a sharp knife for slicing chicken. Having the right tools makes cooking easier and more fun. For the complete recipe, check out the Full Recipe. Start by marinating the chicken. In a small bowl, mix olive oil, garlic powder, onion powder, smoked paprika, dried oregano, salt, and pepper. Brush this mixture on both sides of the chicken breasts. Let it sit for about 15 minutes for extra flavor. Next, preheat your grill or stovetop grill pan over medium-high heat. Place the chicken on the grill. Cook for 6-7 minutes on each side. Look for nice grill marks and ensure the chicken is cooked through. If you have a meat thermometer, aim for 165°F. Once done, remove the chicken and let it rest for 5 minutes. This helps keep it juicy. After resting, slice the chicken thinly. For the salad mixture, combine cherry tomatoes, cucumber, red onion, and feta cheese in a bowl. Drizzle with lemon juice and season with salt and pepper. This mix adds freshness to your tacos. To make the Greek yogurt sauce, simply stir the yogurt in a small bowl. You can add a pinch of salt for extra flavor. This creamy sauce is a great topping. Now, it’s time to assemble your tacos! Start by warming the tortillas. Place them on the grill for about 30 seconds on each side until they are soft and pliable. This step makes them easier to fold. Lay slices of grilled chicken on each tortilla. Next, add a generous amount of the tomato-cucumber mixture. Drizzle the Greek yogurt sauce over the top. Finally, sprinkle with fresh parsley for a pop of color. For the full recipe, check the provided details. Enjoy your Mediterranean chicken tacos! To make the best Mediterranean chicken, cook the chicken to the right temperature. Use a meat thermometer to check for 165°F (75°C). This ensures it is safe to eat. If you don’t have a thermometer, cut the chicken to check. The juices should run clear, not pink. After grilling, let the chicken rest for 5 minutes. This helps keep it juicy. When you slice the chicken, cut it against the grain. This technique makes each bite more tender and easy to chew. Want to boost the flavor? Try adding spices like cumin or coriander. These spices add warmth and depth. A pinch of red pepper flakes gives your tacos a spicy kick. To balance flavors, keep your taco fillings fresh. The cool cucumber and tart lemon juice brighten the dish. A sprinkle of salt on your veggies enhances their taste. Mixing these elements creates a delightful flavor harmony. For sides, serve your tacos with a simple salad. A mix of greens with olive oil and lemon makes a great match. You can also offer a side of hummus and pita chips for dipping. To make your dish look stunning, stack the tacos neatly. Use a colorful plate to make the food pop. Garnish with chopped parsley for a fresh touch. This not only adds color but also a hint of flavor. For the full experience, check the Full Recipe for more details on how to prepare these tasty Mediterranean chicken tacos! {{image_2}} If you want to switch things up, try using different proteins. Beef and lamb work great in Mediterranean tacos. Use ground beef or lamb for a hearty option. For a quicker choice, try shredded rotisserie chicken. If you prefer plant-based options, use grilled mushrooms or tempeh. These choices keep the meal tasty while adding variety. Now, let’s dive into flavor! You can create Mediterranean-style tacos by adding spices like cumin or coriander. Another option is to infuse your tacos with a smoky chipotle sauce. For a fresh twist, try a tzatziki sauce made with yogurt, cucumber, and mint. Each sauce brings a unique flavor to your tacos. You can also make these tacos fit your diet. For gluten-free options, use corn tortillas instead of wheat. If you’re watching carbs, try lettuce wraps instead of tortillas. For vegan substitutions, replace chicken with chickpeas or jackfruit. Use dairy-free yogurt to replace Greek yogurt. These adjustments keep the dish delicious and accessible. For the complete Mediterranean Chicken Tacos recipe, check out the Full Recipe. To keep your Mediterranean chicken tacos fresh, store them in the fridge. Use airtight containers for best results. This method helps lock in flavors and moisture. The leftover chicken lasts about three to four days. Fresh veggies stay crisp for about two days. If you have any Greek yogurt, it lasts about a week as well. You can freeze either the assembled tacos or the ingredients. For assembled tacos, wrap them tightly in plastic wrap and then in foil. This method keeps them safe from freezer burn. They can last for up to three months in the freezer. To thaw, place them in the fridge overnight. Reheat in the oven at 350°F for about 15-20 minutes. If you freeze the chicken and veggies separately, defrost them in the fridge before cooking. Don’t let any ingredients go to waste! You can create delicious new meals with your leftovers. Use the chicken in wraps or salads. Toss it into a grain bowl with quinoa or rice. The tomato-cucumber mix also works great on top of greens. You can combine the Greek yogurt with herbs to make a dip or sauce. The possibilities are endless, and you can keep enjoying those Mediterranean flavors! To check if your chicken is done, use a meat thermometer. Insert it into the thickest part of the chicken. It should read 165°F (75°C). If you don't have a thermometer, cut the chicken open. The inside should be white, with no pink. Cooking time is about 6-7 minutes on each side over medium-high heat. I always let my chicken rest after grilling. This helps keep it juicy. Yes, you can make these tacos ahead of time! Cook the chicken and let it cool. Store it in the fridge for up to three days. You can also prepare the salad mix and yogurt sauce ahead. Just keep everything in separate containers. When you are ready to eat, warm the tortillas and assemble your tacos. This makes meal prep easy and quick! You can get creative with taco toppings! Here are some ideas: - Avocado slices for creaminess - Pickled red onions for tang - Sliced jalapeños for heat - Fresh herbs like dill or mint for a fresh kick - Olives for briny flavor - Microgreens for a crunchy texture Feel free to mix and match toppings to suit your taste! Mediterranean chicken tacos are a tasty twist on a classic dish. We explored key ingredients, including chicken, fresh veggies, and optional toppings. You learned how to prepare the chicken, mix the salad, and assemble your tacos for the best taste. Tips on cooking and storing leftovers made the process easier. Finally, we looked at variations for different diets. Now, you can enjoy these tacos any night! Embrace the flavors and customize them to your liking for a fun dinner experience.
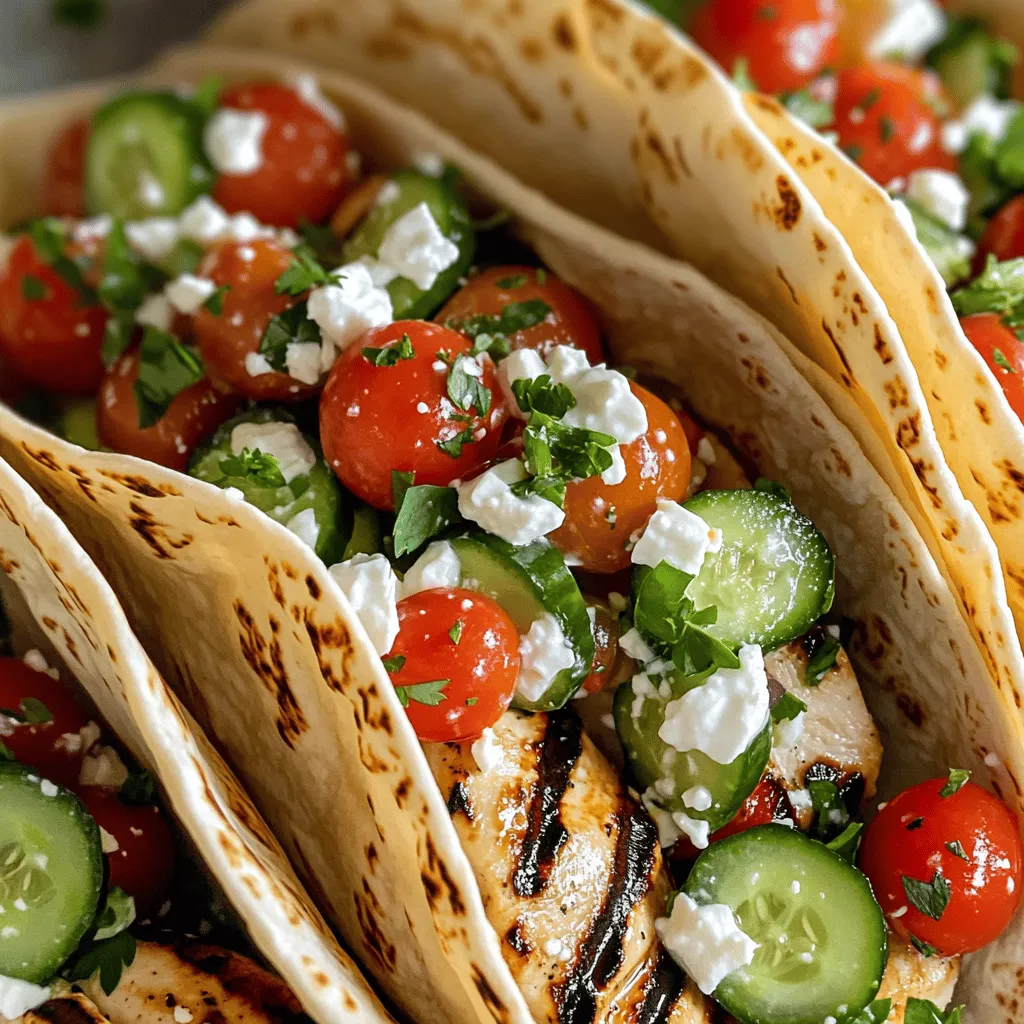
Mediterranean Chicken Tacos Flavorful and Simple Meal
Looking for a meal that’s both tasty and easy to make? Mediterranean Chicken Tacos are your answer! With juicy chicken, fresh veggies, and a zesty
- 4 boneless, skinless chicken breasts - 1 cup cherry tomatoes, halved - 2 cups fresh spinach - 1/3 cup balsamic vinegar - 2 tablespoons honey - 2 tablespoons olive oil - 3 cloves garlic, minced - 1 teaspoon dried oregano - Salt and pepper to taste - Fresh basil leaves for garnish You can swap chicken for turkey or firm tofu. Both options work well with the marinade. For veggies, consider using zucchini or bell peppers. They add color and taste. Seasonal veggies like asparagus in spring can also make a nice touch. A large skillet works best for this dish. A non-stick skillet helps prevent sticking and makes cleaning easier. You will also need a good set of measuring cups and spoons. A sharp knife and cutting board are essential for chopping ingredients quickly and safely. First, we need to create a tasty marinade. In a small bowl, you will whisk together balsamic vinegar, honey, olive oil, minced garlic, oregano, salt, and pepper. This mix adds flavor and moisture to the chicken. I recommend letting the chicken marinate for at least 30 minutes. If you have time, two hours will deepen the taste even more. Next, it's time to cook the chicken. Preheat a large skillet over medium heat. Once it gets hot, add a little olive oil. This step helps in browning the chicken nicely. Place the chicken in the skillet and cook for about 6-7 minutes on one side. You want it to be golden brown. After browning, flip the chicken over. Now is the time to add the cherry tomatoes and spinach to the pan. Pour the reserved marinade over everything. This helps the veggies soak up flavor. Cover the skillet and let it simmer for 8-10 minutes. Cook until the chicken reaches 165°F (75°C). This ensures it is done and safe to eat. For the full recipe, you can check the complete instructions provided in the article. To get the best balsamic flavor, marinate the chicken for at least 30 minutes. If you have time, go for 2 hours. This lets the chicken soak in the rich flavors. You want a nice balance of sweet and tangy. The honey adds sweetness, while balsamic vinegar gives acidity. Taste your marinade before adding it to the chicken. Adjust honey or vinegar to suit your taste. Check the chicken’s doneness by using a meat thermometer. It should reach 165°F (75°C) in the thickest part. This means it is safe to eat. To keep the chicken juicy, don’t overcook it. Let it rest for a few minutes after cooking. This helps retain moisture. Prepare your ingredients in advance. Chop garlic and halve cherry tomatoes before you start cooking. This makes the cooking process quicker. If you use frozen chicken, thaw it safely in the fridge overnight. This keeps the chicken safe and ready to cook. You can also use a microwave to defrost it quickly. Just be sure to cook it right after thawing. For the Full Recipe, check the earlier section. {{image_2}} You can swap chicken for turkey or tofu in this recipe. Turkey works great as it cooks similarly to chicken. Just remember, turkey may take a bit longer to cook. For tofu, use firm or extra-firm. Cut it into cubes and marinate like the chicken. Cook it until golden brown, about 5-6 minutes per side. This way, you can enjoy the same flavors with different proteins. While cherry tomatoes and spinach are tasty, feel free to add other veggies. Zucchini, bell peppers, or green beans pair well with balsamic chicken. You can also adjust your veggies based on the season. In summer, try fresh corn or asparagus. In winter, root vegetables like carrots or sweet potatoes add warmth and flavor. Want to change the flavor? You can easily switch up the sauces and seasonings. Try adding soy sauce or mustard for a different twist. Fresh herbs like rosemary or thyme can enhance the dish. Experiment with spices like paprika or red pepper flakes for a kick. These small changes can make a big difference in taste. For the full recipe, check out the Easy One-Pan Balsamic Chicken. To store your Easy One-Pan Balsamic Chicken, let it cool first. Place the chicken in an airtight container. This keeps it fresh. You can refrigerate it for up to three days. If it smells off or looks strange, throw it away. Always check before eating! You can also freeze this dish. Start by letting it cool completely. Place the chicken in a freezer-safe bag. Remove as much air as possible before sealing. You can freeze it for up to three months. To thaw, leave it in the fridge overnight. Reheat in a skillet or microwave until hot. If you want to make this dish ahead of time, marinate the chicken the night before. This gives it more flavor. You can cook it and store leftovers for later. Use glass or plastic containers that seal well. This way, your chicken stays tasty and ready to eat! Yes, you can use bone-in chicken. Just know that it will take longer to cook. Bone-in pieces usually need about 10 to 15 more minutes. You want the internal temperature to reach 165°F (75°C). Check with a meat thermometer to be sure. Many sides go well with this dish. Here are a few ideas: - Steamed rice - Quinoa - Roasted vegetables - Garlic bread - A fresh green salad These sides will add balance to your meal and enhance the flavors. Look for a few signs to check doneness. The chicken should be golden brown on the outside. The juices should run clear when you cut into it. If you have a thermometer, check that it reads 165°F (75°C). Always cut the thickest part to check. These tips will help ensure your chicken is fully cooked and safe to eat. This blog post covers a delicious one-pan balsamic chicken dish. You learned about the key ingredients, how to prepare and cook the meal, and which tools to use. I shared tips for perfecting flavors, ensuring juicy chicken, and even time-saving techniques. You can swap out proteins or veggies based on your taste. Storing leftovers and meal prep ideas keep you organized. Cooking should be fun and tasty. With this guide, you can create a satisfying meal that is both easy and flavorful. Enjoy your cooking journey!
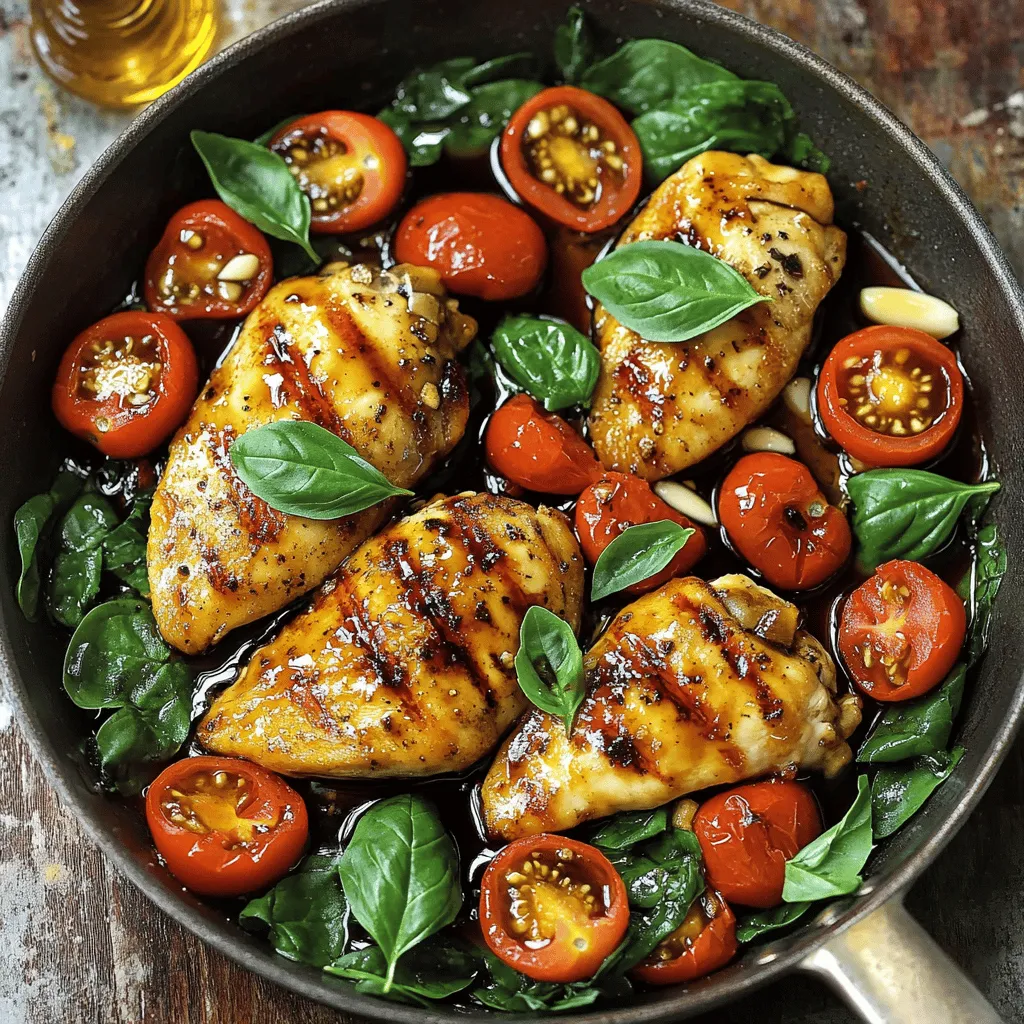
Easy One-Pan Balsamic Chicken Quick and Flavorful Meal
If you want a quick, tasty meal that’s simple to prepare, this Easy One-Pan Balsamic Chicken is for you. You’ll gather fresh ingredients like juicy
- 4 salmon fillets (about 6 ounces each) - 2 cups broccoli florets - 1 cup cherry tomatoes, halved - 1 bell pepper (red or yellow), sliced - 1 medium zucchini, sliced - 3 tablespoons olive oil - 2 teaspoons garlic powder - 1 teaspoon smoked paprika - 1 teaspoon dried oregano - Salt and pepper to taste In this recipe, I focus on fresh and healthy ingredients. Salmon is not just tasty; it is rich in omega-3 fatty acids. These are good for your heart. I use bright vegetables like broccoli and bell peppers. They add color and nutrients to the dish. - Fresh parsley - Lemon wedges After baking, I love to add fresh parsley. It makes the dish look nice and bright. Lemon wedges add a punch of flavor. Just squeeze some juice over the salmon and veggies. It really brings the meal to life! You can find the full recipe at the top. 1. Preheat the oven Begin by preheating your oven to 425°F (220°C). This high heat helps cook the salmon and vegetables quickly. 2. Prepare the vegetables In a large bowl, toss together 2 cups of broccoli florets, 1 cup of halved cherry tomatoes, 1 sliced bell pepper, and 1 sliced medium zucchini. Drizzle 2 tablespoons of olive oil over the mix. Add 2 teaspoons of garlic powder, 1 teaspoon of smoked paprika, 1 teaspoon of dried oregano, and season with salt and pepper. Mix well to coat the veggies. 3. Season the salmon Pat 4 salmon fillets dry with a paper towel. Place them on the sheet pan next to the veggies. Drizzle 1 tablespoon of olive oil over the salmon. Season it lightly with salt and pepper. 1. Arrange ingredients on the sheet pan Spread the seasoned vegetables on one side of the sheet pan, leaving space for the salmon on the other side. This layout helps everything cook evenly. 2. Baking time and temperature Place the sheet pan in the preheated oven. Bake for 15-20 minutes. The salmon should look opaque and flake easily when done. The veggies will be tender and slightly caramelized. 3. Checking for doneness To check if the salmon is done, use a fork to see if it flakes. If it does, it's ready to eat. If not, give it a few more minutes. Keep an eye on the veggies; they should look golden. Enjoy this simple yet tasty meal from the Full Recipe! To choose fresh salmon, look for bright, shiny skin. The flesh should have a nice pink color. Avoid fish that smells strong or has brown spots. Fresh salmon should smell like the ocean, not fishy. Seasoning is key for great flavor. Use salt and pepper to enhance the taste. Smoked paprika adds a nice, smoky touch. Garlic powder gives a warm, rich flavor. Always season both the salmon and the vegetables for a balanced taste. Set your oven to 425°F (220°C). This high heat cooks the salmon quickly and gives veggies a nice char. A hot oven helps create a crispy outside while keeping the inside tender. For veggies, cut them into equal sizes. This way, they cook evenly. Broccoli and bell peppers will crisp up nicely. Zucchini cooks fast, so cut it thicker to avoid mushy pieces. Toss them well in oil and spices to coat evenly for the best texture. For the full recipe, check the detailed instructions provided earlier. {{image_2}} You can switch out vegetables based on what you like or what is fresh. Seasonal veggies add great taste. Try asparagus in spring or Brussels sprouts in fall. You can also use root veggies like carrots and sweet potatoes. Mix in colorful additions for a fun look. Use purple cabbage or orange carrots. The more colors, the better your meal looks! Adding different herbs and spices changes the dish's flavor. Try dill for a fresh taste. Use thyme for earthiness. A squeeze of fresh lemon juice lifts the flavor. Marinades also make the salmon special. Combine soy sauce, honey, and garlic for a sweet and savory mix. Let the salmon soak in this blend for an hour before cooking. You can find more in the Full Recipe. After enjoying your salmon and veggies, store leftovers right. Place them in an airtight container. Make sure to refrigerate them within two hours. This keeps your food safe. Leftovers last up to three days in the fridge. If you want to keep them longer, try freezing. Wrap each portion tightly in plastic wrap and then in foil. This helps avoid freezer burn. You can freeze leftovers for up to three months. For reheating, the oven works best. Preheat it to 350°F (175°C). Place the salmon and veggies on a baking sheet. Cover them with foil to keep moisture. Heat for about 10-15 minutes. This step ensures the meal tastes fresh. You can also use the microwave. Place food on a microwave-safe plate. Heat in short bursts of 30 seconds. Check often to avoid overcooking. Always aim to keep the salmon moist and tender. Don’t forget to enjoy with fresh lemon juice for added flavor. For the full recipe, check out the detailed instructions above. How long to cook salmon on a sheet pan? I cook salmon on a sheet pan for 15 to 20 minutes. The time depends on the thickness of the fillets. When done, the salmon should flake easily with a fork. Can I use frozen salmon for this recipe? Yes, you can use frozen salmon. Just ensure to thaw it first. Thawing helps the salmon cook evenly. Is sheet pan salmon healthy? Sheet pan salmon is a healthy choice. It is rich in omega-3 fatty acids, which are good for your heart. The vegetables add fiber and vitamins, making it a balanced meal. What are the health benefits of salmon? Salmon offers many health benefits. It supports brain health, boosts immunity, and improves skin health. Eating salmon regularly can also help lower the risk of chronic diseases. For a full recipe, check out the Sheet Pan Salmon Delight with Veggies. This article covered how to make a tasty sheet pan salmon dish. You learned about key ingredients like salmon, fresh veggies, and good seasonings. Following the steps helps you cook perfectly every time. I shared tips to choose fresh salmon and make your veggies pop. Remember, you can add your favorite flavors or store leftovers easily. Cooking salmon this way is simple and fun. With practice, you’ll impress your family and friends with your skills. Enjoy every bite!
Sheet Pan Salmon and Vegetables Quick and Simple Meal
Are you looking for a quick and easy meal that tastes amazing? Sheet Pan Salmon and Vegetables is just what you need! In this simple
- 1 pound fresh green beans, trimmed - 2 large Yukon Gold potatoes, diced into 1-inch cubes - 1 medium onion, chopped - 2 cloves garlic, minced - 3 cups vegetable broth - 2 tablespoons olive oil - 1 teaspoon smoked paprika - ½ teaspoon crushed red pepper flakes (optional) - Salt and pepper to taste - Fresh parsley for garnish You can swap green beans with other veggies like snap peas or asparagus. This keeps the dish fresh and colorful. For potatoes, try red or russet varieties for different textures. If you want a vegan option, use mushroom broth instead of vegetable broth. This adds deep flavor without any animal products. To start, you need to prepare your green beans and potatoes. First, wash the green beans well and trim the ends. You want them fresh and crisp for the best taste. For the potatoes, peel them if you like. Then, cut them into 1-inch cubes. This size helps them cook evenly. When it comes to chopping onions and garlic, here are a few tips: Use a sharp knife for clean cuts. For the onion, cut it in half, peel it, and slice it thinly. Always keep your fingers tucked in to avoid cuts. Mince the garlic cloves by pressing down with the knife, then chopping finely. This way, you get good flavor without big pieces. Now for the cooking. Heat the olive oil in a big pot over medium heat. Add the chopped onion first. Sauté until it turns soft and clear, about 5 minutes. This step builds a strong base for your dish. Next, stir in the minced garlic. Cook it for 1-2 minutes until it smells great. Then, add the diced potatoes and pour in the vegetable broth. Bring everything to a simmer. Let it cook for about 10 minutes. This helps the potatoes start to get soft. After 10 minutes, it's time for the green beans. Add them to the pot along with the smoked paprika and red pepper flakes if you want a kick. Season with salt and pepper. Cover the pot and let it simmer for another 15-20 minutes. Check the potatoes for tenderness. They should be soft, and the green beans should look bright green. When it's done, take it off the heat. Taste it and adjust the seasoning if needed. If you want more flavor, add a bit more salt or pepper. Enjoy your Southern-Style Green Beans and Potatoes hot, garnished with fresh parsley for a nice touch. For a complete guide, check the Full Recipe. To sauté onions and garlic well, start with medium heat. This helps them cook evenly. Add olive oil to the pot first. Once the oil is hot, toss in the chopped onions. Stir them often until they turn soft and clear. This usually takes about five minutes. Next, add minced garlic. Cook for one to two minutes. Be careful not to burn the garlic, as it can taste bitter. To prevent overcooking green beans, use fresh ones. Trim the ends and rinse well. Add them to the pot after the potatoes have simmered for ten minutes. This way, they cook for just enough time. You want them bright green and tender but not mushy. Cover the pot while they cook. This helps keep the heat in. To boost flavor, consider adding herbs like thyme or rosemary. A pinch of fresh herbs can brighten the dish. If you like heat, try adding crushed red pepper flakes. These spices add depth and warmth. Seasoning during cooking is vital. Add salt and pepper at each step. This allows the flavors to blend well. Taste your dish as you go. Adjust the seasoning if needed. Always finish with fresh parsley on top for a pop of color and flavor. For the full recipe, refer to the main section above. {{image_2}} Southern cooking has many styles. Each region adds its own twist to green beans and potatoes. In some areas, cooks use ham or bacon. This adds a rich, smoky flavor. You can sauté diced ham or crisp bacon before adding the onions. It gives the dish depth and heartiness. Another popular touch is using fatback or salt pork. These meats add saltiness and flavor. Just remember to adjust your salt when using these meats. You can easily adapt this dish to fit different diets. For those needing gluten-free options, this recipe is perfect. It uses fresh vegetables and broth, which are naturally gluten-free. Always check the broth label to ensure it meets your needs. If you want vegan variations, swap the broth for water or a plant-based broth. You can also add more herbs to boost flavor. Fresh herbs like thyme or dill work well. They add brightness without meat. These variations let everyone enjoy Southern-style green beans and potatoes. You can make it your own while keeping the spirit of this classic dish. For the full recipe, check out the details above. To keep your Southern-Style Green Beans and Potatoes fresh, store them in the fridge. Use a tight container to keep air out. Glass or plastic containers with lids work well. If you do not have a lid, use plastic wrap. Store the leftovers within two hours of cooking for food safety. When reheating, use the stove for the best results. Heat in a pan over low heat, stirring often. This keeps the green beans crisp. You can also use the microwave. Heat in short bursts, stirring in between. Leftovers will stay fresh in the fridge for up to three days. For best taste, enjoy them sooner rather than later. For the full recipe, check [Full Recipe]. How long do green beans need to cook? Green beans need about 15 to 20 minutes to cook. They should be bright green and tender. Can I freeze Southern-Style Green Beans and Potatoes? Yes, you can freeze this dish. Allow it to cool, then pack it in airtight containers. It lasts for up to three months. What are the nutritional benefits of this dish? This dish is rich in vitamins A and C. It provides fiber from the beans and potatoes. It’s also low in calories, making it a great side dish. How do I make this recipe spicier? To add heat, include more crushed red pepper flakes. You can also add hot sauce during cooking. What can I serve with green beans and potatoes? These beans and potatoes pair well with fried chicken or grilled meats. You can also serve them with cornbread for a complete meal. How do I know when the potatoes are cooked through? You can check by piercing a potato cube with a fork. If it goes through easily, the potatoes are done. In this blog post, we explored a simple and delicious recipe for Southern-style green beans and potatoes. I shared key ingredients, tips for preparation, and cooking methods to enhance flavor. We covered variations and dietary options to suit your needs. Remember, this dish is versatile and forgiving. With a few adjustments, you can customize it to your taste. Enjoy making this comforting meal for yourself or loved ones!
Southern-Style Green Beans and Potatoes Savory Dish
Welcome to a taste of the South! Today, I’ll show you how to make Southern-Style Green Beans and Potatoes, a savory dish that warms the
- 4 boneless, skinless chicken breasts - 1 cup cherry tomatoes - 1 ball fresh mozzarella - 1 cup fresh basil leaves - 2 tablespoons olive oil - Salt and pepper to taste - 1 teaspoon garlic powder - ½ cup balsamic glaze - 1 tablespoon balsamic vinegar (for added depth) When I make Caprese Chicken, I start with fresh, high-quality ingredients. The chicken should be plump and juicy. I always choose ripe cherry tomatoes, as they bring a sweet burst of flavor. The fresh mozzarella adds creaminess that melts beautifully. Basil leaves provide a fragrant touch that ties everything together. In my pantry, I keep olive oil, salt, and pepper ready for seasoning. Garlic powder is a must for that extra flavor kick. It’s simple but makes a big difference. For those who want to elevate the dish, I recommend balsamic glaze. It adds a tangy sweetness that complements the chicken. A splash of balsamic vinegar can deepen the flavor, too. Gather these ingredients before you start cooking. Having everything ready makes the process smooth and enjoyable. You can find the full recipe [here](#). - Preheat your oven to 400°F (200°C). - Pat the chicken breasts dry with paper towels. Season both sides with salt, pepper, and garlic powder. This step helps enhance the chicken's natural flavor. - In a large oven-proof skillet, heat the olive oil over medium-high heat. You want the oil hot but not smoking. - Once hot, add the chicken breasts. Sear for about 5 minutes on each side until they turn golden brown. This creates a nice crust. - Remove the skillet from heat. Layer the halved cherry tomatoes and slices of mozzarella on top of the chicken. The cheese will melt and mix with the tomatoes, creating a delicious topping. - Drizzle balsamic glaze over the chicken and tomatoes, ensuring an even coat. This glaze adds a sweet and tangy flavor. - Transfer the skillet to your preheated oven. Bake for 20-25 minutes until the chicken is cooked through. The internal temperature should reach 165°F (75°C). - In the last 5 minutes of baking, add fresh basil leaves on top to wilt slightly. This adds fresh flavor and a pop of green. - Once done, remove from the oven and drizzle a little balsamic vinegar over the dish if you want extra depth. - Serve the Caprese Chicken hot, drizzled with any leftover balsamic glaze from the pan. This dish pairs well with greens or pasta. For a complete guide to making this dish, check the Full Recipe. To keep your chicken juicy, use a meat thermometer. Cook the chicken until it reaches 165°F (75°C). This will prevent it from drying out. Searing the chicken first adds flavor and a nice crust. Bake the chicken at 400°F (200°C) for even cooking. This temperature works well to ensure all ingredients meld perfectly. For serving, place the chicken on a bed of arugula or mixed greens. This adds color and makes the dish look fancy. You can also sprinkle extra basil leaves on top for garnish. A drizzle of balsamic glaze on the plate adds flair and draws the eye. Adding fresh herbs like thyme or oregano can boost the taste. You might also try a pinch of red pepper flakes for some heat. Using different cheeses, like goat cheese or feta, gives a unique twist to the dish. Each cheese can bring out different flavors, making it exciting every time you cook. {{image_2}} You can easily swap ingredients in Caprese chicken. If you want a lighter meal, try turkey instead of chicken. Turkey breast works well and stays juicy. For a plant-based option, use tofu. Press it to remove excess water. Then, season and cook it just like chicken. You can also change the vegetables. Instead of cherry tomatoes, use bell peppers or zucchini. Both add great flavor. You can even mix in spinach for a pop of color and nutrition. If you like heat, try making spicy Caprese chicken. Add red pepper flakes to the seasoning mix. You can also use jalapeños for a fresh kick. This adds a fun twist to the classic dish. Another option is to play with herbs. Instead of just basil, add oregano or thyme. These Italian herbs can enhance the flavor. You might even try a pesto drizzle for a rich taste. For those who need gluten-free meals, this dish fits the bill. All the ingredients are naturally gluten-free. Just ensure any sauces are also gluten-free. If you want a low-carb version, skip the balsamic glaze. Instead, use a simple lemon juice drizzle. This keeps the dish light while still being tasty. You can also serve it with a side salad instead of bread or pasta. For the full recipe, check out the Caprese Chicken Delight. To keep your Caprese chicken fresh, store it in an airtight container. This helps retain moisture and flavor. You can refrigerate it for up to three days. If you plan to eat it later, make sure it cools down before sealing. When reheating, aim for a gentle method. The microwave works, but it may dry out the chicken. Instead, use a skillet on low heat. Add a splash of water or broth to keep it moist. Cover the skillet to trap steam and heat evenly. You can freeze Caprese chicken for later. Wrap each piece tightly in plastic wrap, then place it in a freezer bag. This method prevents freezer burn. It can last up to three months in the freezer. To thaw, move it to the fridge overnight. For reheating, use the oven at 350°F (175°C) until warm. This keeps the chicken juicy and flavorful. Yes, you can prepare Caprese Chicken ahead of time. Here are some tips for meal prep: - Marinate the chicken: You can season and marinate the chicken up to 24 hours in advance. - Layer the ingredients: Assemble the dish without cooking it. Cover it and store in the fridge for up to 1 day. - Cook when ready: Bake the chicken just before serving for the best taste. This way, you save time and still enjoy a fresh meal. To check chicken for doneness, use a meat thermometer. The recommended internal temperature is 165°F (75°C). Insert the thermometer into the thickest part of the chicken. This ensures it is safe to eat and not dry. Yes, you can use store-bought balsamic glaze. However, here’s a comparison: - Homemade glaze: You control the flavor and sweetness. It can taste fresher. - Store-bought glaze: It is convenient and saves time. Look for high-quality brands. Both options work well, but homemade often shines in taste. Check out the Full Recipe for tips on making your own! This dish combines fresh chicken, tomatoes, and mozzarella. You season and bake it for great flavor. Remember to keep the chicken juicy and add your favorite herbs. Feel free to swap ingredients for your taste. You can even prepare it in advance or store leftovers with care. Enjoy this simple and delicious meal!
Best Caprese Chicken with Balsamic Glaze Recipe Delight
Looking to impress at dinner tonight? My Best Caprese Chicken with Balsamic Glaze recipe does just that! This dish combines juicy chicken, fresh mozzarella, and
To make this tasty Caprese Chicken, gather these fresh ingredients: - 4 boneless, skinless chicken breasts - Salt and pepper to taste - 1 teaspoon garlic powder - 1 tablespoon olive oil - 2 cups cherry tomatoes, halved - 1 cup fresh mozzarella balls, drained - 1 cup fresh basil leaves, chopped - 2 tablespoons balsamic glaze - Fresh basil leaves for garnish Choosing fresh ingredients is key for great taste. Here are some tips: - Chicken: Look for pink, moist chicken. Avoid any that looks dull or has dark spots. - Tomatoes: Pick cherry tomatoes that feel firm and bright. A shiny skin means they are ripe. - Mozzarella: Choose mozzarella balls that are soft and packed in water. This keeps them fresh. - Basil: Look for vibrant green leaves. Avoid any that are yellow or wilted. You can mix up this recipe with some fun extras: - Spinach: Add fresh spinach for more nutrition and color. - Pesto: Swap out the basil for pesto to give a new flavor twist. - Olives: Toss in some sliced olives for a salty kick. - Zucchini: Add sliced zucchini for a healthy crunch. For the full recipe, check out the [Full Recipe]. Start by seasoning the chicken breasts. Use salt, pepper, and garlic powder. Make sure to coat both sides well. This step adds flavor and makes the chicken tasty. Heat olive oil in a large skillet over medium-high heat. Once the oil is hot, add the seasoned chicken. Cook each side for about 4 to 5 minutes. Look for a nice golden brown color. When done, take the chicken out and set it aside. Now, in the same skillet, add the halved cherry tomatoes. Cook them for 2 to 3 minutes. They will soften and release their juices. This also helps to lift the flavor left in the pan. Next, return the chicken to the skillet. Place it among the tomatoes. Top each piece with fresh mozzarella balls and chopped basil. Cover the skillet with a lid. Let it cook for another 2 to 3 minutes until the cheese melts. Finally, drizzle balsamic glaze over the chicken and tomatoes. This adds a burst of flavor. For the final touch, garnish with fresh basil leaves. Enjoy your meal! For the full recipe, check above. To make your chicken juicy, brine it first. Mix water with salt and soak the chicken for 30 minutes. This adds moisture. Next, make sure to sear the chicken on medium-high heat. This gives it a nice brown crust. Do not overcook the chicken. It should reach an internal temperature of 165°F. Remove it from the heat as soon as it’s done. Use simple seasonings for great flavor. Start with salt and pepper. Add garlic powder for a kick. You can also use Italian herbs like oregano or thyme. Mix these in a bowl before seasoning the chicken. This helps to evenly coat the chicken. If you like a bit of heat, add some red pepper flakes. Serve your Caprese chicken with a side of rice or pasta. This will soak up the tasty juices. A simple salad of mixed greens also works well. Drizzle some olive oil and vinegar over the salad for extra flavor. You can also serve with crusty bread to enjoy every last bite. Don't forget to drizzle extra balsamic glaze on top before serving. For the full recipe, check out the link provided! {{image_2}} You can switch up the flavors in your Caprese chicken. Try adding some spices like paprika or Italian seasoning. You can also use different types of cheese. Feta or goat cheese will add a nice twist. For a zesty touch, add lemon juice or zest. You can even mix in some sliced olives for a briny flavor. These small changes can make your dish stand out. If you want a low-carb version, skip the balsamic glaze. Instead, use a sprinkle of lemon juice for flavor. You can also serve it with sautéed spinach or zucchini noodles. This keeps the dish light and healthy. The chicken will still be juicy, and you'll enjoy the fresh taste of the tomatoes and cheese. For a vegetarian option, replace the chicken with firm tofu or portobello mushrooms. Season them the same way you would the chicken. Sear them in the skillet until golden brown. Follow the same steps for adding tomatoes and cheese. This way, you still get that Caprese flavor without meat. It’s a great way to enjoy this dish while keeping it veggie-friendly. For the full recipe, check out the 30-Minute One Pan Caprese Chicken. To store your leftover Caprese chicken, let it cool first. Place the chicken in an airtight container. Add any tomatoes and cheese you have left. You can keep it in the fridge for up to three days. Make sure to label the container with the date. This helps you remember when you made it. When you're ready to eat, you can reheat your chicken. The best way is to use a skillet. Heat it over medium-low heat. Add a splash of water to keep it moist. Cover the skillet with a lid for even heating. You can also use a microwave. Just cover it with a microwave-safe lid. Heat in short bursts, checking often. If you want to save the Caprese chicken for later, freezing is a great option. Make sure it cools completely before freezing. Wrap each piece in plastic wrap, then place them in a freezer bag. Squeeze out as much air as you can. You can freeze it for up to three months. When you're ready to eat, thaw it in the fridge overnight before reheating. For the full recipe, check out the earlier section. You can keep leftovers in the fridge for up to three days. Store them in an airtight container. This helps keep the chicken moist. If you want to save it longer, consider freezing the dish. Just remember to thaw it overnight in the fridge before reheating. Yes! You can use other cheeses if you like. Try feta, goat cheese, or even provolone. Each will give your dish a unique taste. Just make sure the cheese melts well. This way, you still get that creamy texture we love. Caprese Chicken pairs well with many sides. Try serving it with garlic bread or a fresh salad. You can also serve it over pasta or rice. These options soak up the extra sauce nicely. For a light side, roasted vegetables work great too. For the full recipe, check out the detailed steps and ingredients provided earlier. Enjoy your cooking! In this post, we explored key ingredients for Caprese Chicken, how to prepare and cook it, plus helpful tips. Fresh ingredients boost flavor, and the right cooking steps make it easy. Remember, variations let you customize the dish to fit your taste. Store leftovers properly to enjoy them later. I hope you feel ready to make a great Caprese Chicken meal! Enjoy trying new flavors and sharing this delicious dish with others. Happy cooking!
30-Minute One Pan Caprese Chicken Quick and Easy Meal
Looking for a quick and tasty dinner? Try my 30-Minute One Pan Caprese Chicken! It’s simple, fresh, and made in one pan, which means less