Dinner

To make these tasty Pineapple Baked Beans, gather these simple ingredients: - 2 cups cooked navy beans (or canned, rinsed and drained) - 1 cup fresh pineapple chunks (or canned pineapple, drained) - 1 medium onion, diced - 1 green bell pepper, diced - 2 cloves garlic, minced - 1/4 cup brown sugar - 1/4 cup ketchup - 2 tablespoons soy sauce - 1 teaspoon mustard (yellow or Dijon) - 1 teaspoon smoked paprika - 1/2 teaspoon black pepper - 1 tablespoon olive oil - Salt to taste When choosing fresh pineapple, look for these key signs: - The skin should be slightly soft but not mushy. - The color should be golden-yellow. - It should have a sweet smell at the base. - The leaves should be green and fresh, not brown. A ripe pineapple adds great flavor to your baked beans. If fresh pineapples are not available, canned pineapple works well too. Just drain it well before adding. If you have specific dietary needs, here are some swaps: - Use other beans like black beans or pinto beans for variety. - For a gluten-free option, swap soy sauce for tamari. - You can replace brown sugar with maple syrup or coconut sugar for a healthier choice. These alternatives keep the dish tasty while meeting your needs. Don't forget to check the Full Recipe for more details! To start, preheat your oven to 350°F (175°C). This step gets your oven ready for baking the beans. Next, grab a large skillet and add 1 tablespoon of olive oil. Heat it over medium heat. Once hot, add 1 medium onion, diced, and 1 green bell pepper, diced. Sauté them for about 5-7 minutes. You want them soft and translucent. Then, stir in 2 cloves of minced garlic and cook for one more minute. This brings out a great smell. Now it’s time to combine everything. In a large mixing bowl, put in 2 cups of cooked navy beans. You can also use canned beans if you like. Add the sautéed onion and bell pepper mix. Next, toss in 1 cup of fresh pineapple chunks. If you use canned pineapple, just drain it first. Add 1/4 cup of brown sugar, 1/4 cup of ketchup, 2 tablespoons of soy sauce, and 1 teaspoon each of mustard and smoked paprika. Finally, sprinkle in 1/2 teaspoon of black pepper and salt to taste. Mix everything well until it’s all combined. Transfer the mixture into a greased 9x13-inch baking dish. Spread it evenly across the dish. Cover it with aluminum foil and place it in the preheated oven. Bake for 30 minutes. After that, remove the foil and bake for another 15-20 minutes. This helps the tops caramelize a little. When done, take it out of the oven and let it cool for a few minutes. Now, you can enjoy your homemade pineapple baked beans! For the full recipe, you can refer to the earlier section. To make your pineapple baked beans shine, add a splash of lime juice. The lime adds a bright, zesty note. You can also toss in some chopped jalapeños for heat. If you like a smoky flavor, add more smoked paprika. Lastly, a sprinkle of fresh cilantro on top makes it look great and adds freshness. One common mistake is not sautéing the onion and bell pepper enough. They should be soft and sweet before mixing in. Another mistake is using too much salt. Be careful to taste as you go. If you add salt early, it can overpower the dish. Lastly, don’t skip the foil step when baking. It helps keep the moisture in and flavors balanced. Serve your baked beans warm in colorful bowls. Top them with fresh pineapple pieces or chopped herbs. They pair well with grilled meats or as a side for a picnic. Try serving with cornbread for a comforting meal. You can also enjoy them as a filling for tacos or wraps. For the full recipe, check out the Tropical Paradise Baked Beans. {{image_2}} You can make this dish vegetarian or vegan easily. Simply skip the honey or any animal-based products. Use maple syrup or agave instead of brown sugar for sweetness. This keeps the flavor while making it plant-based. While navy beans are great, you can try other beans too. Black beans or pinto beans work well. Each type adds its own twist to the dish. Experiment and find your favorite. Want to make it even more tropical? Add diced mango or shredded coconut. These fruits will enhance the sweetness and flavor. You can also mix in some chopped nuts for a crunchy texture. Enjoy the fun of making this dish your own! To keep your pineapple baked beans fresh, store them in an airtight container. Use glass or plastic containers that close tightly. Let the beans cool down before sealing them. This helps to prevent moisture buildup. You can also line your container with parchment paper for extra protection. Proper storage helps maintain flavor and texture. Freezing is a great way to save leftover baked beans. First, let the beans cool completely. Then, scoop them into freezer-safe bags. Remove as much air as possible before sealing. You can also use containers, but leave some space at the top for expansion. Label your bags or containers with the date. They will stay good for up to three months in the freezer. When you're ready to enjoy your baked beans again, you have a few options. For the oven, preheat it to 350°F (175°C). Place the beans in an oven-safe dish and cover with foil. Heat for about 20-25 minutes or until warm. For quicker results, use the microwave. Place a portion in a microwave-safe bowl. Heat for about 2-3 minutes, stirring halfway through. Always check the temperature before serving to ensure it's hot. Yes, you can use canned beans. They save time and taste great. Just rinse and drain them first. This helps remove extra salt and keeps your dish fresh. I often choose canned navy beans for their creamy texture. They blend well with the pineapple and other flavors. Pineapple baked beans pair well with many dishes. Try serving them with grilled chicken or pork. The sweet and tangy flavors complement the meat nicely. You can also serve them with cornbread for a hearty meal. A fresh salad adds a nice crunch and balances the sweetness. Pineapple baked beans last about 3 to 5 days in the fridge. Store them in an airtight container for best results. Make sure they cool before you put them away. You can also freeze them for up to three months. Just thaw and reheat when you want to enjoy them again. For the full recipe, check out Tropical Paradise Baked Beans. You learned how to make delicious pineapple baked beans from fresh ingredients. We talked about picking the best pineapple and noted ideas for dietary needs. I shared easy steps to prepare, combine, and bake your dish. To make it even better, we discussed flavor tips and common mistakes. Don't forget the fun variations to try. Lastly, I covered how to store and reheat leftovers. Pineapple baked beans can brighten any meal. Enjoy making this tasty dish!
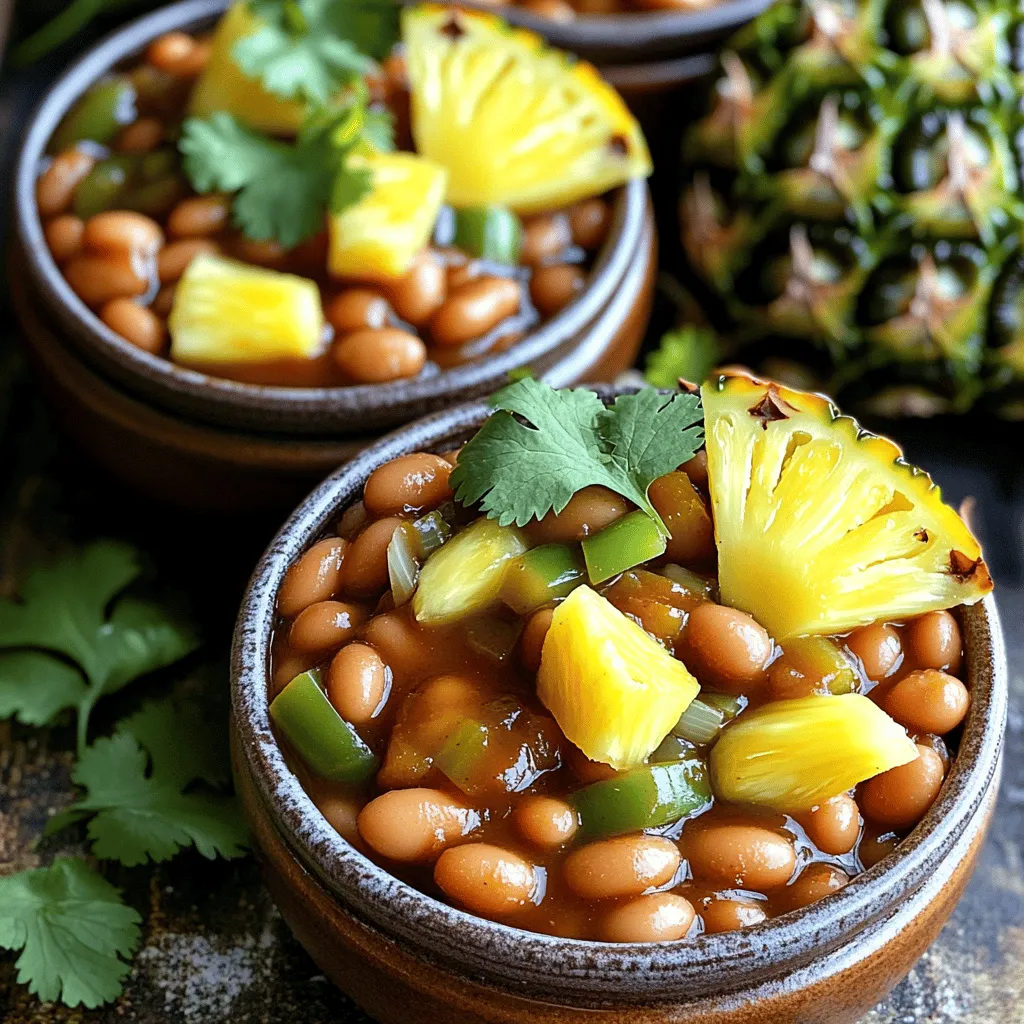
Homemade Pineapple Baked Beans Tasty and Easy Recipe
Looking for a fun twist on a classic dish? Try my Homemade Pineapple Baked Beans! This tasty recipe combines the sweet flavor of pineapple with
- 2 boneless, skinless chicken breasts - 1 cup breadcrumbs - 1/2 cup grated Parmesan cheese - 1 teaspoon Italian seasoning - 1/2 teaspoon garlic powder - Salt and pepper to taste - 1 cup fresh mozzarella balls (bocconcini), halved - 1 cup cherry tomatoes, halved - 1/4 cup fresh basil leaves, chopped - 2 tablespoons balsamic glaze - 2 tablespoons olive oil Crispy Chicken Caprese is a simple dish that bursts with flavor. You will love how fresh and vibrant it tastes. The chicken is juicy, and the toppings add a nice pop. You start with chicken breasts. They need to be boneless and skinless for easy cooking. The breadcrumbs give the chicken a crispy outer layer. Mixing in Parmesan cheese adds a rich flavor. Then, the additional spices come into play. Italian seasoning and garlic powder bring out the taste of the chicken. A pinch of salt and pepper helps balance everything. Next, we have the fresh ingredients. Fresh mozzarella balls make everything creamy. Cherry tomatoes provide sweetness and color. The basil brings a lovely herbal note. Finally, balsamic glaze adds a tangy finish that ties it all together. For the full recipe, make sure to check out the detailed instructions. This dish is quick to prepare and perfect for any meal. - Preheat your oven to 425°F (220°C). - Line a baking sheet with parchment paper. This step helps with easy cleanup. - In a shallow dish, combine the breadcrumbs, grated Parmesan cheese, Italian seasoning, garlic powder, salt, and pepper. Mix well to ensure even flavor. - Pat the chicken breasts dry with paper towels. This helps the coating stick better. - Season both sides of the chicken with salt and pepper. A little seasoning goes a long way. - Dredge each chicken breast in the breadcrumb mixture. Press down firmly to coat evenly. This ensures a crispy crust. - Place the coated chicken breasts on the prepared baking sheet. Drizzle with olive oil for added flavor and moisture. - Bake in the preheated oven for 20-25 minutes. The chicken should be golden brown and reach an internal temperature of 165°F (74°C). - While the chicken is baking, combine the halved mozzarella balls, cherry tomatoes, and chopped basil in a bowl. Toss lightly to mix. This fresh topping brightens the dish. - Once the chicken is done, remove it from the oven. Let it rest for a few minutes to keep it juicy. - Top each crispy chicken breast with the tomato and mozzarella mixture. Drizzle with balsamic glaze for a sweet finish. - Serve immediately to enjoy this delightful combination of flavors. For the full experience, pair it with a fresh salad or pasta. To achieve a perfect crispy texture, you need to use dry chicken. Pat the chicken breasts with paper towels to remove any moisture. This step helps the breadcrumbs stick better. When coating the chicken, press down firmly on the breadcrumbs. This ensures they adhere well and form a crunchy crust. Let the cooked chicken rest for a few minutes before serving. Resting allows the juices to settle, keeping the chicken moist and flavorful. If you cut into it right away, those juices will run out and make the coating soggy. You can enhance the flavor of your crispy chicken with extra spices. Try adding paprika for a smoky kick or cayenne pepper for heat. Fresh herbs, like thyme or oregano, can also boost the taste. When seasoning, adjust based on your preference. If you love garlic, add more garlic powder. If you prefer less salt, reduce it. You control the taste, so make it your own! Using the right tools can make your cooking experience easier. A shallow dish is great for mixing breadcrumbs and cheese. A baking sheet lined with parchment paper helps with easy cleanup. A meat thermometer is essential for checking doneness. It ensures your chicken reaches 165°F (74°C) without overcooking. Having these tools ready will make your cooking smoother and more enjoyable. For the full recipe, check out the detailed instructions and tips. {{image_2}} You can switch up the cheese in this dish for a new taste. Try using provolone or goat cheese for a different flavor. Both options add a nice creaminess. If you want a sharper taste, consider using aged cheddar. Adding more veggies can make your meal healthier. Try including spinach or arugula in the tomato mix. Zucchini or bell peppers also work well. They add color and crunch to your plate. The air fryer is great for making crispy chicken. It cooks faster and uses less oil. You’ll still get that perfect crunch. For a more traditional method, bake the chicken in your oven. It gives a nice golden color and flavor. Grilling the chicken adds a tasty smoky flavor. The grill marks make it look stunning too! Just be sure to oil the grill to prevent sticking. Get creative with side dishes to serve with your chicken. A fresh salad or garlic bread pairs well. You can also serve it with pasta or rice for a hearty meal. If you want a quick lunch, turn this dish into a salad or wrap. Slice the chicken and mix it with greens, tomatoes, and mozzarella. Wrap it up in a tortilla for an easy meal on the go. For the full recipe, check out [Full Recipe]. To keep your Crispy Chicken Caprese fresh, store leftovers in the fridge. Place the chicken in an airtight container. This helps maintain its flavor and texture. Use the chicken within three days for the best taste. For longer storage, you can freeze the chicken. Wrap each piece tightly in plastic wrap, then place it in a freezer bag. This prevents freezer burn and keeps it tasty for up to three months. Reheating your chicken while keeping it crispy is key. The best way to do this is in the oven. Preheat your oven to 375°F (190°C). Place the chicken on a baking sheet for about 10-15 minutes. This method warms the chicken and restores some crispiness. You can also use an air fryer. Set it to 350°F (175°C) and cook for about 8 minutes. This method is fast and keeps the chicken delicious. Enjoy your flavorful meal without losing that crunchy texture! For the full recipe, check out my Crispy Chicken Caprese. Making Crispy Chicken Caprese takes about 40 minutes. - Prep Time: 15 minutes - Cook Time: 20-25 minutes Yes, you can prepare some parts in advance. - Chicken: You can bread the chicken and refrigerate it. - Salad: Mix the tomatoes, mozzarella, and basil a few hours before serving. This dish pairs well with various sides and drinks. - Side Dishes: Garlic bread, steamed veggies, or a fresh salad. - Drinks: A light white wine or sparkling water complements it nicely. You can easily add seasonal veggies for extra flavor. - Zucchini: Thinly slice and roast alongside the chicken. - Spinach: Toss fresh spinach in the salad for added greens. - Bell Peppers: Roast or sauté them and add to your tomato mix. Feel free to explore the Full Recipe for more details! Crispy Chicken Caprese combines simple ingredients for a delicious dish. You learned about the key ingredients, preparation steps, and tips to make it perfect. Feel free to experiment with flavors and cooking methods for your own twist. Remember, the right storing and reheating methods keep leftovers tasty. Enjoy making this meal for family and friends; it’s sure to impress! Embrace your kitchen creativity and have fun cooking.
Crispy Chicken Caprese Flavorful and Easy Meal
Looking for a meal that’s both crisp and delicious? You’ll love my Crispy Chicken Caprese! This dish combines juicy chicken, fresh mozzarella, and vibrant tomatoes
For this quick and tasty dish, gather these main ingredients: - 2 packs of instant ramen noodles (discard the seasoning packets) - 1 lb (450g) chicken breast, thinly sliced - 2 tablespoons sesame oil - 1 bell pepper (red or yellow), sliced - 1 cup broccoli florets - 1 carrot, julienned - 4 green onions, sliced - 3 cloves garlic, minced - 1 tablespoon ginger, minced - 3 tablespoons soy sauce - 1 tablespoon honey - 1 tablespoon rice vinegar - 2 teaspoons cornstarch, mixed with 2 tablespoons water (slurry) - Sesame seeds, for garnish These ingredients create a colorful and flavorful stir fry. The chicken adds protein, while the veggies bring crunch and vitamins. You can add or swap in ingredients based on your taste. Here are some ideas: - Snap peas for extra crunch - Mushrooms for earthy flavor - Bok choy for a unique twist - Chili flakes for some heat Feel free to mix and match! This dish is flexible and fun. If you don't have some ingredients, try these substitutions: - Use tofu instead of chicken for a vegetarian option. - Replace soy sauce with tamari for a gluten-free choice. - Honey can be swapped for maple syrup for a vegan option. - Use any oil you have, like canola or olive oil, in place of sesame oil. These alternatives keep the dish tasty while catering to dietary needs. {{ingredient_image_1}} To start, bring a pot of water to a boil. Add 2 packs of instant ramen noodles. Cook them for about 3-4 minutes. They should be tender but not mushy. Once cooked, drain the noodles. Set them aside for later. Next, heat 1 tablespoon of sesame oil in a large skillet or wok. Set the heat to medium-high. Add the thinly sliced chicken breast. Stir-fry the chicken for about 5-7 minutes until it is fully cooked and slightly golden. Make sure to stir often for even cooking. When done, remove the chicken from the skillet and set it aside. In the same skillet, add another tablespoon of sesame oil. Toss in the minced garlic and ginger. Sauté them for about 30 seconds until they smell amazing. Now, add the sliced bell pepper, broccoli florets, and julienned carrot. Stir-fry these vegetables for about 3-4 minutes. You want them to be tender but still crisp. Return the cooked chicken to the skillet. Mix it well with the vegetables. In a small bowl, combine soy sauce, honey, rice vinegar, and cornstarch slurry. Pour this sauce over the chicken and vegetables. Stir to coat everything evenly. Cook for another 1-2 minutes until the sauce thickens nicely. Now it's time to add the cooked ramen noodles. Gently fold them into the skillet, making sure they mix well with the chicken and veggies. For a beautiful finish, garnish with sliced green onions and sprinkle sesame seeds on top. Your chicken ramen stir fry is ready to enjoy! To make a great stir fry, keep your heat high. This helps to cook the food fast. Use a large skillet or wok for even cooking. Cut your chicken and veggies into small pieces. This helps them cook evenly. Remember, do not overcrowd the pan. If it’s too full, food will steam instead of fry. Cook chicken first until it is golden. Set it aside to keep it juicy. Then, stir-fry the veggies until they are tender-crisp. This keeps them colorful and tasty. You can tweak the flavors to match your taste. Add more soy sauce for saltiness. A splash of lime juice can bring a fresh taste. If you like spice, add chili flakes or sriracha. Honey adds a nice sweetness. Adjust the amount to your liking. For a richer flavor, try adding garlic and ginger earlier. This makes the whole dish fragrant. You can also use sesame seeds for a nice crunch. They add texture and a nutty flavor. Using the right tools makes cooking easier. A wok is perfect for stir-frying. It allows for quick cooking and even heat. If you do not have a wok, a large non-stick skillet works too. A good knife helps with slicing chicken and veggies. Keep your cutting board steady. Use a spatula to toss the food around. This keeps everything moving without burning. Invest in a good pair of chopsticks for serving. It makes the dish fun to eat! Pro Tips Use Fresh Ingredients: Opt for fresh vegetables and chicken for the best flavor and texture in your stir fry. Don’t Overcook the Noodles: Ramen noodles should be slightly undercooked in the first step since they will continue to cook when added to the stir fry. Customize Your Veggies: Feel free to substitute or add other vegetables like snap peas, mushrooms, or bok choy based on your preference. Adjust the Sauce: Taste the sauce before adding it to the stir fry; adjust the sweetness or saltiness according to your liking. {{image_2}} You can make a great vegetarian or vegan ramen stir fry. Just swap the chicken for tofu or tempeh. Both options soak up flavors well and add protein. For the sauce, use soy sauce or tamari as a base. This keeps it plant-based. Add in a splash of maple syrup instead of honey for sweetness. You can also use vegetable broth to enhance the flavor. Want to switch up the protein? Try shrimp, beef, or pork. Shrimp cooks quickly and adds a nice texture. Beef strips can bring a rich flavor, while pork offers a savory bite. Adjust cooking times to keep each protein tender. Always make sure to slice proteins thinly for even cooking. You can mix in many vegetables to boost nutrition. Snap peas, mushrooms, or baby corn work well. Each adds a unique crunch and flavor. If you want more heat, toss in some chili flakes or sriracha. For a fresh twist, add fresh herbs like cilantro or basil. These variations make the dish fun and exciting. Enjoy experimenting! After you enjoy your Chicken Ramen Stir Fry, store any leftovers in a tight container. It helps keep the food fresh. Make sure to cool it down before sealing. Leftovers stay good in the fridge for about three days. When it's time to eat your leftovers, reheat them gently. You can use a microwave or a skillet. If using a microwave, heat in short bursts. Stir between each burst to warm it evenly. If using a skillet, add a splash of water to prevent sticking. Heat on low until hot. You can freeze Chicken Ramen Stir Fry for longer storage. Use a freezer-safe container or bag. Make sure to remove as much air as possible. This helps prevent freezer burn. The dish can be frozen for about one month. To eat, thaw in the fridge overnight and then reheat. You can make chicken ramen stir fry healthier by adding more veggies. Try adding spinach, kale, or snap peas. Use less oil and low-sodium soy sauce. You can also swap chicken for tofu or shrimp for a lighter option. Adding fresh herbs like cilantro or basil boosts flavor without extra calories. Yes, you can use whole grain ramen noodles. They add fiber and nutrients. Whole grain noodles have a nuttier taste too. Just cook them according to the package instructions. Then, follow the same steps in the recipe. This small change makes your meal a bit healthier. You can serve chicken ramen stir fry with a side salad. A simple cucumber salad adds crunch and freshness. You might also pair it with steamed edamame or pickled vegetables. For a heartier meal, serve it with dumplings or spring rolls. These sides complement the dish and enhance your dining experience. In this article, we explored how to create delicious chicken ramen stir fry. We covered essential ingredients, custom options, and tasty substitutes. I shared clear steps for cooking, from preparing noodles to stir-frying veggies. You learned valuable tips for better technique and flavor. We also discussed variations for different diets and how to store your meals. This dish is fun and easy to make, perfect for any taste. Enjoy making your own unique chicken ramen stir fry!
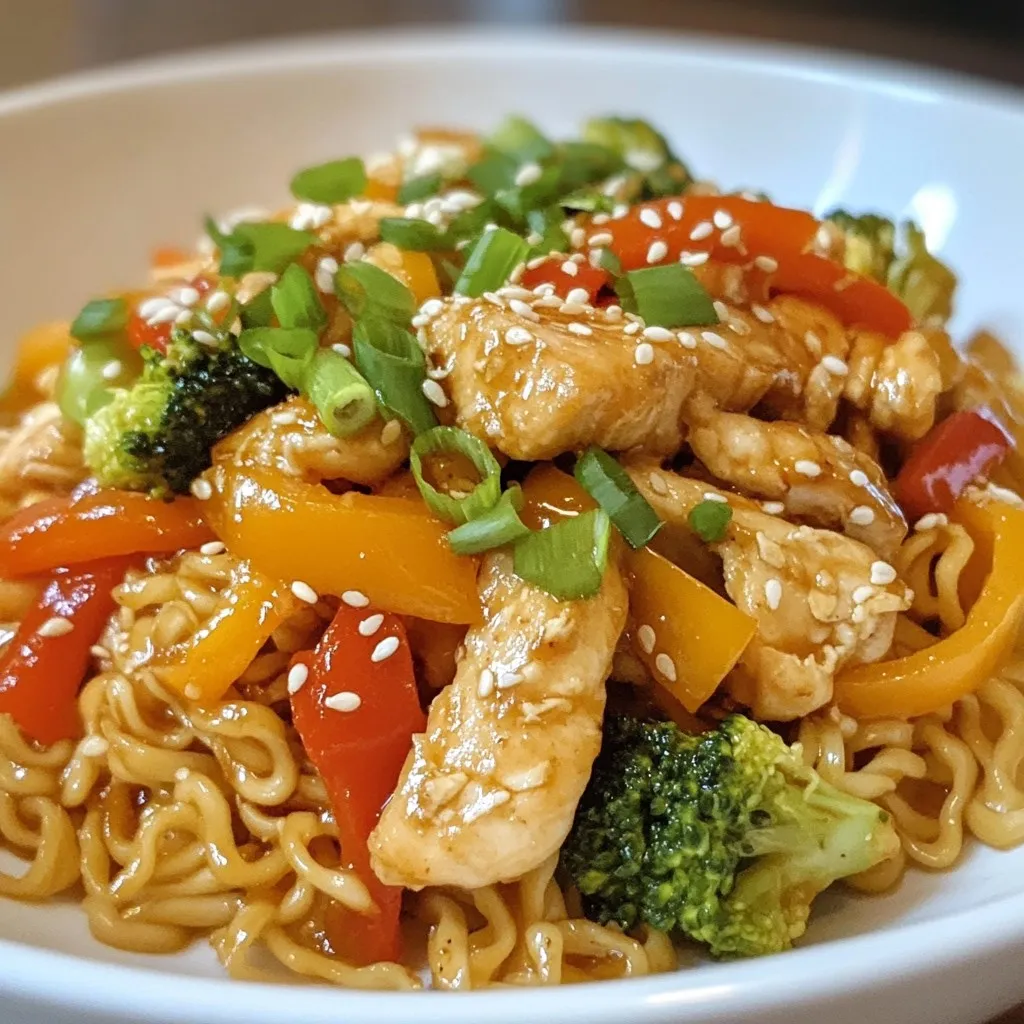
Chicken Ramen Stir Fry Flavorful and Quick Recipe
Looking for a quick and tasty meal? Chicken Ramen Stir Fry is your answer! This dish is packed with flavor and takes just minutes to
- 2 cups fresh or frozen butter beans - 1 medium onion, diced - 2 cloves garlic, minced - 1 red bell pepper, diced - 4 cups vegetable broth - 2 tablespoons olive oil - 1 teaspoon smoked paprika - 1/2 teaspoon cayenne pepper - Fresh parsley, chopped - Salt and pepper to taste Gathering the right ingredients is key to a great dish. You can choose fresh or frozen butter beans. Fresh beans give a nice texture and flavor, while frozen beans save time. A medium onion adds sweetness. Use garlic for depth and aroma. The red bell pepper adds color and crunch. For the broth, I prefer vegetable broth. It enhances the taste without overpowering the beans. Olive oil is great for sautéing. Smoked paprika brings warmth, and cayenne adds a little kick. Adjust cayenne to suit your taste. Finally, salt and pepper bring everything together. Don’t forget fresh parsley for garnish! It adds a bright touch to the dish. You can find the full recipe above for more details. Let’s start cooking! To start, you need to decide if you want to use fresh or frozen butter beans. If you choose fresh, shell them first. This can be fun and rewarding. Rinse them under cold water to clean them well. If you pick frozen butter beans, let them thaw slightly before cooking. Next, you will need to dice the onion and red bell pepper. Make sure your pieces are small and even. This helps them cook faster and mix well with the beans. Now it's time to cook! In a large pot, heat two tablespoons of olive oil over medium heat. Once hot, add the diced onion and red bell pepper. Cook them for about five minutes or until they soften. Stir them often to avoid burning. After the vegetables soften, add the minced garlic. Sauté it for one to two minutes. The smell will be amazing! Now, it’s time to add spices. Add smoked paprika and cayenne pepper. These give the dish a nice kick. Stir the mixture well to coat the vegetables. Next, add the butter beans to the pot. Pour in four cups of vegetable broth and add dried thyme, salt, and pepper. Stir everything together. Bring the mixture to a gentle simmer. This means small bubbles will form on the surface. Once simmering, reduce the heat to low. Cover the pot and let it cook for about 30 to 40 minutes. Stir it occasionally to prevent sticking. You want the beans to be tender and creamy. Check the seasoning and adjust if needed. Once you finish, let it sit for five minutes to absorb the flavors. Enjoy your delicious Southern butter beans! For the full recipe, check out the details above. To soften butter beans, the best method is simmering them in broth. Cooking them slowly helps them become tender and creamy. If you're using dried beans, soak them overnight. This step cuts down cooking time. When cooking, keep an eye on the heat. Too high of a heat can break down the beans. I suggest medium heat for a gentle simmer. Stir occasionally to ensure even cooking. You can add more flavor with herbs and spices. I love using thyme and smoked paprika. Fresh herbs like rosemary also work well. Adjust the cayenne pepper based on your taste. If you want more heat, add a bit more. If you prefer it mild, skip the cayenne. Taste as you go to find your perfect balance. Garnishing makes your dish look more appealing. I often use fresh parsley for a pop of color. You can also add a slice of lemon for brightness. Serve the beans in a shallow bowl to show off their creamy texture. A colorful dish always catches the eye. Use a rustic bowl for a warm feel or a sleek dish for modern flair. Enjoy the process of making your meal visually appealing! {{image_2}} You can change the recipe to fit your taste. Adding smoked sausage or ham gives it a nice protein boost. The smoky flavor pairs well with the creamy butter beans. You can also try using other veggies like carrots or celery. They add crunch and extra nutrients to the dish. Just chop them up and toss them in when you sauté the onion and bell pepper. The recipe works well with different cooking methods. You can use an Instant Pot for a quick meal. Just set it to high pressure for about 10 minutes. A Slow Cooker is great for a hands-off approach. Cook it on low for about 6 hours. If you prefer the stovetop, follow the recipe as is. Baking in the oven is another option. Just cover the pot and bake at 350°F for about 45 minutes. Want to spice things up? Add more cayenne for a spicy version. It gives the beans a nice kick. If you want a lighter dish, switch to chicken broth instead of vegetable broth. This change adds depth without being too heavy. You can mix and match these ideas to find your perfect flavor. Enjoy the journey of making this dish your own! To keep your Southern butter beans fresh, store leftovers in an airtight container. Place it in the fridge right after they cool down. These beans can stay good for about 3 to 5 days. Just make sure to check for any off smells or changes in texture before eating. If you want to save some for later, freezing is a great option. First, let the beans cool completely. Next, divide them into portions and place them in freezer bags. Try to squeeze out as much air as possible before sealing. These beans can last up to 6 months in the freezer. When you're ready to use them, just take out a portion and place it in the fridge overnight to thaw. For quick thawing, you can put the bag in a bowl of cold water for about an hour. To refresh your Southern butter beans after storage, reheat them gently on the stove. Add a splash of vegetable broth or water to keep them moist. Stir occasionally to ensure even heating. When reheating, taste them again. You may want to add a pinch of salt or pepper to brighten the flavors. This way, you keep the dish tasty and creamy! For the best texture, avoid overheating them. Enjoy your delicious dish like it’s fresh from the pot! Butter beans are large, creamy beans. They are often called lima beans. These beans are packed with nutrients. They provide protein, fiber, and essential vitamins. Nutritional value and health benefits: - High in protein, which helps build muscle - Rich in fiber for healthy digestion - Good source of iron, which supports energy - Contains potassium for heart health - Low in fat, making them a great choice Eating butter beans can help you feel full and satisfied. They work well in many dishes, adding both flavor and nutrition. Yes, you can use dried butter beans. However, they need more prep time. Dried beans must be soaked before cooking. This helps them cook evenly and quickly. Cooking differences with dried beans: - Soak dried beans in water for at least 6 hours. - Drain and rinse the beans before cooking. - Cook them in water or broth for about 1-1.5 hours, until tender. - Adjust the liquid in the recipe, as dried beans absorb more. Using dried beans adds a deeper flavor. They can be a fun project if you have the time. To make this recipe vegetarian, swap the broth. Use vegetable broth instead of chicken broth. This keeps the dish flavorful without meat. Substitute options for non-vegetarian ingredients: - Use vegetable broth for a rich base. - Replace any butter or lard with olive oil. - Add mushrooms or tempeh for extra texture and protein. These swaps make the dish just as tasty. You won’t miss the meat! This blog post covers a simple and tasty dish using butter beans. We explored the main ingredients, like fresh beans, onions, garlic, and bell peppers. I shared step-by-step cooking tips and ways to enhance flavors. We discussed variations to customize your meal and best storage methods for leftovers. Take these ideas and make this dish your own. Enjoy the cooking process, and let the flavors shine! You can create a delicious meal that's good for you and your friends. Happy cooking!
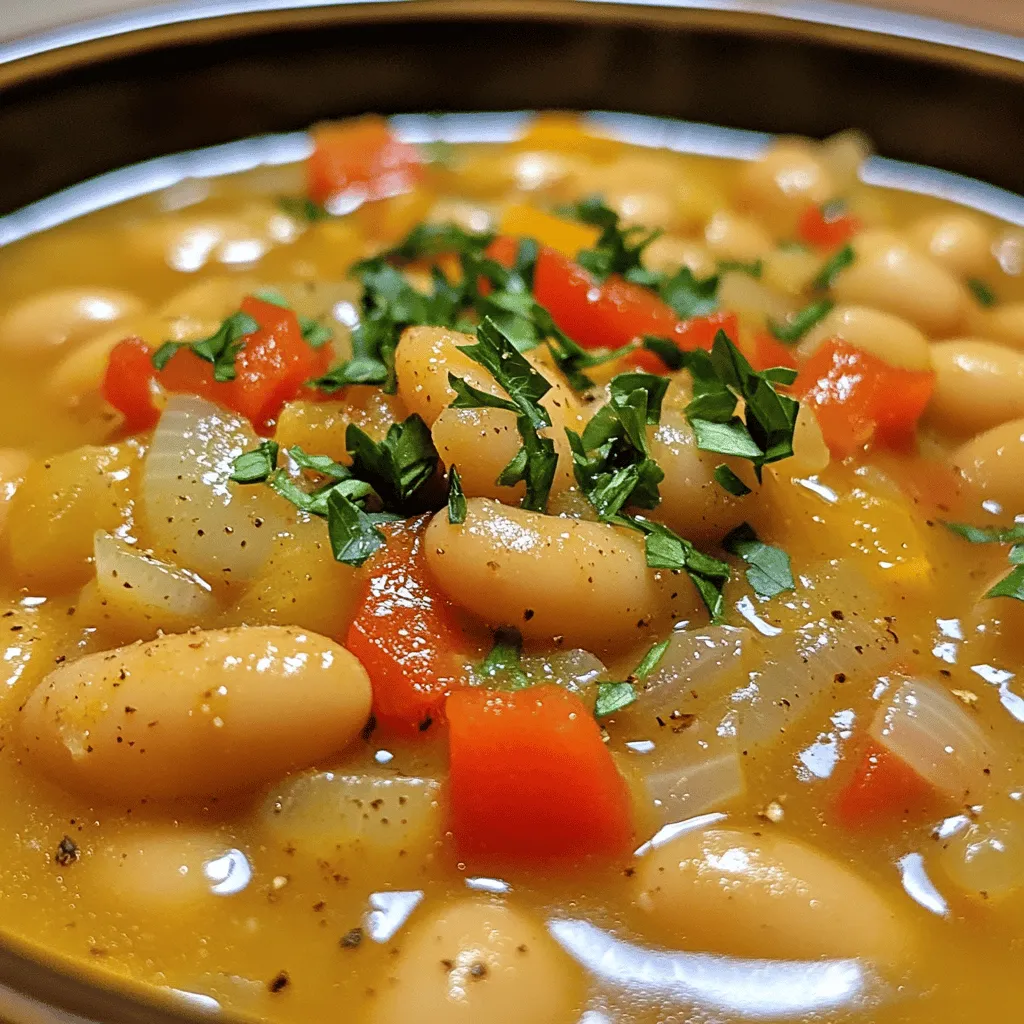
Delicious Southern Butter Beans Recipe Easy and Tasty
Are you ready to savor a taste of the South? My Delicious Southern Butter Beans Recipe is a simple, flavorful dish that impresses everyone. With
To make Creamy Crockpot White Chicken Chili, you need some simple, fresh ingredients. Here’s what you’ll need: - 2 lbs boneless, skinless chicken breasts - 1 medium onion, diced - 3 cloves garlic, minced - 3 cans white beans (cannellini or great northern), drained and rinsed - 1 can diced green chilies - 1 cup corn (fresh or frozen) - 4 cups chicken broth - 1 teaspoon cumin - 1 teaspoon chili powder - ½ teaspoon oregano - 1 cup sour cream - 1 cup cream cheese, softened - Salt and pepper to taste - Fresh cilantro for garnish (optional) Each ingredient plays a key role in the dish. The chicken provides protein and heartiness. The beans add fiber and creaminess. The spices bring warmth and flavor. The sour cream and cream cheese create that rich, creamy texture we all love. Don't forget, fresh cilantro brightens everything up with a pop of flavor. For the full recipe, check out the detailed instructions that follow. Start by placing the boneless, skinless chicken breasts at the bottom of your crockpot. This helps the chicken cook evenly. Next, layer the diced onion, minced garlic, and the three cans of white beans. I prefer cannellini beans for their creamy texture. Then, add the can of diced green chilies and the cup of corn. Pour in the chicken broth, and sprinkle the cumin, chili powder, oregano, salt, and pepper. Stir gently to mix everything. It’s important to ensure the chicken is submerged to keep it moist during cooking. You can cook this chili on low heat for 6-7 hours or on high for 4 hours. Both methods work well; just choose the one that fits your schedule. When the chicken is fully cooked and tender, it’s time to shred it. About 30 minutes before serving, take the chicken breasts out of the pot. Use two forks to shred the chicken into bite-sized pieces. This step adds texture and flavor to the chili when you return it to the pot. Once the chicken is back in the pot, it’s time to make it creamy. Stir in the softened cream cheese and sour cream. This will give the chili its rich, creamy texture. Mix until fully blended. Before serving, taste your chili and adjust the seasoning as needed. You can add more salt, pepper, or spices for extra flavor. This creamy crockpot white chicken chili is now ready to serve! For the full recipe, check out the earlier section. To make your creamy crockpot white chicken chili pop with taste, focus on spices. Adding spices like cumin and chili powder helps build layers of flavor. Use fresh ingredients whenever you can. Fresh onion and garlic bring a bright taste that dried versions can't match. Adjust the cooking time based on the size of your chicken breasts. Larger pieces may need extra time to cook through. If you use frozen corn, you can toss it in directly. Fresh corn adds a sweet crunch, so choose what fits your taste. Garnish your chili with fresh cilantro for a vibrant touch. A dollop of sour cream adds creaminess and balance. For some crunch, serve with crushed tortilla chips. Pair your chili with warm bread or a side salad for a complete meal. Don’t forget to check out the Full Recipe for more details! {{image_2}} To make this chili a bit lighter, try using low-fat cream cheese. This change cuts down on calories but keeps the creamy texture. You can also boost the veggie content. Add more corn or toss in some chopped bell peppers and zucchini. This adds flavor and nutrients. If you want a change from chicken, use turkey instead. Rotisserie chicken is another great option. It saves time and adds a rich flavor. For a vegetarian twist, skip the meat altogether. Use extra white beans or add lentils for protein. You still get a hearty meal without meat. For those who love heat, adding jalapeños can spice things up. You can chop them finely and mix them in. Other peppers work well too, like poblano or serrano. If you prefer a simple boost, incorporate a few dashes of hot sauce. This gives your chili a kick without being too overwhelming. Don’t forget to check the [Full Recipe] for all the details! To store leftovers of your creamy crockpot white chicken chili, let it cool first. Then, pack it in an airtight container. You can keep it in the fridge for about 3 to 4 days. Make sure to label it with the date. This helps you know when to eat it. If you want to freeze your chili, use freezer-safe containers. Leave some space at the top, as liquids expand when frozen. Your chili can last up to 3 months in the freezer. When you're ready to eat it, move it to the fridge to thaw overnight. You can reheat your chili on the stovetop or in the microwave. For stovetop, heat it in a pot over medium heat until hot. Stir often to avoid sticking. In the microwave, place chili in a bowl and cover it. Heat in 1-minute bursts, stirring in between. If it looks too thick, add a little broth or water to adjust the consistency. Yes, you can use frozen chicken. It saves time and is convenient. Just make sure your crockpot is large enough. Cooking frozen chicken may take a bit longer. The chicken will be safe to eat once it reaches 165°F. Don't skip the shredding step; it helps blend flavors. If you want a thicker chili, try these methods: - Add a cornstarch slurry: Mix cornstarch with water and stir it in. - Mash some beans: Use a fork to mash a few beans against the side of the pot. - Simmer uncovered: Let it cook without the lid for a bit to reduce liquid. Serving this chili is fun and easy! Here are some ideas: - Serve it in bowls, and top with fresh cilantro. - Add a dollop of sour cream for creaminess. - For some crunch, sprinkle crushed tortilla chips on top. - Pair it with warm cornbread or a side salad for a complete meal. Absolutely! Meal prep makes life easier. Here are some tips: - Prep your ingredients the night before and store them in the fridge. - Cook the chili and let it cool before storing it in airtight containers. - You can freeze leftovers for up to three months. Just thaw in the fridge before reheating. This blog post covered a tasty recipe for Creamy Crockpot White Chicken Chili. We explored the essential ingredients, step-by-step instructions, and tips to enhance flavor. I shared variations to suit different diets and preferences, along with storage and reheating tips. Remember, this dish is versatile and easy to tweak. Get creative with spices or add your favorite toppings. Enjoy making this chili, and share it with friends and family for a warming meal!
Creamy Crockpot White Chicken Chili Simple and Savory
If you love a hearty meal that cooks itself, you’re in the right place! This Creamy Crockpot White Chicken Chili is easy, tasty, and perfect
- 3 lbs beef chuck roast - 4 tablespoons unsalted butter, softened - 4 cloves garlic, minced - 1 tablespoon fresh rosemary, chopped - 1 tablespoon fresh thyme, chopped - Salt and pepper to taste - 2 cups beef broth - 1 onion, quartered - 4 carrots, cut into chunks - 4 potatoes, cut into cubes - 1 tablespoon olive oil - 1 cup heavy cream - 1 tablespoon flour (optional, for thickening) The heart of this dish lies in the ingredients. Choosing a quality beef chuck roast is key. It brings flavor and tenderness. The unsalted butter and minced garlic create a rich base. Fresh herbs like rosemary and thyme add a bright flavor. You can adjust the seasoning to your taste. I like to use a generous amount of salt and pepper. The beef broth keeps the roast moist and adds depth. For the veggies, I always use fresh onions, carrots, and potatoes. They add sweetness and texture. Heavy cream makes the sauce silky and rich. If you want a thicker sauce, use flour. Check the Full Recipe for cooking steps. Enjoy the process of blending these ingredients. Each one plays a role in making this dish a savory comfort. - Preheat your oven to 325°F (165°C). - Season the beef chuck roast generously with salt and pepper. These steps set the stage for a delicious pot roast. Preheating the oven helps cook the meat evenly. Seasoning the roast well ensures every bite is flavorful. - Sear the roast in a large oven-safe pot. - Sauté the vegetables in the same pot. - Mix the creamy garlic-herb butter. First, heat olive oil in the pot. Sear the roast for about 3-4 minutes on each side. This gives it a nice brown crust. When you remove the roast, toss in your onions, carrots, and potatoes. Sauté them for about 5 minutes until they start to soften. Next, in a bowl, mix the softened butter, minced garlic, chopped rosemary, and thyme. This mix is your creamy garlic-herb butter. It adds a rich flavor to the roast. - Spread the herb butter and roast with beef broth. - Cover and roast in the oven. - Thicken the sauce and serve. Now, spread the garlic-herb butter over the seared roast. Place the roast back in the pot and pour in the beef broth. Make sure the veggies are covered. Cover the pot with a lid and roast it in your preheated oven for about 3 hours or until the meat is fork-tender. After 3 hours, carefully take the pot out. If you want a thicker sauce, mix flour with a bit of cold water until smooth. Stir this into the pot juices. Then, add in the heavy cream and mix well. Let it simmer for another 15-20 minutes on the stovetop. You can find the full recipe to guide you through this process. This dish is all about rich flavors and simple steps. Enjoy the warmth it brings to your table! Searing the meat is crucial. It locks in juices and adds flavor. Make sure the pot is hot. I recommend 3 to 4 minutes per side. If your roast is larger, adjust the cooking time. A 4-pound roast may need an extra 30 minutes. Always check for fork-tender meat. Adjusting seasoning is easy. Taste the sauce as it cooks. If it needs more salt, add a pinch. For a richer flavor, stir in a bit more garlic. To achieve a creamy sauce, use heavy cream. For extra thickness, mix a tablespoon of flour in cold water. Stir this into the pot juices before adding cream. For presentation, use a large platter. Arrange the pot roast in the center. Place the veggies around it. Drizzle the creamy sauce over the top. Garnish with fresh thyme for color. To complement this dish, serve with mashed potatoes or crusty bread. These sides soak up the sauce well. For the full recipe, check the link provided earlier. {{image_2}} You can switch up the beef cut for variety. Try brisket or round roast. These cuts offer different textures and flavors. Each option gives you a unique pot roast experience. Herbs and spices can also change the dish. Use thyme or oregano instead of rosemary. Add a pinch of smoked paprika for a warm flavor. Experiment with what you have on hand. For a slow cooker version, follow the same steps. Sear the meat first for flavor. Then add all ingredients to the slow cooker. Cook on low for 8 hours or high for 4 hours. This method makes your home smell amazing. If you're short on time, use an Instant Pot. Sear the roast, then add everything to the pot. Cook for about 60 minutes on high pressure. Let the pressure release naturally for best results. To make the dish gluten-free, simply skip the flour. The sauce will still taste rich and creamy. You can thicken it with cornstarch or simply enjoy it as is. For a dairy-free version, replace heavy cream with coconut cream. It gives a nice richness without any dairy. Almond milk is another option, but it may be less creamy. Adjust seasonings to balance the flavors. Curious to see the full recipe? Check out the Full Recipe for all the details! To keep leftover pot roast fresh, let it cool down. Place it in an airtight container. Make sure to seal it well. Leftover pot roast can last in the fridge for about 3 to 4 days. Always check for any signs of spoilage before using it again. Freezing pot roast is a great way to save it for later. Cut the roast into smaller pieces first. This helps it freeze better. Wrap each piece tightly in plastic wrap, then place them in a freezer-safe bag. Pot roast can be frozen for up to 3 months. To thaw, move it to the fridge overnight. For quick thawing, use the microwave on low. When reheating, you have two good options: stovetop or microwave. The stovetop keeps the meat juicy. Heat it in a pot on low heat with a splash of broth. Stir it often to avoid burning. The microwave is faster but may dry it out. Use a microwave-safe dish and cover it loosely. To refresh the creamy sauce before serving, add a bit of broth or cream while reheating. Mix well to keep it smooth and tasty. This will make your leftovers just as enjoyable as the first meal. For the full recipe, check out the earlier section. How long does it take to cook a pot roast? Cooking a pot roast takes about three hours in the oven. You want low heat for tender meat. A good rule is to roast for 30 minutes per pound. So, for a 3-pound roast, aim for three hours. This long time helps the meat become very tender and flavorful. Can I make Creamy Garlic-Herb Butter Pot Roast ahead of time? Yes, you can make this pot roast ahead of time. Cook it fully and let it cool first. Then, store it in the fridge for up to three days. When ready to serve, just reheat it gently on the stove. The flavors will blend even more. Can I substitute fresh herbs with dried herbs? Yes, you can use dried herbs instead of fresh. Use one-third of the amount since dried herbs are stronger. For example, if the recipe calls for 1 tablespoon of fresh thyme, use 1 teaspoon of dried thyme. Just add them early in the cooking process to develop the flavor. What type of beef is best for pot roast? The best beef for pot roast is beef chuck. It has the right amount of fat and connective tissue. This makes it tender and juicy when cooked slowly. You can also use brisket or round, but chuck is my top choice for flavor. Why is my pot roast tough? If your pot roast is tough, it likely needed more cooking time. Tough cuts need long, slow cooking to break down. Check the internal temperature; it should reach at least 195°F for fork-tender meat. If it’s not tender, cover it and cook longer. How can I make the sauce thicker? To thicken the sauce, use flour or cornstarch. Mix 1 tablespoon of flour with a bit of cold water until smooth. Stir this mixture into the pot juices and simmer for a few minutes until thick. You can also let it simmer longer to reduce and thicken naturally. This blog post covered how to make a delicious Creamy Garlic-Herb Butter Pot Roast. You learned about key ingredients, step-by-step instructions, and tips for the best results. You can experiment with different cuts of beef or herbs to suit your taste. Don’t forget to follow storage tips for leftovers, so nothing goes to waste. Whether you serve it on a special occasion or a weeknight, this roast will impress. Enjoy your cooking and savor every bite of this hearty meal!
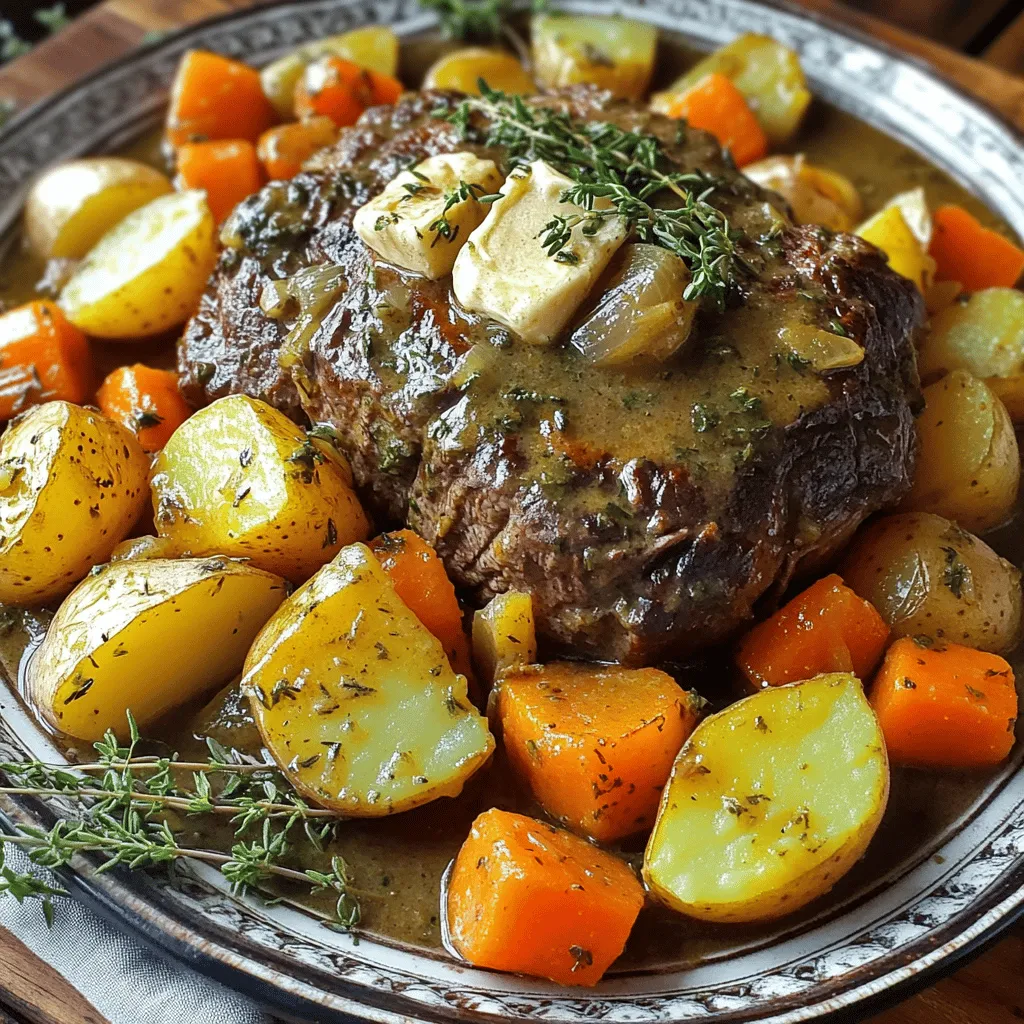
Creamy Garlic-Herb Butter Pot Roast Savory Comfort Dish
If you’re looking for a dish that warms the soul, you’ve found it! This Creamy Garlic-Herb Butter Pot Roast is packed with rich flavors and
For the Chicken Tzatziki Bowls, start with these key items: - 2 boneless, skinless chicken breasts - 1 teaspoon paprika - 1 teaspoon garlic powder - 1 teaspoon onion powder - 1 tablespoon olive oil - Salt and pepper to taste - 1 cup cooked quinoa - 1 cucumber, diced - 1 cup cherry tomatoes, halved - 1/4 red onion, thinly sliced These ingredients form the heart of the dish. The chicken brings protein and flavor. The spices add depth, while quinoa and fresh veggies create a balanced meal. The tzatziki sauce is essential for flavor. You will need: - 1/2 cup plain Greek yogurt - 1 tablespoon fresh dill, chopped - 1 tablespoon lemon juice - 1 tablespoon olive oil (for tzatziki) This sauce acts as a creamy and refreshing topping. The yogurt base provides tang, while dill and lemon add brightness. For a complete meal, consider these extras: - Pita bread, for serving (optional) - Garnishes like a sprig of dill or lemon wedges Pita bread can enhance the experience. It’s perfect for scooping up the tzatziki. Garnishes add color and make the dish visually appealing. You can find the full recipe for Chicken Tzatziki Bowls in the section above. Enjoy crafting this flavorful and healthy meal! - In a bowl, combine paprika, garlic powder, onion powder, olive oil, salt, and pepper. - Coat the chicken breasts in this mix. - Let the chicken sit for at least 30 minutes. This helps the flavors soak in. - Preheat your grill or grill pan to medium-high heat. - Cook the chicken for about 6-7 minutes on each side. - Use a meat thermometer to check for doneness. It should reach 165°F. - Once done, let the chicken rest before slicing. - In a small bowl, mix Greek yogurt, diced cucumber, dill, lemon juice, olive oil, and a pinch of salt. - Stir well to combine. - Set aside for a few minutes. This allows the flavors to meld together nicely. - Start with a base of cooked quinoa in each serving bowl. - Top with sliced grilled chicken, diced cucumber, cherry tomatoes, and red onion. - Make it colorful and fresh for the best presentation. - Generously spoon the tzatziki sauce over the top of each bowl. - For extra flavor, consider serving with warmed pita bread on the side. - Enjoy the mix of flavors and textures in every bite! This is how you create a Chicken Tzatziki Bowl that is both flavorful and healthy. For the complete recipe, check out the [Full Recipe]. To cook chicken perfectly, I recommend grilling. Grilling gives a nice smoky flavor. You can also pan-sear if you prefer. To check for doneness, use a meat thermometer. Chicken should reach 165°F. This ensures it is safe to eat. Letting the chicken rest helps keep it juicy. Slice it after resting for best results. The tzatziki sauce is key to this dish. If you want a thicker sauce, strain the yogurt. This removes excess water and makes it creamy. To boost the flavor, add more herbs like mint or parsley. Fresh herbs can make a big difference. You can also try a splash of vinegar for tanginess. A great-looking bowl makes the meal more fun. Garnish your dish with a sprig of dill. A lemon wedge adds a fresh touch too. For serving, use wide bowls to show off the layers. You can also serve with warm pita bread on the side. This adds a nice crunchy element to your meal. For the full recipe, check out the steps above! {{image_2}} You can easily change the protein in Chicken Tzatziki Bowls. If you want to substitute chicken, consider using turkey. Turkey has a similar taste and texture. You can also try grilled shrimp for a lighter option. For vegetarian choices, chickpeas are great. They add protein and a nice texture. Tofu is another option. It's easy to flavor and grill or bake. Quinoa is a popular base for these bowls, but you have other choices. Brown rice is a tasty substitute. It has a nice chew and is full of fiber. You can also use farro. This grain adds a nutty flavor and is very filling. For a low-carb option, try cauliflower rice. It absorbs flavors well and keeps the meal light. Spice mixes can enhance your Chicken Tzatziki Bowls. Try adding cumin or coriander for a warm twist. If you like some heat, cayenne pepper can spice things up. Seasonal vegetables can also change the dish. In summer, add bell peppers or zucchini. In the fall, roasted butternut squash is a delightful addition. These changes keep the meal fresh and exciting. For the full recipe, check out the [Full Recipe]. To keep your Chicken Tzatziki Bowls fresh, store leftovers in the fridge. Place them in airtight containers. This helps prevent moisture loss and keeps the flavors intact. Use glass or BPA-free plastic containers for best results. When reheating, use the microwave or stovetop. If using the microwave, cover the bowl with a lid to keep moisture. Heat in short bursts of 30 seconds. Stir in between to warm evenly. If using a stovetop, add a splash of water and heat on low. This keeps the chicken tender and juicy. You can freeze the chicken and tzatziki separately. Chicken freezes well for up to three months. Use freezer-safe bags or containers. For tzatziki, freeze it in small portions. Thaw in the fridge overnight before using. This way, you maintain the quality and flavor of your meal. To cook quinoa, use a 2:1 water-to-quinoa ratio. This means for every cup of quinoa, use two cups of water. Rinse the quinoa before cooking to remove bitterness. Then, boil water in a pot, add quinoa, and cover it. Cook on low heat for about 15 minutes. Once the water is absorbed, let it sit covered for five more minutes. Fluff it with a fork before serving. Yes, you can make tzatziki without yogurt. Alternatives include sour cream or cashew cream. These will change the flavor and texture a bit. Sour cream gives a tangy taste, while cashew cream adds creaminess. If you use these, add cucumber, lemon juice, and herbs as usual. This keeps your tzatziki fresh and tasty. Chicken Tzatziki Bowls will last about three days in the fridge. Store them in an airtight container to keep them fresh. Check for signs of spoilage like off smells or changes in texture. If the chicken looks slimy or the veggies feel mushy, it’s best to throw it away. Keeping your food safe ensures you enjoy every bite! To wrap up, we explored how to make Chicken Tzatziki Bowls from scratch. You learned about key ingredients, such as chicken, quinoa, and tzatziki sauce. The step-by-step guide shows you how to marinate and cook the chicken, prepare the sauce, and build your bowl. I shared tips for cooking and presentation. Don't forget the variations and storage advice to keep your meal fresh. Enjoy experimenting with your bowls, and make it your own!
Chicken Tzatziki Bowls Flavorful and Healthy Meal
Are you craving a meal that’s both tasty and healthy? Look no further! Chicken Tzatziki Bowls are packed with flavor, nutrition, and freshness. In this
- 4 boneless, skinless chicken breasts - 1 cup cherry tomatoes, halved - 1/4 cup balsamic vinegar - 2 tablespoons olive oil - 2 cloves garlic, minced - 1 teaspoon dried oregano - 1 teaspoon dried thyme - Fresh basil leaves - Salt and pepper Gather all these items to create a delicious Savory Balsamic Chicken with Burst Tomatoes. Each ingredient plays a key role in building flavor. The chicken serves as the heart of the dish, while the cherry tomatoes add a burst of sweetness. Balsamic vinegar brings a tangy depth, and olive oil helps bind everything together. The seasonings elevate the dish. Garlic adds an aromatic touch, while oregano and thyme give earthy notes. Fresh basil leaves on top add a bright finish. Remember to adjust salt and pepper to your taste for the perfect balance. For the full recipe, check the detailed instructions. Enjoy your cooking adventure! First, season the chicken breasts with salt and pepper. Use enough to cover both sides well. This adds flavor and enhances the dish. Next, heat the olive oil in a large skillet over medium-high heat. Make sure it is hot before adding the chicken. Place the chicken breasts in the pan. Sear them for about 5-7 minutes on each side. Look for a nice golden-brown color. This step locks in juices and creates a tasty crust. Once cooked through, remove the chicken from the skillet and set it aside. Now, it's time for the burst tomatoes. In the same skillet, add the halved cherry tomatoes. Cook them for 2-3 minutes. Watch them closely as they start to burst and soften. This brings out the natural sweetness of the tomatoes. After that, add the minced garlic to the skillet. Sauté it for about one minute. This helps release a lovely aroma that enhances the dish. Next, pour in the balsamic vinegar. Stir it well to mix with the tomatoes and garlic. Allow the sauce to simmer gently. This should take about 3-4 minutes, as it reduces slightly. Now, it’s time to bring it all together. Return the chicken to the skillet. Spoon the balsamic tomato mixture over the top. Sprinkle the dried oregano and thyme on the chicken. Cover the skillet and cook for another 2-3 minutes. This allows the flavors to meld beautifully. Finally, remove from heat and let it sit for a couple of minutes. For the best presentation, plate the chicken on a serving dish. Spoon the burst tomatoes and balsamic sauce generously over it. Garnish with fresh basil leaves. This adds a vibrant touch and makes the dish pop. Enjoy your Savory Balsamic Chicken with Burst Tomatoes! You can find the full recipe above. How to properly sear chicken To sear chicken well, start with a hot pan. Heat olive oil in a skillet over medium-high heat. Season both sides of the chicken breasts with salt and pepper. When the oil shimmers, add the chicken. Sear for 5-7 minutes on each side. You want a nice, golden-brown crust. This step keeps the chicken juicy. Ensuring tomatoes burst To make the tomatoes burst, use fresh cherry tomatoes. Cut them in half for more surface area. Add them to the skillet after searing the chicken. Cook them for 2-3 minutes until they soften. This step adds sweetness to the dish. Using fresh herbs Fresh herbs make a big difference. I love adding basil to the dish. It brightens the flavors and adds color. You can also try fresh thyme or oregano. Just chop them up and sprinkle them on top before serving. Adjusting seasoning to taste Always taste your dish before serving. If it needs more flavor, add salt and pepper. Balsamic vinegar adds sweetness, but you can balance it with a pinch of salt. Adjust the seasonings until it tastes just right. Plating tips for an appealing look For a beautiful plate, start with the chicken in the center. Spoon the burst tomatoes and balsamic sauce generously over the chicken. This adds color and makes it look inviting. Serving suggestions with side dishes Serve this dish with steamed vegetables for a healthy side. Rice or quinoa also pairs well. They soak up the sauce and add texture. Enjoy your meal with a green salad for a fresh touch. {{image_2}} You can change up proteins for this dish. Try using turkey breasts or pork chops. Both options will work well with the balsamic sauce. If you want something plant-based, use firm tofu or tempeh. These swap ideas keep the dish fresh and exciting. For tomatoes, cherry tomatoes are perfect, but you can also use grape tomatoes or even diced regular tomatoes. Each type will give a different taste and texture to the dish. To add some heat, sprinkle in red pepper flakes. This spice nicely contrasts the sweetness of the balsamic vinegar. Just a pinch will do, but you can adjust it to your taste. You can also mix in other fresh herbs. Parsley or thyme can enhance the dish's flavor. Fresh herbs bring brightness to the meal and make it even more delightful. If you want to make this dish low-carb or keto-friendly, skip the rice and serve it with a salad instead. Zucchini noodles are another great option. They soak up the sauce and add a fun twist. For those needing gluten-free options, this recipe is naturally gluten-free. Just ensure any extra ingredients or sides you choose are gluten-free too. You can enjoy this dish without worry! For the full recipe, check out Savory Balsamic Chicken with Burst Tomatoes. To store leftovers, let the chicken cool first. Place it in an airtight container. This keeps the chicken fresh for up to four days in the fridge. I recommend using glass containers. They are sturdy and do not stain. Make sure to keep the burst tomatoes with the chicken for added flavor. If you want to save the dish for later, freezing is a good option. You can freeze the chicken and sauce together. Use freezer-safe bags or containers. This meal can stay good for up to three months in the freezer. When you are ready to eat, thaw it overnight in the fridge. This method keeps the chicken moist. For reheating, the oven or stovetop works best. Preheat your oven to 350°F (175°C). Place the chicken in an oven-safe dish, cover it with foil, and heat for about 15-20 minutes. If using the stovetop, add a splash of water to the pan. Heat on low, covering it to keep moisture in. This way, your Savory Balsamic Chicken with Burst Tomatoes remains juicy and tasty. You can pair this dish with several sides. Here are my favorites: - Steamed vegetables, like broccoli or green beans - Creamy mashed potatoes for a comforting touch - A fresh garden salad with a light vinaigrette - Rice or quinoa to soak up the delicious sauce - Garlic bread for a tasty addition These sides complement the chicken well and add variety to your meal. Tender chicken is key for a great dish. Here are some tips: - Brine the chicken in saltwater for 30 minutes before cooking. - Pound the chicken to an even thickness. This helps it cook evenly. - Use a meat thermometer to avoid overcooking. Aim for 165°F. - Let it rest after cooking for a few minutes. This keeps it juicy. These steps help you achieve tender, juicy chicken every time. Yes, you can prep this dish ahead of time. Here’s how: - Marinate the chicken in balsamic vinegar and spices for a few hours or overnight. - Cook the chicken and tomatoes, then cool and store them in the fridge for up to 2 days. - Reheat gently on the stove or in the oven. This keeps the chicken moist. Preparing ahead saves you time and makes dinner easy. For the full recipe, check out the details! This blog post covers how to make Savory Balsamic Chicken with Burst Tomatoes. We discussed key ingredients, cooking steps, and ways to enhance flavor. I shared tips for perfecting your dish and offered variations for dietary needs. Proper storage and reheating methods will keep leftovers fresh. Remember, experimenting with different ingredients can boost flavor. Enjoy this simple yet delicious meal with ease! Your cooking journey can be fun and rewarding.
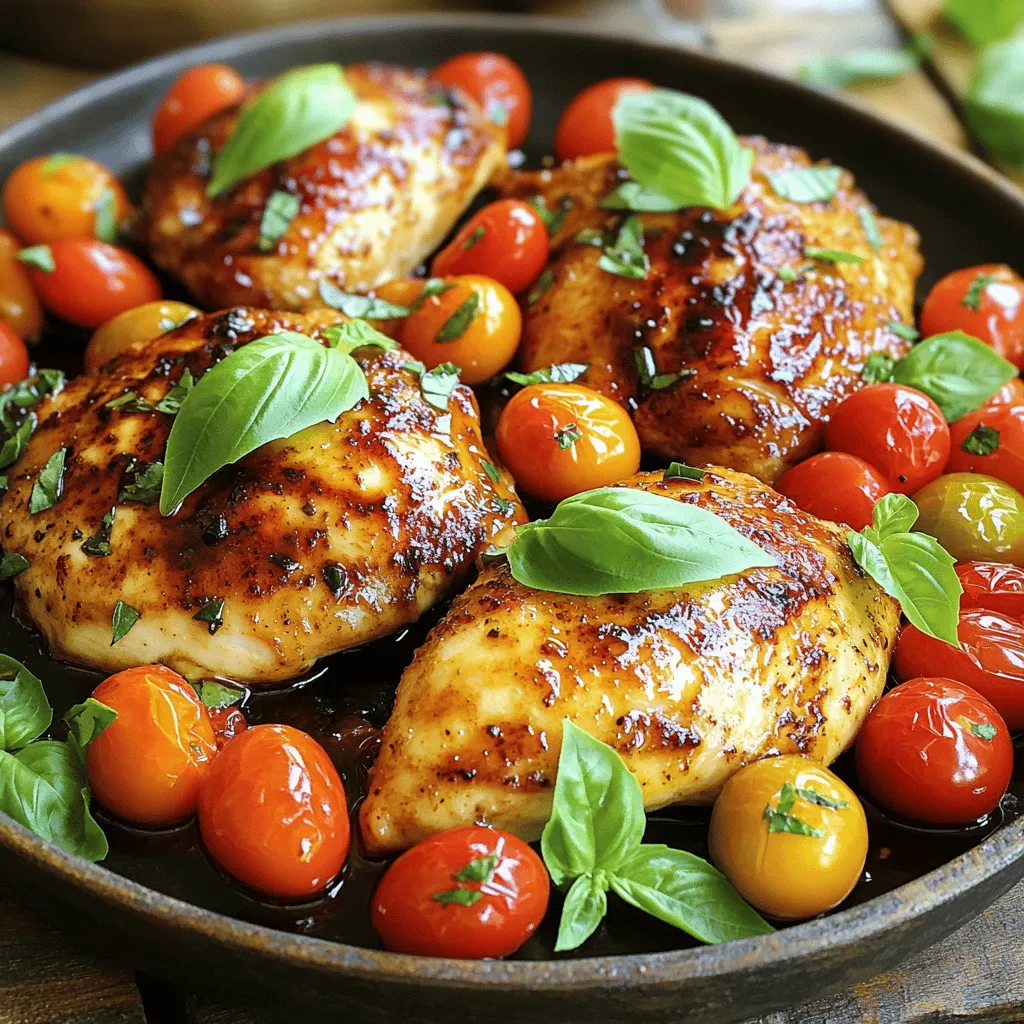
Savory Balsamic Chicken with Burst Tomatoes Delight
Get ready to impress your taste buds with Savory Balsamic Chicken with Burst Tomatoes! This dish is quick, simple, and bursting with flavor. Juicy chicken
To make One Pan Balsamic Chicken, you need to gather a few simple items. Here’s what you will need: - 4 boneless, skinless chicken thighs - 1 cup cherry tomatoes, halved - 1 bell pepper (any color), sliced - 1 red onion, sliced - 3 cloves garlic, minced - 1/4 cup balsamic vinegar - 2 tablespoons honey - 3 tablespoons olive oil - Salt and pepper to taste - Fresh basil leaves for garnish These ingredients come together to create a dish that is both tasty and easy to prepare. The chicken thighs are juicy and soak up the flavor well. The balsamic vinegar and honey mix brings a sweet and tangy taste. The veggies add color and crunch, making this meal a delight for the eyes and the palate. Using fresh basil as a garnish gives the dish a nice touch. It's not only pretty but also adds a burst of flavor. You can find all these ingredients at your local store. This recipe is perfect for busy nights when you want something yummy and quick. For the full recipe, you can check out the sections that follow. Enjoy cooking! First, you need to preheat your oven to 400°F (200°C). This step is key for even cooking. In a small bowl, mix balsamic vinegar, honey, olive oil, minced garlic, salt, and pepper. Whisk until it blends well. This marinade will give the chicken great flavor. Take the chicken thighs and place them in a large bowl. Pour half of the marinade over the chicken. Make sure each piece is coated well. Let it sit for at least 15 minutes. This helps the chicken soak up the flavors. Grab a large oven-safe pan. Add the sliced bell pepper, red onion, and cherry tomatoes. Drizzle a bit of olive oil on top. Sprinkle with salt and pepper. Toss them together to mix. Now, push the veggies to the sides of the pan. Place the marinated chicken thighs in the center. Pour the rest of the marinade over both the chicken and veggies. This adds flavor to everything. Put the pan in your preheated oven. Bake for 30 to 35 minutes. The chicken should reach an internal temperature of 165°F (75°C). Once done, take it out and let it rest for a few minutes. Garnish with fresh basil leaves before serving. For the full recipe, check [Full Recipe]. Cooking time can change based on your oven. Always check the chicken's internal temp. Aim for 165°F (75°C). If using larger thighs, add 5-10 minutes. If they are smaller, reduce the time. To keep chicken juicy, marinate it well. Use half the marinade before cooking and save the rest. The balsamic vinegar helps tenderize the meat. Don't overcook the chicken. Watch the clock and use a meat thermometer. Marinate your chicken for at least 15 minutes. For more flavor, let it sit for up to 2 hours in the fridge. Use a resealable bag for even coating. The marinade can also work on other proteins. Try it with shrimp or pork. For the full recipe, check the section above. {{image_2}} You can mix in different veggies to change the taste. Try adding zucchini, carrots, or asparagus. These will add color and crunch to your dish. Just chop them up to similar sizes. Toss them in with your bell pepper and onion. This keeps cooking times even. If you like a kick, add red pepper flakes or sliced jalapeños. Mix them into the marinade for extra heat. You can also sprinkle some on the veggies before baking. This adds flavor without making the dish too hot. Adjust the spice level to fit your taste. You can swap out chicken for other proteins. Try using turkey thighs or pork tenderloin instead. Both will work well with the balsamic flavors. Just keep an eye on baking times. Pork may need a bit longer, while turkey can cook faster. Always check for a safe internal temperature. For the full recipe, check out the details above! You can store leftover One Pan Balsamic Chicken in the fridge. Place it in an airtight container. It will stay fresh for up to four days. Make sure the dish cools down first. This will help keep it from getting soggy. To reheat, preheat your oven to 350°F (175°C). Place the chicken and veggies in an oven-safe dish. Cover it with foil to keep it moist. Heat for about 15-20 minutes. You can also use the microwave. Heat for 2-3 minutes, checking often. Stir halfway to ensure even heating. If you want to save it longer, you can freeze the chicken. Wrap it tightly in plastic wrap. Then place it in a freezer bag. It can last up to three months in the freezer. When you are ready to eat, thaw it in the fridge overnight. Reheat as mentioned above. For more details, check out the Full Recipe. Yes, you can use chicken breasts. They will cook well too. Chicken breasts are leaner than thighs. They may dry out if overcooked. Keep an eye on baking time. Aim for 25-30 minutes of baking. Bake the chicken for 30-35 minutes. Check the internal temperature with a meat thermometer. It should reach 165°F (75°C). This ensures it is safe to eat. If you use chicken breasts, start checking at 25 minutes. You can serve many sides with this dish. Some great options include: - Rice or quinoa - Mashed potatoes - Crusty bread - A fresh green salad These sides will balance the flavors well. They will also soak up the delicious juices. Yes, the marinade is versatile. You can use it for pork or tofu. It adds a nice flavor to any protein. Just make sure to adjust cooking times. Pork may need 25-30 minutes, while tofu needs less. Use a meat thermometer for the best results. The chicken should reach 165°F (75°C) in the thickest part. If you don’t have a thermometer, cut into it. The juices should run clear, not pink. Always check for doneness to be safe. For more details, you can check the Full Recipe. This blog post shared how to make One Pan Balsamic Chicken. We covered each step from marinating the chicken to baking it with fresh veggies. I also provided tips to help you cook moist chicken and recipe variations. Overall, this dish is easy and delicious. You can customize it to fit your tastes. Enjoy cooking and sharing this meal with others!
Easy Family Dinner – One Pan Balsamic Chicken Delight
Looking for a quick and tasty family dinner? You’ve come to the right place! This One Pan Balsamic Chicken recipe is easy, flavorful, and perfect
To make One-Pan Balsamic Chicken & Veggies, you need fresh, simple ingredients. Each one adds flavor and nutrition to the dish. Here’s the list: - 4 boneless, skinless chicken thighs - 2 cups cherry tomatoes, halved - 1 zucchini, sliced - 1 bell pepper (any color), chopped - 1 red onion, sliced - 3 cloves garlic, minced - 1/4 cup balsamic vinegar - 2 tablespoons olive oil - 1 tablespoon honey - 1 teaspoon dried oregano - 1 teaspoon dried basil - Salt and pepper to taste - Fresh basil leaves for garnish These ingredients work together to create a tasty meal. The chicken thighs stay juicy, while the veggies add color and crunch. The balsamic vinegar gives everything a tangy kick. You can find the full recipe in the article. Enjoy cooking! 1. Preheat your oven and prepare marinades: Start by setting your oven to 400°F (200°C). This ensures your oven is hot when you bake the dish. Next, grab a large bowl and mix the balsamic vinegar, olive oil, honey, dried oregano, dried basil, minced garlic, salt, and pepper. Whisk it well until all the ingredients blend nicely. 2. Marinate the chicken thighs: Take your boneless, skinless chicken thighs and add them to the marinade. Make sure to coat them thoroughly. Let them sit in the marinade for at least 15 minutes. For a stronger flavor, you can marinate them for up to 2 hours in the fridge. 1. Arrange chicken and vegetables in the pan: Get an oven-safe skillet or a baking dish. Place the marinated chicken thighs inside. Pour any leftover marinade over the chicken. Now, surround the chicken with the halved cherry tomatoes, zucchini slices, chopped bell pepper, and sliced red onion. Drizzle a bit of olive oil over the veggies and season with salt and pepper. 2. Baking instructions and timing: Place the skillet or baking dish into your preheated oven. Bake for 25-30 minutes. Check that the chicken reaches an internal temperature of 165°F (75°C). The veggies should be tender, too. 1. Resting the dish and garnishing: After baking, take the dish out of the oven. Let it rest for about 5 minutes before serving. This helps the juices settle. For a lovely finish, garnish with fresh basil leaves before you serve. The colors and flavors will shine through beautifully. If you're looking for more details, check out the full recipe. To keep your chicken juicy, marinate it properly. Use the balsamic mixture and let it soak for at least 15 minutes. If you have time, marinate for two hours in the fridge. This step helps the chicken absorb flavors and retain moisture while cooking. For roasting vegetables, cut them into even pieces. This ensures they cook at the same rate. Spread them out in the pan. Avoid crowding, as this traps steam and makes them soggy. Drizzle with olive oil and season well for the best flavor. For a complete meal, serve with a side of rice or crusty bread. These pair well with the chicken and veggies. You can also add a fresh salad for a light touch. For presentation, serve directly from the skillet for a rustic feel. If using a platter, arrange the chicken and veggies nicely. Drizzle any leftover marinade over the top. This adds flavor and makes the dish look shiny and inviting. {{image_2}} You can easily switch out the veggies. Try using broccoli, carrots, or asparagus. These vegetables add different flavors and textures. You can also use sweet potatoes or green beans for a tasty twist. If you want to change the protein, chicken is not your only option. You can swap chicken for tofu or shrimp. Tofu absorbs flavors well, making it a great choice. Shrimp cooks quickly and brings a nice seafood taste. Changing herbs or spices can really boost your dish. You can use rosemary or thyme for a different flavor. Fresh herbs like parsley or cilantro can also make it pop. If you want some heat, try adding red pepper flakes or cayenne pepper. They will spice up your meal without overpowering it. For a sweet touch, you could add a splash of orange juice. This adds a fresh twist to the balsamic flavor. Don't be afraid to play around with flavors to find what you love! For the full recipe, check [Full Recipe]. To store your One-Pan Balsamic Chicken & Veggies, cool the dish first. Place leftovers in an airtight container. This keeps the chicken and veggies fresh. You can store them in the fridge for up to three days. After that, the quality may drop. Always check for any off smells before eating. When reheating, avoid drying out your chicken. Use the oven or a skillet for the best results. For the oven, preheat to 350°F (175°C). Place the chicken and veggies in a baking dish, cover with foil, and heat for about 15-20 minutes. This helps keep everything moist. If using a skillet, add a splash of water and cover with a lid. Heat over medium-low for about 10 minutes. Check until warm. Enjoy your tasty leftovers! How do I know when chicken is fully cooked? You can check the chicken’s doneness with a meat thermometer. The center should reach 165°F (75°C). If you don’t have a thermometer, cut into the thickest part. The meat should be white, with no pink inside. Juices should run clear, not red. Can I make this recipe ahead of time? Yes, you can prepare the marinade and coat the chicken ahead of time. Marinate the chicken for up to 2 hours in the fridge. You can also chop the veggies ahead of time. Store everything in the fridge until you are ready to cook. What other vegetables pair well with balsamic chicken? Many vegetables work well with balsamic chicken. Consider adding broccoli, asparagus, or carrots. Sweet potatoes also add a nice touch. Just make sure to cut them into similar sizes for even cooking. Can I freeze One-Pan Balsamic Chicken & Veggies? Yes, you can freeze this dish. Cook it first, let it cool, and store in airtight containers. It will stay good for up to three months. When ready to eat, thaw in the fridge overnight and reheat in the oven. This recipe for One-Pan Balsamic Chicken & Veggies is simple and tasty. We covered ingredients, preparation, cooking, and storage tips. Juicy chicken and fresh vegetables create a healthy meal in one pan. You can customize it with different veggies or spices to suit your taste. Remember to store leftovers properly and reheat gently. Enjoy making this dish that fits your kitchen and diet needs. Happy cooking!
One-Pan Balsamic Chicken & Veggies Simple Delight
Are you ready for a meal that is both easy and tasty? One-pan balsamic chicken and veggies combine juicy chicken thighs with fresh vegetables. This