Dinner

Easy Crustless Tomato Pie Simple and Flavorful Dish
If you’re looking for a delicious and simple dish, this Easy Crustless Tomato Pie is a winner. Bursting with flavor and fresh ingredients, it’s perfect
Savory Chicken Lazone Flavor-Packed Dinner Delight
Are you ready to dive into a flavor-packed dish that will take your dinner game to the next level? Chicken Lazone offers tender chicken smothered
![- Ripe tomatoes: Choose firm, juicy tomatoes. Varieties like heirloom or vine-ripened work best. They bring rich flavor and moisture to your pie. - Types of cheeses: This recipe uses three cheeses. Mozzarella gives a lovely melt, ricotta adds creaminess, and Parmesan adds a salty bite. You can mix and match to suit your taste. - Essential herbs and spices: Fresh herbs make a big difference. Use basil for sweetness and thyme for earthiness. Garlic adds depth, while salt and pepper enhance the flavors. - Suggested additions: If you want to mix it up, add crispy bacon or caramelized onions. They add a savory kick that pairs nicely with the tomatoes. - Seasoning options: Feel free to experiment! Try adding Italian seasoning or a sprinkle of smoked paprika. A pinch of red pepper flakes gives a nice heat. - Variations in cheese types: You can swap ricotta for goat cheese or use cheddar instead of mozzarella. Each cheese brings its own unique flavor to the pie. For the complete recipe, check out the Full Recipe section. To start, let's pre-bake the pie crust. Take your pre-made crust and press it into a 9-inch pie dish. Use a fork to prick the bottom. This helps prevent bubbling. Bake it at 375°F (190°C) for about 10 minutes. You want it lightly golden. Once done, let it cool for a bit. Next, mix the cheese and herb filling. In a medium bowl, combine ricotta cheese, half a cup of mozzarella, and Parmesan cheese. Add chopped basil, thyme, minced garlic, olive oil, salt, and pepper. Stir it well until creamy. This mix adds great flavor to the pie. Now, arrange the tomatoes in the crust. Start by layering half of the sliced tomatoes at the bottom. Sprinkle a bit of salt and pepper over the tomatoes. This seasoning is key for flavor. Then, spread the ricotta mixture evenly over this layer. After that, add the rest of the tomato slices on top. Finish the layers with the remaining mozzarella cheese. Sprinkle it evenly across the top. If you like a kick, add a pinch of red pepper flakes. This step adds a nice spice to the pie. For baking, place the pie in the preheated oven. Bake it for 30 to 35 minutes. Look for the cheese to turn golden and bubbly. The tomatoes should also be tender. These signs show the pie is done. Once out of the oven, let it cool for about 10 minutes before slicing. Enjoy your flavorful creation! If you're interested in more details, you can check the Full Recipe. Choosing the right tomatoes: Use ripe, juicy tomatoes for the best flavor. Varieties like Roma or heirloom work well. Look for tomatoes that feel heavy and have a rich color. Avoid ones with blemishes or soft spots. Fresh, in-season tomatoes give the pie a sweet taste. How to avoid a soggy crust: To prevent a soggy crust, pre-bake it. This step helps set the base. After fitting the crust into your pie dish, poke holes in the bottom with a fork. Bake it at 375°F (190°C) for about 10 minutes. Let it cool slightly before adding the filling. Ideal accompaniments to enhance flavors: Serve your tomato pie warm with a fresh garden salad. A light vinaigrette pairs well. You can also add crusty bread or a side of roasted vegetables for more texture. These sides balance the rich cheese and tomatoes. Recommended garnishes for presentation: Garnish each slice with fresh basil leaves for color and flavor. Drizzle a bit of olive oil on top for shine. You can also sprinkle grated Parmesan cheese before serving. These small touches make the dish pop visually. Common mistakes to avoid: Don’t skip the pre-baking step. This is key for a firm crust. Also, avoid overloading the pie with too many tomatoes. Stick to the recipe for balanced flavors. Lastly, let the pie cool before slicing to avoid messy pieces. How to customize the recipe: Feel free to mix in some caramelized onions or cooked bacon. You can swap cheeses too, using feta or goat cheese for a twist. Adjust herbs based on what you like. Experimenting will help you find your perfect blend. {{image_2}} Classic tomato pie is all about fresh tomatoes and creamy cheese. The Southern-style version shines with its buttery crust, ripe tomatoes, and a rich blend of cheeses. You often find it topped with basil and sometimes a sprinkle of sugar to balance the acidity of the tomatoes. In many Southern homes, this dish is a summer staple. Italian influences bring a different flair. In Italy, you might see tomato pie made with a flaky pastry and regional cheeses. It often includes herbs like oregano and fresh garlic, giving it a robust flavor. Each region uses local ingredients, creating unique versions worth trying. Not everyone needs a traditional crust. For gluten-free folks, a chickpea or almond flour crust works well. You can also use cauliflower to make a low-carb alternative. If you want a vegan twist, swap out the cheese for plant-based options. Vegan ricotta or cashew cream can add creaminess without dairy. Nutritional yeast can give a cheesy flavor, which many find delightful. The beauty of tomato pie lies in its versatility. You can experiment by adding different vegetables. Spinach, zucchini, or bell peppers can enhance the dish's flavor and nutrition. Want a creative twist? Try adding pesto for a burst of flavor or some roasted garlic for depth. You could even throw in some artichoke hearts or sun-dried tomatoes for a gourmet touch. The possibilities are endless! To keep your tomato pie fresh, you have two main options: refrigeration and freezing. - Refrigeration: If you plan to eat the pie within a few days, store it in the fridge. Cover it with plastic wrap or foil. This keeps the pie moist and prevents it from absorbing other smells. - Freezing: If you want to save it for later, freezing is best. Wrap the pie tightly in plastic wrap, then place it in a freezer bag. This can keep your pie tasty for up to three months. When it’s time to enjoy your frozen pie, let it thaw in the fridge overnight. To reheat, place it in a preheated oven at 350°F (175°C) for about 20-25 minutes. Check that the center is warm. This method helps the crust stay crisp. In the fridge, your tomato pie lasts about 3 to 5 days. After that, it may not taste good anymore. Look for signs that the pie has gone bad: - An off smell - Mold on the crust or filling - A change in texture If you see any of these signs, it's best to throw it away. If you want to save time, you can prepare your tomato pie ahead of time. Make the filling and crust in advance, then assemble and bake when ready. Freezing portions is also a smart idea. Cut the pie into slices before freezing. This way, you can enjoy a single slice anytime. Just reheat as needed. For the complete recipe, check out the [Full Recipe]. Tomato pie is a savory dish made with fresh tomatoes and cheese. It often has a flaky crust. This dish comes from the South, where tomatoes grow well. People have enjoyed it for many years, especially in summer. You can find tomato pie in many family cookbooks. It combines the flavors of summer tomatoes with creamy cheese. Yes, you can prepare tomato pie ahead of time. Make it up to a day before serving. Just bake it and let it cool. After cooling, cover it and place it in the fridge. When ready to eat, simply reheat it. You can also serve it cold if you like. The best tomatoes for tomato pie are ripe and juicy. Varieties like beefsteak, heirloom, and Roma work well. Choose tomatoes that are firm but slightly soft. The ripeness adds to the flavor. Avoid using very watery tomatoes, as they can make the crust soggy. For the best taste, try to pick tomatoes at their peak ripeness. Tomato pie is a tasty dish made with fresh tomatoes, cheese, and herbs. You learned how to select ripe tomatoes and choose the right cheeses. The step-by-step guide showed you how to layer ingredients for the best flavor. Also, tips helped to avoid a soggy crust and suggested tasty sides. You can try fun variations or adapt the recipe to fit your needs. Remember to store any leftovers safely. Enjoy making your own tomato pie. It’s a rewarding dish that can impress anyone.](https://tossedrecipes.com/wp-content/uploads/2025/06/4027f49a-9152-40fc-ae46-5c6a85aec748.webp)
Tomato Pie Delightful Recipe for a Flavorful Meal
Are you ready to take your taste buds on an adventure? Tomato Pie is a delicious dish that showcases fresh, ripe tomatoes in a way

Extra Crispy Buttermilk Fried Chicken Delight
Get ready to indulge in Extra Crispy Buttermilk Fried Chicken like never before! With a juicy, flavorful interior and a delightfully crunchy exterior, this fried
. - Use potato starch for an ultra-crispy coating. - Ensure the oil temperature is consistent during frying. To get that perfect crunch, potato starch is your best friend. This starch gives a light and crispy texture that you won't find with regular flour. It absorbs moisture while frying, creating a lovely crisp shell. Keeping the oil temperature steady is key too. If the oil is too cool, the chicken will soak up oil and become greasy. If it's too hot, the coating can burn before the chicken cooks. Aim for about 180°C (350°F). A thermometer helps keep it just right. - Overcrowding the pan which leads to soggy chicken. - Not allowing chicken to marinate long enough. One common mistake is overcrowding the pan. When you add too many chicken pieces at once, the temperature drops. This results in soggy chicken instead of crispy. Fry in small batches to keep the heat steady. Another mistake is rushing the marinating process. Marinate the chicken for at least 30 minutes. If you have time, go for 2 hours. This longer marination helps the flavors soak in, making the chicken juicy and tasty. - Complement with sides like rice, salad, or pickles. - Pair with dipping sauces like mayonnaise or spicy sauce. When serving, think about sides that balance your meal. Steamed rice, a fresh salad, or tangy pickles make great companions. They add freshness and texture to the crispy chicken. Don’t forget the sauces! Creamy mayonnaise or a spicy dipping sauce can elevate the dish. These options allow everyone to customize their bites. For ideas, check out the Full Recipe for more pairings. {{image_2}} You can switch up the marinade to fit your taste. For a spicy kick, add chili paste or sriracha. These will make your chicken burst with heat. If you prefer sweet, try using honey or increase the mirin. This will add a rich, sweet layer to the dish. You can also play with the type of chicken you use. Swap chicken thighs for chicken breast if you want a leaner dish. Both options taste great in this recipe. You can also experiment with different starches or flours for the coating. Cornstarch, rice flour, or even breadcrumbs can change the texture. How you serve your chicken can change the meal. Try it as a sandwich with your favorite toppings. You can also wrap it in lettuce for a fresh, crunchy bite. Another idea is to add it to a rice bowl with veggies and sauce. Each option offers a new way to enjoy this crispy delight. After enjoying your Japanese fried chicken, store any leftovers in an airtight container. This keeps the chicken fresh. You can refrigerate it for up to 3 days. Make sure to let it cool before sealing it up. This helps keep the flavor and moisture locked in. When it’s time to eat your leftovers, reheating is key. The best way to do this is in an oven or air fryer. Both methods help restore the crispiness you love. Set the oven to 180°C (350°F) and warm the chicken for about 10-15 minutes. If using an air fryer, heat it at the same temperature for about 5-8 minutes. This will bring back that crunchy texture. If you want to save your fried chicken for later, freezing is a great option. Place the cooked chicken in a freezer-safe bag. Remove as much air as possible before sealing. You can freeze it for up to 1 month for future meals. When ready to eat, thaw in the fridge overnight before reheating. Japanese fried chicken, or karaage, is a popular dish in Japan. It features marinated chicken pieces, deep-fried until crispy. This dish symbolizes comfort food in Japanese culture, often served at home or festivals. The marinade usually includes soy sauce, garlic, and ginger, giving it a savory taste. The crispy coating adds texture, making it a favorite among many. Yes, you can prepare Japanese fried chicken ahead of time. Marinate the chicken and coat it, then store it in the fridge. Fry it just before serving for the best results. If you have leftovers, refrigerate them in an airtight container. They will stay fresh for up to three days. When serving Japanese fried chicken, consider these tasty sides: - Steamed rice or fried rice - Fresh salad with a light dressing - Pickled vegetables for a crunchy contrast - Miso soup for a comforting touch - Cold beer or green tea to drink To get the crispiest chicken, follow these tips: - Use potato starch for the coating; it makes a great crunch. - Heat the oil to 180°C (350°F) before frying. - Fry in small batches. This keeps the oil hot and the chicken crispy. - Let the chicken rest on paper towels to drain excess oil. Japanese fried chicken and KFC differ in many ways: - Flavor: Karaage has a savory, umami flavor from the marinade, while KFC is often more seasoned. - Coating: Karaage uses potato starch, making it lighter and crispier than KFC's breaded coating. - Preparation: Japanese fried chicken is marinated first, while KFC has a secret blend of spices. For a full recipe on making this delicious dish, check out the [Full Recipe]. This recipe for Japanese Fried Chicken combines tender chicken thighs with a crispy coating. Marinating enhances the flavors, while simple frying techniques ensure perfect texture. Use potato starch for extra crunch, and avoid overcrowding the pan to keep each piece crispy. You can also explore different marinades and serving options to customize your dish. Remember to store any leftovers properly for delicious meals later. With these tips, you’ll create a crowd-pleasing dish every time. Enjoy your cooking and the tasty results it brings!](https://tossedrecipes.com/wp-content/uploads/2025/06/dc137012-94de-46b7-9848-0106089a4693.webp)
Japanese Fried Chicken Crispy Delight for Everyone
Are you ready to indulge in a crispy treat? Japanese Fried Chicken, or Karaage, is a beloved dish that combines juicy chicken with a crunchy

Baked Salmon Foil Packs Quick and Easy Dinner Delight
If you need a quick and tasty dinner, Baked Salmon Foil Packs are a must-try! These packs are easy to make and keep clean-up simple.
![Here’s what you need for a tasty Tomato Galette: - 1 ½ cups all-purpose flour - ½ teaspoon salt - ¼ teaspoon black pepper - ½ cup unsalted butter, chilled and cubed - 5-6 tablespoons ice water - 4 medium ripe tomatoes, sliced - 1 cup fresh mozzarella cheese, torn into chunks - ¼ cup fresh basil leaves, chopped - 1 tablespoon balsamic glaze - Salt and pepper to taste - 1 egg, beaten (for egg wash) These ingredients create a perfect balance of flavors. When choosing tomatoes, look for ripe ones. They add sweetness and moisture to your galette. Fresh mozzarella gives a creamy texture that pairs well with the tomatoes. Basil adds a fresh touch, enhancing the dish's overall taste. The balsamic glaze offers a nice tang. It brings everything together, making each bite a delight. The egg wash gives the crust a beautiful golden color. This galette is not just easy to make; it’s a feast for the eyes and the palate. For the full recipe, check out the instructions included above. Enjoy the cooking experience! To start, gather your dry ingredients. In a large bowl, mix together 1 ½ cups of all-purpose flour, ½ teaspoon of salt, and ¼ teaspoon of black pepper. This mix will add flavor to your crust. Next, you need to incorporate the butter. Cut ½ cup of chilled, cubed unsalted butter into the flour mix. Use your fingers or a fork to mash it until it looks like coarse crumbs. Now, it's time to add ice water. Gradually mix in 5-6 tablespoons of ice water, one tablespoon at a time. Stop mixing when the dough holds together. Shape the dough into a disk. This makes it easier to roll out later. Wrap the disk tightly in plastic wrap. Place it in the fridge for at least 30 minutes. Chilling helps the butter firm up and makes the dough flaky. While your dough chills, prepare the filling. Slice 4 medium ripe tomatoes. Place the slices on a paper towel. This step helps absorb excess moisture. Sprinkle the tomato slices lightly with salt and let them sit for about 10 minutes. This draws out some water and keeps your galette crisp. Once your dough is chilled, roll it out. On a lightly floured surface, roll the dough into a 12-inch round circle. Transfer the rolled dough to a parchment-lined baking sheet. Now, layer the fillings. Start from the center and add 1 cup of torn fresh mozzarella cheese, followed by the tomato slices. Overlap them slightly, leaving a 2-inch border around the edges. Sprinkle with chopped basil and drizzle with 1 tablespoon of balsamic glaze for added flavor. Preheat your oven to 400°F (200°C). While it heats, fold the edges of the dough over the filling. Pleat it as you go for a rustic look. Brush the edges with a beaten egg to give them a golden color while baking. Bake the galette for 30-35 minutes. You want the crust to be golden brown and the tomatoes tender. After baking, let the galette cool slightly before slicing. This helps the filling set. For a beautiful presentation, serve it warm on a wooden board. Garnish with extra basil leaves for a fresh touch. You can also add a simple green salad for a tasty meal. For the full recipe, check the section above. Using chilled ingredients is key for a flaky crust. Cold butter and water help keep the dough firm. When you mix the dough, avoid overmixing. Stop when you see small crumbs. This way, the dough stays light and airy. For the best flavor, choose heirloom or Roma tomatoes. They are juicy and sweet, perfect for baking. In summer, use fresh garden tomatoes. In fall, you may find delicious varieties at local markets. Always select ripe tomatoes for a great taste. A savory tomato galette pairs well with a fresh salad. Try a simple green salad with light dressing. For drinks, a crisp white wine or iced tea works nicely. These choices balance the rich flavors of the galette. {{image_2}} You can switch up the cheese in your tomato galette. If you want a different taste, try these alternatives to mozzarella: - Goat cheese for a tangy flavor - Feta cheese for a crumbly texture - Gruyère for a nutty touch If you need vegan cheese suggestions, consider: - Cashew cheese for a creamy base - Vegan mozzarella, which melts well - Nutritional yeast for a cheesy flavor without dairy Adding vegetables can boost flavor and nutrition. Some great choices are: - Sliced zucchini for a mild taste - Bell peppers for sweetness - Spinach for a pop of color You can also enhance flavor with spices and herbs. Consider these options: - Oregano for a classic touch - Red pepper flakes for heat - Garlic powder for depth Make the most of seasonal produce! In summer, use fresh basil and ripe tomatoes. Try these ideas for fall: - Swap tomatoes for roasted squash - Add caramelized onions for sweetness - Use thyme for an earthy flavor Choosing seasonal ingredients not only enhances the dish but also supports local farms. For the full recipe, check out the complete guide to creating a savory tomato galette. To keep your galette fresh, store leftovers in the fridge. Use an airtight container for best results. This method helps maintain the flavor and texture of the tomatoes. The galette will stay good for about three days. When it's time to enjoy your galette again, the oven works best. Preheat it to 350°F (175°C). Place the galette on a baking sheet. Heat for about 10-15 minutes. This keeps the crust crispy and the filling warm. You can also use a toaster oven if you have one. If you want to save some galette for later, freezing is a great option. First, let it cool completely. Wrap the galette tightly in plastic wrap. Then, place it in a freezer bag. It can last up to three months in the freezer. When you're ready to eat, let it thaw in the fridge overnight. Preheat your oven to 375°F (190°C). Bake the thawed galette for 20-25 minutes. This way, you'll enjoy that delightful crispy crust again! For the full recipe and more details, check out the [Full Recipe]. A tomato galette is a free-form tart filled with fresh tomatoes. It has a flaky crust and a savory filling. The galette offers a rustic look. You can use various tomato types for flavor. I love using ripe, juicy tomatoes for the best taste. The cheese adds creaminess, while herbs bring freshness. Yes, you can prepare the dough ahead. After mixing, shape it into a disk. Wrap the disk in plastic wrap. Store it in the fridge for up to two days. This way, you save time on busy days. Just remember to let it sit at room temperature for a few minutes before rolling it out. To avoid a soggy crust, use fresh tomatoes. Slice them and let them sit on paper towels. This helps remove excess moisture. You can also sprinkle salt lightly on the tomatoes. This step draws out more water. Lastly, bake the galette right away after assembling for the best crust. The tomato galette pairs well with many sides. A simple green salad works great. You can also serve it with roasted veggies. For a heartier meal, try a quiche or frittata. A light soup can also complement the galette nicely. Choose sides that balance the flavors. Yes, you can make a gluten-free tomato galette. Use gluten-free all-purpose flour in the dough. There are many great blends available. Make sure to check for good binding agents. These help keep the galette from falling apart. Your final dish will still be tasty! A tomato galette lasts for about three days in the fridge. Store it in an airtight container. For the best taste, eat it within two days. Reheat slices in the oven to keep the crust crispy. You can also freeze it for up to a month. Absolutely! If you don’t have balsamic glaze, try olive oil instead. Drizzle it over the tomatoes before baking. You can also use a splash of lemon juice for brightness. For a sweet touch, honey or a fruit glaze works too. Feel free to get creative! You have learned how to make a delicious Tomato Galette. We covered the ingredients, step-by-step instructions, and helpful tips for success. Remember to choose fresh tomatoes and chill the dough to get the best crust. Feel free to experiment with different cheeses and add your favorite veggies. Store leftovers properly to keep them tasty. This galette is not just a dish; it is a canvas for your creativity. Try it out and enjoy your cooking!](https://tossedrecipes.com/wp-content/uploads/2025/06/0fd8e3d5-add3-4782-bf89-d5a02dbac95c.webp)
Savory Tomato Galette Quick and Easy Delight
Are you ready to impress your family and friends with a delicious Tomato Galette? This savory dish combines fresh tomatoes, gooey mozzarella, and a flaky
![Here are the ingredients you will need for Tomato Pie Delight: - 2 cups fresh tomatoes, sliced - 1 cup mozzarella cheese, shredded - 1 cup ricotta cheese - 1/2 cup grated Parmesan cheese - 1/4 cup fresh basil, chopped - 1 tablespoon olive oil - 1 garlic clove, minced - 1 teaspoon dried oregano - 1 teaspoon salt - 1/2 teaspoon black pepper - 1 9-inch pie crust (store-bought or homemade) Feel free to add your own touch! Here are some optional ingredients: - Spinach for extra greens - Zucchini for a different texture - Feta cheese for a tangy twist - Additional herbs like thyme or rosemary This recipe allows you to be creative. Swap in your favorite flavors to make it your own! For the full recipe, check out the instructions above. To make Tomato Pie Delight, follow these easy steps. 1. Preheat Oven and Prepare Pie Crust First, set your oven to 375°F (190°C). Next, take your pie crust and place it in a 9-inch pie dish. Bake the crust for about 10-12 minutes. You want it lightly golden. Once done, remove it from the oven and let it cool a bit. 2. Layering Ingredients Technique Start layering your ingredients. Begin with half of the sliced tomatoes. Spread them evenly in the pie crust. Then, take your ricotta mixture and spread it over the tomatoes. Next, add half of the mozzarella and Parmesan cheese. Top this with the rest of the sliced tomatoes. Finish by sprinkling the remaining mozzarella and Parmesan on top. 3. Baking Time and Tips for Monitoring Now, drizzle olive oil over the top and add the chopped basil. Place the pie in the oven and bake for 30-35 minutes. Watch for the cheese to bubble and turn golden brown. When done, take it out and let it cool for 10 minutes before slicing. Follow these steps for a delicious Tomato Pie Delight. For full details, check the Full Recipe. Enjoy! Choosing the Best Tomatoes for Flavor For the best taste, use fresh, ripe tomatoes. Varieties like heirloom, beefsteak, or vine-ripened work well. They have a rich flavor that shines through in every bite. Look for tomatoes that feel heavy for their size and have smooth skin. Avoid any that are bruised or too soft. Cheese Substitutions and Recommendations While mozzarella gives a great melt, you can swap it for provolone or gouda. Ricotta adds creaminess, but you can use cottage cheese if you like. For a tangy kick, feta cheese is also a good choice. Just remember to adjust the salt, as some cheeses are saltier than others. How to Achieve a Flaky Pie Crust For a flaky pie crust, keep your ingredients cold. Use chilled butter or shortening, and ice water when mixing. Don't overwork the dough; mix until just combined. If using a store-bought crust, let it sit at room temperature for a few minutes before baking. This helps it bake evenly and prevents shrinkage. Feel free to explore more tips in the [Full Recipe]. {{image_2}} You can easily change the flavors in your Tomato Pie Delight. Here are some great ideas: - Adding Vegetables: Spinach or Zucchini Adding greens like spinach or thin slices of zucchini makes the pie healthier. Spinach adds a nice color and flavor. Zucchini brings a mild taste and great texture. Just sauté them briefly before adding to the pie. - Different Cheeses: Feta or Goat Cheese If you want a different cheese flavor, try feta or goat cheese. Feta gives a salty kick that pairs well with tomatoes. Goat cheese adds a creamy texture and tang. You can mix these with mozzarella for a unique taste. - Seasoning Variations: Adding Spices or Herbs Spices or herbs can change the whole dish. Try adding red pepper flakes for heat, or smoked paprika for a smoky flavor. Fresh herbs like thyme or dill can also enhance the taste. Just sprinkle them in the ricotta mix or on top before baking. These variations let you make the Tomato Pie Delight truly your own. You can create a dish that fits your tastes. For the full recipe, check out the details above. After enjoying your Tomato Pie Delight, you may have some left. Storing it properly keeps it fresh and tasty. - Refrigeration Guidelines: Allow the pie to cool completely. Once cool, wrap it tightly in plastic wrap or aluminum foil. You can also place it in an airtight container. Store it in the fridge for up to three days. - Freezing Tomato Pie Delight: Step-by-Step: If you want to save it longer, freezing is a great option. First, let the pie cool completely. Then, slice it into pieces. Wrap each slice in plastic wrap. Place the wrapped slices into a freezer bag or container. Be sure to label it with the date. It will stay good for up to three months in the freezer. - Reheating Instructions for Best Results: When you're ready to eat your leftovers, the best way to reheat is in the oven. Preheat the oven to 350°F (175°C). Remove the plastic wrap from the pie or slices and place them on a baking sheet. Heat for about 15-20 minutes, or until warmed through. You can also use a microwave, but the oven keeps the crust crispy. Enjoy your delicious Tomato Pie Delight again! Can I make Tomato Pie Delight Ahead of Time? Yes, you can! Prepare the pie, but do not bake it. Wrap it well and store it in the fridge for up to 24 hours. When ready to eat, bake it right from the fridge. This keeps the flavors fresh and tasty. What is the Best Way to Serve Tomato Pie Delight? Serve it warm for the best taste. I like to garnish it with fresh basil leaves. Pairing it with a simple side salad adds crunch and balance. You can also cut it into slices for easy serving. Can I Use Canned Tomatoes Instead of Fresh? You can use canned tomatoes, but fresh ones taste best. If you use canned, drain them well to avoid a soggy pie. The flavor of fresh tomatoes shines in this dish, so try to use them when possible. For the full recipe of Tomato Pie Delight, check the earlier section. Enjoy your cooking! This article covered how to make a tasty Tomato Pie Delight. We discussed ingredients and precise measurements, along with tips for perfecting your dish. I shared ways to personalize it with extra veggies and cheeses and storage methods for leftovers. Remember, you can prepare this dish ahead of time and even swap fresh tomatoes for canned ones. Experiment and enjoy each bite. Happy cooking!](https://tossedrecipes.com/wp-content/uploads/2025/06/a2f9e63a-717e-426e-95fb-dc2b02afd1e2.webp)
Tomato Pie Delight Flavorful and Easy Recipe
If you’re craving a comforting dish that’s bursting with flavor, you’ll love this Tomato Pie Delight recipe! It’s simple to make and perfect for anyone,
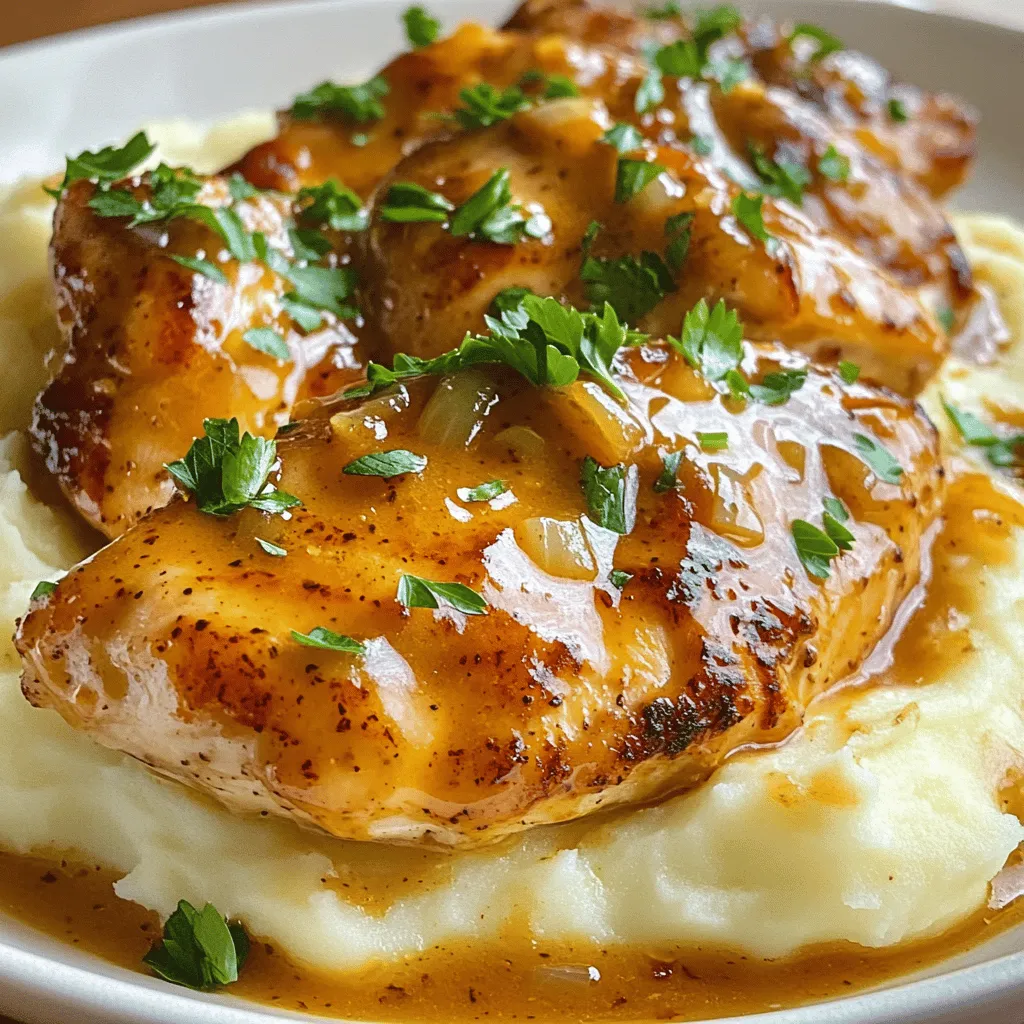
![For this Garlic Cheddar Chicken Breast, you need simple, quality ingredients. First, use four boneless, skinless chicken breasts. They are easy to cook and stay juicy. Choose fresh ones for the best taste. Next, garlic is key. Use four cloves minced for strong flavor. The cheese is just as vital. A cup of shredded sharp cheddar gives a rich, creamy taste. It melts beautifully over the chicken and adds a nice golden color. Seasoning makes this dish shine. The marinade includes one teaspoon of smoked paprika. This spice adds warmth and a hint of smoke. You’ll also need one teaspoon of dried thyme. It brings a lovely, earthy note that complements the chicken well. For extra flavor, mix in half a teaspoon of salt and black pepper. Adjust these to your taste. If you want more garlic flavor, feel free to add garlic powder to the mix. Garnishes add a nice touch and color. Fresh parsley works great as a bright finish. Just chop some and sprinkle it on top before serving. For a crunchy side, consider colorful veggies like roasted bell peppers or steamed broccoli. They not only taste good, but also make your plate look vibrant. Try these ideas to elevate your Garlic Cheddar Chicken Breast experience. For the full recipe, check the entire article. Start by marinating your chicken breasts. In a bowl, mix minced garlic, smoked paprika, dried thyme, olive oil, salt, and black pepper. This blend gives your chicken flavor. Place the chicken breasts in a baking dish. Pour the marinade over the chicken. Make sure each piece is coated well. An even coating helps the chicken absorb all those tasty flavors. Preheat your oven to 375°F (190°C). This temperature cooks the chicken just right. Cover your baking dish with aluminum foil. This keeps moisture in, making the chicken juicy. Bake the chicken for 25 minutes. After that, remove the foil. Bake for an extra 10-15 minutes. The chicken should reach an internal temperature of 165°F. This means it’s safe to eat. The cheese on top should be bubbly and golden brown. Once the chicken is done, let it rest for 5 minutes. This helps the juices settle. It makes the chicken more tender. For serving, sprinkle fresh chopped parsley on top. This adds a pop of color and flavor to your dish. Enjoy your Garlic Cheddar Chicken Breast with sides like rice or a salad. For the full recipe, refer to the main section above. To enhance the taste, you can customize the garlic and cheese. If you love garlic, add more cloves. For cheese, try a mix of cheddar and mozzarella for a creamier texture. It’s all about what you like! Resting time is key, too. After baking, let the chicken sit for five minutes. This step helps keep the juices inside. It makes each bite tender and tasty. For juicy chicken, I suggest using a meat thermometer. Cook the chicken until it reaches 165°F. This ensures it stays moist. Also, avoid overcooking, as it can dry out the meat. To get a crispy cheese topping, broil the chicken for a few minutes after baking. Watch closely to prevent burning. You want that golden, bubbly cheese that everyone loves! A good baking dish is crucial. I recommend a glass or ceramic dish. These materials help heat the chicken evenly. You will need some essential kitchen tools. A sharp knife for cutting, a mixing bowl for the marinade, and a meat thermometer are must-haves. With these tools, you’ll make this dish with ease! For the [Full Recipe], refer back to the main article. Enjoy your cooking! {{image_2}} You can play with flavors in your Garlic Cheddar Chicken Breast. Here are two great ideas: - Adding spices for a kick: Want more heat? Try adding cayenne pepper or chili flakes to your marinade. This extra spice gives your dish a nice buzz. You could also add Italian herbs, like oregano or basil, for a fresh twist. - Substituting proteins: If you want to switch it up, try using turkey or pork. Both cook well and take on the flavors nicely. You can even use tofu for a vegetarian option. Just make sure to adjust the cooking time based on what protein you choose. Eating healthy can still be tasty. Here are a couple of ways to lighten up this dish: - Low-fat cheese options: Use reduced-fat cheddar cheese instead of regular cheese. It melts well and still gives you that cheesy flavor. You can also try mozzarella for a milder taste. - Marinating alternatives: Instead of oil-based marinades, try using Greek yogurt. It keeps chicken moist and adds a creamy texture. Mix it with garlic and herbs for a flavorful base. Make your meal shine with these serving tips: - Creative side dishes: Pair your chicken with steamed veggies or a fresh salad. Roasted sweet potatoes or quinoa also make great sides. These dishes add color and nutrition to your plate. - Presentation tips: For a fancy touch, slice the chicken and fan it out on the plate. Drizzle some balsamic glaze or a herb sauce over the top. Lastly, sprinkle fresh parsley for a pop of green. These small details make your dish stand out. For the full recipe, check the recipe section above and enjoy creating your Garlic Cheddar Chicken Breast! To keep your Garlic Cheddar Chicken Breast fresh, follow these steps: - Refrigeration Guidelines: Store the chicken in an airtight container. It will stay good in the fridge for up to 3 days. Make sure it cools to room temperature before sealing. This helps prevent condensation. - Freezing Instructions: If you want to freeze leftovers, wrap the chicken tightly in plastic wrap, then place it in a freezer bag. It can last for about 3 months. To enjoy later, thaw it overnight in the fridge. When it's time to enjoy your delicious chicken again, reheating is key: - Best Methods for Reheating: The oven is the best choice for reheating. Preheat your oven to 350°F (175°C). Place the chicken in a baking dish and cover with foil. Heat for about 15–20 minutes until warm. - Maintaining Moisture and Flavor: To keep the chicken juicy, add a splash of chicken broth or water to the dish before covering. This helps steam the chicken and keeps it moist. Enjoy the rich taste of the garlic and cheddar! How to know when chicken is cooked? You can check if chicken is cooked by using a meat thermometer. The internal temperature should reach 165°F (75°C). If you don’t have a thermometer, cut into the thickest part of the chicken. The meat should be white, not pink, and the juices should run clear. Can I use skin-on chicken breasts? Yes, you can use skin-on chicken breasts. They will add more flavor and moisture. Just adjust the baking time slightly, as skin-on breasts may take a bit longer to cook. Can I make this dish ahead of time? Yes, you can prepare Garlic Cheddar Chicken Breast ahead of time. Marinate the chicken and cover it. Store it in the fridge for up to 24 hours. Bake just before serving for the best results. What sides pair well with Garlic Cheddar Chicken Breast? Great sides include roasted vegetables, mashed potatoes, or a fresh salad. These options balance the rich flavors of the chicken and add color to your plate. What to do if the cheese burns? If the cheese burns, you can scrape off the burnt parts gently. Try covering the dish with foil while baking to prevent burning. Also, reduce the oven temperature slightly if needed. Best chicken breast cooking methods? The best methods for cooking chicken breasts include baking, grilling, and sautéing. Baking gives even cooking and retains moisture. Grilling adds a nice char, and sautéing cooks quickly while keeping the chicken juicy. For detailed steps, check the Full Recipe. In this post, we explored how to prepare Garlic Cheddar Chicken Breast. We covered the main ingredients, such as chicken, garlic, and cheese. Then, we detailed the baking process, seasoning tips, and finishing touches for the best flavor. Remember, resting the chicken enhances its juiciness. Feel free to customize the recipe with spices or use different cheeses. With proper storage and reheating tips, you can enjoy this dish later. Get creative with your plating and side dishes for a vibrant meal. Enjoy your cooking journey!](https://tossedrecipes.com/wp-content/uploads/2025/06/9ff0f54f-b2b1-4e36-9eba-66825a511601.webp)
Garlic Cheddar Chicken Breast Simple and Flavorful Dish
If you’re looking for a simple yet flavorful dish, try making Garlic Cheddar Chicken Breast. This recipe combines tender chicken with rich garlic and creamy
![- 4 boneless, skinless chicken breasts - 1 cup grated Parmesan cheese - 1 cup breadcrumbs (preferably panko) - 2 teaspoons garlic powder - 1 teaspoon dried oregano - 1 teaspoon paprika - Salt and pepper to taste - 2 large eggs - 2 tablespoons Dijon mustard - Olive oil spray or melted butter - Fresh parsley for garnish To make Parmesan crusted chicken, you need simple ingredients. The star is the chicken breast, which is lean and versatile. I love using panko breadcrumbs for extra crunch. They give the crust a great texture. Parmesan cheese adds a rich, savory flavor that makes this dish shine. Spices like garlic powder, oregano, and paprika bring warmth and depth to the dish. Don’t forget the salt and pepper; they enhance all the flavors. The eggs and Dijon mustard create a nice coating for the breadcrumbs. You can use olive oil spray or melted butter to help the crust brown beautifully. Lastly, fresh parsley adds a pop of color. It makes the dish look appealing when you serve it. For the full recipe, check out the detailed steps to bring this flavorful dish to life! - Set the temperature to 400°F (200°C). - Prepare the baking sheet with parchment paper or a silicone mat. - Combine 1 cup of grated Parmesan cheese, 1 cup of breadcrumbs, 2 teaspoons of garlic powder, 1 teaspoon of dried oregano, 1 teaspoon of paprika, and salt and pepper to taste in a large bowl. Mix well until everything is even. - In another bowl, whisk together 2 large eggs and 2 tablespoons of Dijon mustard until smooth. - Dip each chicken breast in the egg mixture. Make sure it is fully coated. - Then, dredge it in the breadcrumb mixture. Press lightly so the crumbs stick well. Repeat this for all the chicken breasts. - Place the coated chicken breasts on the prepared baking sheet. - Lightly spray with olive oil or drizzle melted butter over the tops to help with browning. - Bake in the preheated oven for 25-30 minutes. - Check that the internal temperature reaches 165°F (74°C) and that the crust is golden and crispy. - Once done, remove the chicken from the oven. Let it rest for 5 minutes. - Garnish with freshly chopped parsley before serving. You can find the complete recipe in the [Full Recipe] section. To get that perfect crispy crust, use panko breadcrumbs. Panko is lighter and airier than regular breadcrumbs. This creates a crunchier texture. The coating also matters. A good dip in the egg mixture helps the crumbs stick. The more crumbs that adhere, the better the crunch. Spices can really boost the flavor. I like to add garlic powder, paprika, and oregano. These spices give depth to the dish. Fresh herbs are also great. Chopped parsley or basil can add freshness. Just sprinkle them on top right before serving. To make a great meal, pair the chicken with sides. I recommend a fresh green salad or steamed veggies. These sides balance the richness of the chicken. For presentation, serve the chicken on a warm platter. Add lemon wedges for a pop of color and flavor. Garnish with extra parsley for a nice touch. You can find the full recipe to try at home. {{image_2}} To make this dish even tastier, add fresh herbs to the breading. You can use basil, thyme, or rosemary. Just chop them finely and mix them in with the breadcrumbs and cheese. The herbs bring a bright and fresh flavor that really shines. If you like some heat, try adding red pepper flakes or a splash of hot sauce. Mix these into the egg wash or sprinkle them into the breading. This small change gives the chicken a nice kick. You will enjoy the balance of spicy and savory. You can choose how you cook your Parmesan crusted chicken. Baking gives it a lovely, golden crust. Air frying makes it crispier and faster. Both methods work well, but the air fryer may cut down the cook time. Just check that the chicken reaches 165°F for safety. For the full recipe, check out the details above. Enjoy exploring these tasty variations! To store leftovers, let the chicken cool first. Place it in an airtight container. This keeps the chicken fresh and moist. Make sure to eat it within three days for the best taste. You can freeze Parmesan crusted chicken for later. Wrap each piece in plastic wrap. Then, place them in a freezer bag. Be sure to remove as much air as possible. When ready to eat, thaw in the fridge overnight. Bake in the oven until heated through. In the fridge, the chicken lasts about three days. If frozen, it can stay good for up to three months. Always check for any signs of spoilage before eating. Following these steps ensures you enjoy your meal safely! To keep your chicken juicy, you can use a few simple tips. First, brining the chicken in salt water for one hour helps. This adds moisture before cooking. You can also pound the chicken to an even thickness. This way, it cooks more evenly. Avoid cooking at too high of a temperature. A medium heat helps the chicken cook through without drying out. Lastly, always let the chicken rest after cooking. This helps the juices redistribute, keeping each bite moist. Yes, you can make Parmesan crusted chicken ahead of time! To do this, prepare the chicken and coat it with breadcrumbs. Place the coated chicken in the fridge for up to 24 hours before baking. This allows the flavors to meld together. When ready to cook, take it out of the fridge and bake as usual. You can also cook it fully and then store it. Just reheat it gently in the oven to keep the crust crispy. Absolutely! You can change some ingredients if needed. For cheese, try using Pecorino Romano or a blend of mozzarella and Parmesan. For breadcrumbs, regular breadcrumbs work, but panko gives a crunchier texture. If you want more flavor, add herbs like thyme or rosemary. You can swap Dijon mustard with honey mustard for a sweeter taste. This flexibility helps you use what you have on hand. The internal temperature of cooked chicken should reach 165°F (74°C). Using a meat thermometer is key. Insert it into the thickest part of the chicken to check. This ensures the chicken is safe to eat and not undercooked. Always let the thermometer sit for a moment to get an accurate reading. Cooking to this temperature helps avoid dry chicken and ensures it's fully cooked. In this blog post, we explored how to make a tasty Parmesan crusted chicken. We covered all the ingredients, the step-by-step instructions, and tips for making it perfect. You learned how to achieve a crispy crust and flavor it just right. Remember, you can adapt the recipe to your taste with herbs and spices. Enjoy this dish with your favorite sides, and don't forget to store the leftovers properly. Your cooking can shine with this simple recipe!](https://tossedrecipes.com/wp-content/uploads/2025/06/31884d89-a39a-479f-816e-1454682e2ec2.webp)
Parmesan Crusted Chicken Flavorful and Easy Delight
If you’re craving a meal that’s both tasty and simple to make, you’re in the right place. My Parmesan Crusted Chicken is a dish that