Dinner

To make a delicious Pizza Pot Pie, you need a few key ingredients. Here’s the list: - Store-bought or homemade pie crust - 1 cup marinara sauce - 1 cup cooked Italian sausage, crumbled - 1 cup pepperoni slices - 1 cup bell peppers, diced (any color) - 1 cup shredded mozzarella cheese - 1 cup ricotta cheese - 1 teaspoon Italian seasoning - 1 teaspoon garlic powder - Salt and pepper to taste - 1 egg (for egg wash) Each ingredient plays an important role in creating the rich flavors you expect from pizza. The crust provides a flaky base. Marinara sauce adds moisture and tang. Italian sausage and pepperoni bring savory goodness. Bell peppers add crunch and color. The cheeses create that cheesy, gooey texture we all love. When choosing your ingredients, go for fresh items whenever possible. Fresh bell peppers give a nice crunch. Make sure your sausages are cooked and crumbled for the best texture. Using quality marinara sauce enhances the overall taste. You can even make your own sauce for extra flavor. This mix of ingredients makes for a filling and tasty dinner. You can find the full recipe above. Enjoy the process of putting it all together! First, you need to preheat your oven to 400°F (200°C). This helps the pie cook evenly and get that nice, golden crust. While the oven heats, take your store-bought pie crust. If you want to make it from scratch, feel free! Unroll the crust and press it into a 9-inch pie dish. Make sure to leave some overhang. This will help seal the top crust later. In a medium bowl, mix together the marinara sauce, cooked Italian sausage, and pepperoni. Add diced bell peppers and both mozzarella and ricotta cheeses. Stir everything well. Then, season the filling with Italian seasoning, garlic powder, salt, and pepper to taste. This mix gives your pot pie that rich pizza flavor. Now it’s time to put everything together. Pour the filling into the pie crust in the dish. Spread it evenly, but don’t let it overflow. Fold the edges of the bottom crust over. Then, place the second pie crust on top. Press the edges together to seal them. Cut a few vents in the top crust. This allows steam to escape while it bakes. To give your pot pie a shiny look, you’ll need an egg wash. Beat one egg in a small bowl and brush it over the top crust. This step makes it golden and beautiful. Place the pie on a baking sheet to catch any drips. Bake it in the preheated oven for 30 to 35 minutes. You’ll know it’s ready when the crust is golden brown. For the full recipe, check the earlier section. Enjoy your delicious creation! To make a great Pizza Pot Pie, the crust matters a lot. Start with the right thickness. Aim for about 1/8-inch thick. This thickness helps it cook evenly. Thinner crusts can burn, while thicker ones may not cook through. To prevent burning, keep an eye on the pie while it bakes. If the edges brown too fast, cover them with foil. This trick helps the center cook well without overdoing the edges. For a flaky crust, use cold ingredients. Cold butter or shortening creates steam during baking. This steam leads to those lovely flaky layers. Also, avoid overworking the dough. Mix just until combined for the best texture. You can boost the taste of your Pizza Pot Pie easily. Add more seasonings like crushed red pepper for heat. You might also try fresh herbs like basil or oregano for a bright taste. When it comes to cheese blends, think beyond mozzarella. Mixing in provolone or fontina gives a creamy texture. You can even add a bit of parmesan for a salty kick. Experiment with your favorites to find the best mix. Presentation adds joy to every meal. Garnish your Pizza Pot Pie with fresh basil or parsley. This adds color and fresh flavor. A drizzle of marinara sauce on the side makes for a fun dip. For side dishes, salad pairs well. A simple green salad with vinaigrette works great. You can also serve it with garlic bread for a hearty meal. For drinks, a light beer or sparkling water complements the pie nicely. Explore the [Full Recipe] to dive into the details of making this delightful dish. {{image_2}} For a vegetarian pizza pot pie, you can swap meats for veggies. Use ingredients like: - 1 cup mushrooms, sliced - 1 cup zucchini, diced - 1 cup spinach, chopped - 1 cup artichoke hearts, quartered - 1 cup ricotta and mozzarella cheese These ingredients give a fresh twist. You can also try goat cheese or feta for a unique taste. Mix them with marinara and your favorite seasonings. This option is tasty and colorful. If you need a gluten-free pizza pot pie, there are great choices. For the crust, look for: - Gluten-free pie crusts at the store - Cauliflower crusts for a lower-carb option These crusts are easy to find. They work well with any filling. For your filling, try using: - Cooked chicken or turkey - Fresh vegetables like broccoli or carrots - A mix of cheeses, like cheddar and mozzarella These options keep the dish delicious and satisfying. Pizza pot pie can reflect local tastes. In the Midwest, you might find: - Sweet corn and sausage - A mix of cheeses, like provolone In the South, people add: - BBQ chicken and jalapeños - A sprinkle of smoked paprika for a kick Internationally, pizza pot pie adapts, too. In Italy, you could find: - Prosciutto and arugula - A drizzle of balsamic glaze These variations add a fun twist to the classic recipe. Check out the full recipe for more ideas! To keep your Pizza Pot Pie fresh, follow these steps: - Refrigeration guidelines: Store leftover pot pie in an airtight container. It will stay good for 3 to 4 days in the fridge. If you want to enjoy it later, freezing is a great option. - Freezing instructions: To freeze, wrap the pot pie tightly in plastic wrap, then place it in a freezer-safe bag. This keeps it fresh for up to 3 months. Remember to label the bag with the date. When you are ready to eat your leftovers, here’s how to make it great again: - Methods for keeping crust crispy: Preheat your oven to 375°F (190°C). Place the pot pie on a baking sheet. This helps catch any drips and keeps the bottom crust crisp. - Suggested cooking times: Heat for about 20-25 minutes. Make sure the filling warms through and the crust turns golden again. If you want a quicker option, you can use a microwave, but the crust may not stay crispy. A Pizza Pot Pie is a fun twist on classic pizza. It combines the flavors of pizza with the warmth of pot pie. This dish has a flaky crust that holds a savory filling. The filling often includes marinara sauce, cheeses, and meats like sausage and pepperoni. You can trace its origins to comfort food traditions. This dish brings together two favorites, making it a cozy meal. Yes, you can make Pizza Pot Pie ahead of time. Prepare the filling and assemble the pie, then cover it. You can store it in the fridge for up to 24 hours. If you want to keep it longer, freeze it before baking. Just remember to cover it well to prevent freezer burn. When ready to serve, bake it from frozen or let it thaw in the fridge overnight. You can use many toppings in your Pizza Pot Pie. Here are some popular choices: - Pepperoni - Cooked Italian sausage - Bell peppers (any color) - Mushrooms - Onions - Black olives - Spinach - Fresh basil Feel free to mix and match to create your favorite flavors. You can also add different cheeses like provolone or cheddar. Enjoy experimenting to find the perfect combination! For the complete recipe, check out the Full Recipe. You can create a delicious Pizza Pot Pie using simple steps. We covered the ingredients needed, from marinara sauce to cheese blends. I shared tips for crisp crusts and flavor boosts. You learned about variations, including vegetarian and gluten-free options. Finally, I provided storage and reheating advice to help you enjoy leftovers. Now you can impress your friends and family with this comforting dish. Enjoy your cooking adventure!
Pizza Pot Pie Flavorful Comfort Food Delight
Craving comfort food? Look no further than Pizza Pot Pie! This dish combines two favorites: pizza and pot pie. With a golden crust and gooey
- 4 boneless, skinless chicken thighs - 1 cup buttermilk - 1 cup all-purpose flour - 1 teaspoon paprika - 1 teaspoon garlic powder - 1 teaspoon onion powder - ½ teaspoon cayenne pepper - Salt and pepper, to taste - ½ cup hot honey (store-bought or homemade) - 2 tablespoons olive oil For this hot honey chicken, you need tender chicken thighs. They stay juicy and soak up flavors well. Buttermilk adds moisture and helps tenderize the meat. The spices mix with the flour to create a crunchy coating. Hot honey gives a sweet and spicy kick that makes this dish special. - Fresh parsley - Additional spicy toppings Garnishing with fresh parsley brightens the dish. You can also add more spicy toppings if you want extra heat. This step makes your hot honey chicken look great and taste even better. For the full recipe, check out the details above! To start, make a tasty marinade. In a bowl, combine 1 cup of buttermilk with paprika, garlic powder, onion powder, salt, and pepper. This mix adds flavor and keeps the chicken moist. Next, add the 4 boneless, skinless chicken thighs to the bowl. Make sure they are fully submerged in the buttermilk mixture. Cover the bowl and refrigerate for at least 1 hour. For the best taste, marinate overnight. While the chicken marinates, prepare the coating. In a shallow dish, mix 1 cup of all-purpose flour with cayenne pepper, salt, and pepper. This blend gives the chicken an extra kick. Set up a dredging station. Place the flour mix on one side and the bowl of marinated chicken on the other. This setup makes it easy to coat the chicken. Now comes the fun part: frying! Heat 2 tablespoons of olive oil in a large skillet over medium-high heat. Once the oil is hot, remove the chicken from the marinade. Let any excess buttermilk drip off. Dredge each chicken thigh in the flour mixture, making sure to coat it well. Shake off any extra flour. Fry the chicken thighs for 6 to 7 minutes on each side. Look for a golden brown color. Ensure the chicken is cooked to an internal temperature of 165°F. To finish, drizzle ½ cup of hot honey over the chicken while it cooks in the skillet. Let it caramelize for about 1 minute on each side. This step adds a sweet and spicy glaze. For the full recipe, refer to the earlier section in this article. Marinating chicken helps it stay juicy and flavorful. I suggest marinating for at least 1 hour. For even better taste, try marinating overnight. This allows the flavors to soak into the chicken. After marinating, store any leftover marinade in the fridge for up to 2 days. Avoid reusing it for raw chicken to stay safe. Oil temperature is key for frying chicken. Heat the oil to about 350°F for the best results. This helps the chicken cook evenly and get crispy. To check if the oil is ready, drop a small bit of flour into the oil. If it sizzles, you’re good to fry! Cook the chicken in batches to ensure even cooking and avoid crowding the pan. When you apply hot honey, drizzle it on the chicken while it's still in the skillet. This helps it caramelize and adds a delicious glaze. Let it cook for about 1 minute on each side. If you want to switch things up, use alternative sweeteners like maple syrup or agave nectar for a unique twist. You can also make your own hot honey using your favorite honey mixed with chili flakes. {{image_2}} Want to amp up the heat? Adding extra peppers is a great way to do this. You can use sliced jalapeños or crushed red pepper flakes. These will give your dish a nice kick. You can also try spicy honey varieties. They add both sweetness and heat. Look for options with chili or infused spices. This makes your hot honey chicken even more exciting! If you prefer boneless chicken breasts, you can easily adjust the cooking time. Breasts usually cook faster than thighs. Fry them for about 5-6 minutes on each side. This keeps them juicy and tender. You may want to tweak the flavors too. Consider adding more spices or a bit of lemon zest. This can enhance the taste and keep things fresh. What sides go well with hot honey chicken? Here are a few ideas: - Creamy coleslaw - Sweet potato fries - Garlic mashed potatoes - Grilled vegetables These sides balance the sweetness and heat of the chicken. For presentation, serve the chicken on a colorful platter. Drizzle extra hot honey on top for a glossy finish. Add sprigs of fresh parsley for a pop of color. This makes your dish look as good as it tastes! For the full recipe, check out the [Full Recipe]. After you enjoy your hot honey chicken, cool it down quickly. Place the chicken in shallow containers. This helps it cool faster and stay safe. Use airtight containers to keep the chicken fresh. You can store it in the fridge for up to four days. If you want to save it for longer, freeze it. Wrap the chicken tightly in plastic wrap or foil before placing it in a freezer bag. This helps prevent freezer burn. To reheat the chicken, I suggest using the oven. Preheat it to 350°F (175°C). Place the chicken on a baking sheet. Cover it with aluminum foil to keep it moist. Heat for about 20 minutes or until warm. If you want crispy skin, remove the foil for the last 5 minutes. Another option is to use an air fryer. Set it to 350°F and cook for 5-7 minutes. This method brings back the crispiness. Avoid using the microwave, as it can make the chicken soggy. Enjoy your leftovers just like the first time! Hot honey is a sweet and spicy condiment. It blends honey with chili peppers or spices. This mix gives it a sweet taste with a nice kick. You can use it on many foods, such as chicken, pizza, or cornbread. Some popular brands are Mike's Hot Honey and Bee's Knees Spicy Honey. They provide great flavor and are easy to find in stores. Yes, you can use other meats for this recipe. Pork chops or shrimp work well as alternatives. If you choose pork, cook it to an internal temperature of 145°F. For shrimp, cook them until they turn pink. Adjust cooking times as follows: - Pork chops: Cook for about 7-8 minutes per side. - Shrimp: Cook for about 2-3 minutes per side. Making hot honey at home is simple. You need just two ingredients: honey and chili flakes. Here’s how to do it: 1. In a small pot, heat 1 cup of honey over low heat. 2. Add 1-2 tablespoons of chili flakes. 3. Stir gently and let it simmer for about 5 minutes. 4. Remove it from heat and let it cool. For extra flavor, try adding garlic or herbs. Infusing flavors takes time, so let it sit for a day before using. Enjoy your homemade hot honey in the Hot Honey Chicken recipe. Check out the Full Recipe for more details! We explored how to make crispy hot honey chicken using easy steps and tasty ingredients. Start with marinating chicken thighs in buttermilk and spices for maximum flavor. Frying them gives a nice crunch, and a drizzle of hot honey adds the perfect kick. Remember to store leftovers properly and reheat for the best taste. You can even try variations with spicy toppings or different meats. Enjoy this dish on your next dinner night! Keep experimenting and savoring the delicious flavors.
Hot Honey Chicken Flavorful and Easy Recipe Guide
Looking for a dish that offers heat and sweetness in every bite? Hot Honey Chicken is the perfect recipe for you! This easy guide will
For a tasty Chicken and Broccoli Orzo, gather these key ingredients: - 1 cup orzo pasta - 2 tablespoons olive oil - 2 boneless, skinless chicken breasts, diced - 2 cups broccoli florets - 4 cloves garlic, minced - 1 lemon (zested and juiced) - 1 teaspoon dried oregano - 1 teaspoon paprika - Salt and pepper to taste - 1/2 cup grated Parmesan cheese - Fresh parsley for garnish These ingredients blend perfectly, giving you a hearty meal. The orzo pasta acts as the base. It absorbs all the great flavors. Chicken adds protein, while broccoli brings crunch and color. Garlic adds a nice aroma and zest. You can add more ingredients for extra taste. Here are a few suggestions: - Cherry tomatoes for sweetness - Spinach for added greens - Red pepper flakes for heat - Sun-dried tomatoes for a savory touch These add-ins can give your dish a unique twist. You can mix and match based on what you like. To make this dish smoothly, you will need: - A large pot for cooking orzo - A large skillet for sautéing - A wooden spoon for mixing - A knife and cutting board for chopping Having the right tools makes cooking easier. Make sure to have these on hand before you start. {{ingredient_image_1}} To cook the orzo, first, bring a large pot of salted water to a boil. Add 1 cup of orzo pasta to the pot. Stir it gently to prevent sticking. Cook according to the package instructions until it’s al dente, which means firm but cooked through. This usually takes about 8-10 minutes. Once done, drain the orzo and set it aside. This step is key for a perfect texture. Now it's time to sauté the chicken. In a large skillet, heat 2 tablespoons of olive oil over medium heat. When the oil is hot, add 2 diced boneless, skinless chicken breasts. Season the chicken with salt, pepper, 1 teaspoon of dried oregano, and 1 teaspoon of paprika. Cook for about 5-7 minutes. You want the chicken to turn golden brown and be cooked through. This gives a nice flavor to the dish. Next, let's add some color and flavor. Add 2 cups of broccoli florets to the skillet with the chicken. Then, toss in 4 minced garlic cloves. Stir everything together and cook for another 3-4 minutes. You want the broccoli to be tender but still bright green. This keeps it crunchy and fresh, adding a great texture to your dish. To make juicy chicken, start with good-quality chicken breasts. Cut them into even pieces. This helps them cook evenly. Heat olive oil in your skillet until it's hot. Season the chicken well with salt, pepper, oregano, and paprika before adding it to the pan. Sauté the chicken until golden brown, about 5-7 minutes. This browning adds flavor. Let the chicken rest after cooking. This keeps it juicy. For tender broccoli, you want to cook it just right. Add the broccoli florets to the skillet with the chicken. Cook for 3-4 minutes. You want the broccoli to be bright green and tender but still crisp. If you overcook it, it gets mushy. A quick stir-fry keeps its color and flavor. Cheese adds a wonderful flavor to Chicken and Broccoli Orzo. I recommend using grated Parmesan cheese. It melts well and adds a nice salty taste. Sprinkle it on after cooking. For extra creaminess, you might try adding a bit of mozzarella or ricotta. Mix it into the warm pasta for a rich finish. Pro Tips Cooking Orzo Perfectly: Make sure to salt your water generously when cooking orzo. This enhances the flavor of the pasta. Chicken Browning: For the best flavor, let the chicken sit undisturbed for a couple of minutes before stirring. This helps achieve a nice golden-brown crust. Fresh Broccoli Tips: To keep broccoli vibrant and crunchy, avoid overcooking. It should be bright green and tender but still have a slight crisp. Lemon Zest Usage: Use a microplane to zest the lemon. This will give you fine zest without the bitter white pith, enhancing the overall flavor of the dish. {{image_2}} You can easily make a vegetarian version of this dish. Swap out the chicken for chickpeas or tofu. These options give protein and texture. Use vegetable broth instead of chicken broth for cooking the orzo. This keeps the flavor rich. You can also add more veggies like bell peppers or carrots. These add color and crunch. Don't forget to add extra spices to boost the flavor. If you need a gluten-free version, try using rice or quinoa. Both options work well as substitutes. Cook them just like orzo in salted water. There are also gluten-free orzo pasta options available. Check the store for these. They taste great and fit into the dish easily. Always read labels to ensure they meet your needs. You can change the flavors with different spices and herbs. For a kick, add red pepper flakes. They give heat and excitement. Fresh herbs like basil or thyme can brighten the dish. Try adding a bit of cumin for warmth. Lemon juice also brings brightness and freshness. Feel free to experiment and find your perfect blend. To keep your Chicken and Broccoli Orzo fresh, store it in an airtight container. Let it cool to room temperature first. This helps to prevent moisture build-up. Place the container in the fridge. Your leftovers will stay good for up to three days. When you're ready to enjoy your leftovers, reheat them gently. Use a skillet over low heat for best results. Add a splash of water or broth to keep it moist. Stir often to prevent sticking. If you prefer, you can use the microwave. Heat in short bursts, stirring in between. You can also freeze Chicken and Broccoli Orzo. Place it in a freezer-safe container. It can last for up to three months in the freezer. When you want to eat it, thaw it overnight in the fridge. Reheat as mentioned before for the best taste. To make Chicken and Broccoli Orzo in one pot, start by cooking the orzo in salted water. Once cooked, drain and set aside. In the same pot, heat olive oil over medium heat. Add diced chicken, season with salt, pepper, oregano, and paprika. Cook until the chicken is golden and cooked through, about 5-7 minutes. Next, add broccoli florets and minced garlic. Stir and cook for 3-4 minutes. Finally, mix in the cooked orzo, lemon juice, and zest. Stir in grated Parmesan cheese and serve hot. This method saves time and keeps flavors locked in. If you don't have orzo pasta, you can use rice or quinoa as a substitute. Both options offer a great texture. You can also use small pasta shapes like ditalini or couscous. Adjust cooking times based on the substitute. Rice will need more water and time, while small pasta shapes cook similarly to orzo. Choose what you like best for your meal. Yes, you can add more vegetables to enhance this dish. Try bell peppers, carrots, or spinach. Just chop them into bite-sized pieces. Add them when you incorporate the broccoli and garlic. This will help them cook evenly. You can also use frozen veggies for convenience. Adding more veggies boosts nutrition and flavor. This blog post covered how to create a tasty Chicken and Broccoli Orzo. We discussed essential ingredients, helpful tools, and step-by-step instructions. You learned key tips to keep chicken juicy and broccoli tender. We also explored variations for diet needs and how to store leftovers. You now have the skills to make a delicious meal that fits your taste. Enjoy cooking!
Chicken and Broccoli Orzo Flavorful Dinner Delight
Looking for a quick and tasty dinner? Let’s explore Chicken and Broccoli Orzo! This dish packs flavor and is easy to make. I’ll show you
- 4 salmon fillets - 2 tablespoons olive oil - 2 tablespoons unsalted butter, melted - 1 lemon, zested and juiced Salmon fillets are the star of this dish. They provide a rich, buttery flavor that pairs well with lemon. Olive oil and melted butter add richness and help keep the fish moist. The lemon zest and juice bring a bright, fresh taste. - 3 cloves garlic, minced - 1 cup cherry tomatoes, halved - 1 cup broccoli florets - 1/2 cup grated Parmesan cheese Minced garlic gives a savory punch. Cherry tomatoes add a sweet burst, while broccoli florets add color and nutrition. Grated Parmesan cheese enhances the dish with a salty, nutty depth. - Salt and pepper to taste - Fresh parsley, chopped for garnish Salt and pepper are key for flavor. Fresh parsley adds a pop of color and freshness as a garnish. This mix of ingredients makes a delightful meal that is both simple and tasty. {{ingredient_image_1}} First, we need to preheat the oven to 400°F (200°C). This step is key for even cooking. While the oven heats, grab a large mixing bowl. In this bowl, mix 2 tablespoons of olive oil, 2 tablespoons of melted butter, the zest of 1 lemon, the juice of that lemon, and 3 minced garlic cloves. Whisk these ingredients well until they blend together. Now, it's time to coat the salmon. Place 4 salmon fillets in a baking dish. Pour half of the lemon-garlic mixture over the fillets. Make sure they are evenly coated. Then, sprinkle salt and pepper to taste. Next, we’ll add some color and flavor. Add 1 cup of halved cherry tomatoes and 1 cup of broccoli florets around the salmon. This not only adds taste but also makes the dish look great. Drizzle the remaining lemon-garlic mixture over the veggies. Toss them lightly to coat. Now, sprinkle 1/2 cup of grated Parmesan cheese evenly across the salmon and vegetables. This will add a nice crust and flavor as it bakes. Place the baking dish in the oven. Bake for 15 to 20 minutes. To check doneness, look for the salmon to flake easily with a fork. The vegetables should also be tender. Once cooked, carefully remove the dish from the oven. Let it rest for a few minutes. This helps the flavors settle. Finally, garnish with fresh parsley for a pop of color before serving. Resting cooked salmon is key to keeping it moist. After you take it out of the oven, let it sit for about five minutes. This small wait allows the juices to settle. You get a juicier bite every time. To ensure even cooking of vegetables, cut them into similar sizes. This way, they cook at the same rate. For this recipe, cherry tomatoes and broccoli florets are great. They will roast nicely with the salmon. For presentation, you can serve the dish right from the baking dish. This gives a homey feel. If you want a fancier look, plate the salmon and veggies on individual plates. Add a lemon wedge to brighten it up visually. Flavor pairings can enhance your meal. Try serving it with a light salad or garlic bread. A chilled white wine, like Sauvignon Blanc, goes well with this dish too. One common mistake is overcooking salmon. Keep an eye on the time. Salmon should flake easily with a fork but not be dry. If you see it start to lose its pink hue, it’s time to take it out. Another mistake is not seasoning adequately. Don’t skip the salt and pepper. They bring out the flavor of the salmon and veggies. A little sprinkle goes a long way in making your dish taste great. Pro Tips Use Fresh Ingredients: For the best flavor, opt for fresh salmon and seasonal vegetables. Fresh ingredients can elevate the dish significantly. Adjust Cooking Time: Cooking times may vary based on the thickness of the salmon fillets. Always check for doneness by ensuring the salmon flakes easily with a fork. Experiment with Seasonings: Feel free to add other herbs and spices, such as dill or red pepper flakes, to customize the flavor profile to your liking. Serve with Sides: Pair this dish with a light salad or quinoa for a complete meal. The fresh flavors complement a variety of sides beautifully. {{image_2}} You can try other fish if you want. Cod, tilapia, or trout work well. These fish have mild flavors and cook similarly to salmon. If you prefer a different taste, feel free to switch it up. You can also change the vegetables in this dish. Asparagus, green beans, or zucchini are great options. They add color and crunch. Choose what you like best or what you have at home. Adding herbs or spices can boost the flavor. Fresh dill, thyme, or basil pair well with lemon and salmon. For a kick, try red pepper flakes. You can mix these into the lemon-garlic sauce or sprinkle them on top. If you want a different cheese, consider feta or goat cheese. They add a unique taste and creamy texture. Just be sure to adjust the amount, as these cheeses can be saltier. You can cook this meal in a skillet or on the grill. For a skillet, heat some oil and cook the salmon for about 4-5 minutes each side. Add the veggies later, cooking until tender. Grilling gives a smoky flavor. Use a grill pan or foil to keep the fish and veggies from falling through the grates. If you want to try sous vide, season the salmon and seal it in a bag. Cook it in a water bath at 125°F for about 45 minutes. This method keeps the fish moist and tender while letting you cook the veggies separately. To keep your One-Pan Lemon Parmesan Salmon fresh, use airtight containers. Glass containers work well, as they do not stain or retain odors. For best results, store the salmon and veggies separately. You can keep leftovers in the fridge for up to three days. If you want to save them longer, freeze them. In the freezer, they last for about two months. When reheating salmon, use the oven or a skillet. For the oven, heat it to 350°F (175°C). Place the salmon on a baking sheet and cover with foil. Bake for about 10 minutes. This method helps keep the salmon moist and tasty. If using a skillet, heat it over medium-low. Add a little olive oil, then warm the salmon for about five minutes. This way, the flavors stay intact and the fish stays flaky. To simplify busy nights, you can prepare the salmon in advance. Mix the marinade and coat the fish before storing it in the fridge. This allows the flavors to soak in. You can also chop the veggies ahead of time. When ready to cook, just assemble everything in the baking dish. If you want to freeze, portion out the salmon and veggies in freezer bags. Label them with the date to keep track of freshness. Bake salmon for 15 to 20 minutes at 400°F. The salmon should flake easily when done. A thicker fillet may need extra time. Always check for doneness with a fork. Yes, you can use frozen salmon. Just thaw it first for best results. If you bake it from frozen, add a few extra minutes to the cooking time. Fresh salmon has a different texture but frozen works well too. I love serving this salmon with simple sides. Here are some great options: - Steamed rice or quinoa for a filling base. - A light salad with mixed greens for freshness. - Roasted potatoes for a hearty touch. Yes, you can use other citrus fruits. Lime or orange juice adds a unique twist. Each option brings its own flavor. This can enhance the dish with new tastes. This post provided a clear guide on making One-Pan Lemon Parmesan Salmon. You learned about key ingredients, including salmon, lemon, and Parmesan. We covered step-by-step instructions, cooking tips, common mistakes, and variations. To wrap it up, follow these steps for a tasty meal. Use the tips to avoid problems and make it your own with variations. When done right, this dish can impress anyone at your table. Enjoy your cooking!
One-Pan Lemon Parmesan Salmon Flavorful and Easy Meal
Looking for a quick and tasty dinner? Try my One-Pan Lemon Parmesan Salmon recipe! This dish combines juicy salmon with fresh veggies, all baked in
To make crispy air fryer fried chicken, you need: - 4 chicken thighs (bone-in, skin-on) - 1 cup buttermilk - 1 teaspoon garlic powder - 1 teaspoon onion powder - 1 teaspoon smoked paprika - 1 teaspoon dried thyme - 1 teaspoon salt - ½ teaspoon black pepper - 1 cup all-purpose flour - ½ cup cornmeal - Cooking spray You can swap some ingredients if you need to. Try these options: - Use chicken breasts if you prefer white meat. - Substitute yogurt for buttermilk. - Replace cornmeal with crushed crackers for crunch. - Use any dried herbs you have on hand. Each ingredient plays a key role in flavor and texture: - Chicken thighs: They stay juicy and tender. - Buttermilk: It helps the chicken stay moist and adds tang. - Spices: Garlic, onion, and paprika pack a flavor punch. - Flour and cornmeal: This mixture gives the chicken its crispy coating. - Cooking spray: Helps achieve that golden, crispy finish in the air fryer. These ingredients come together to create a dish that is both tasty and satisfying. For the full recipe, check out the crispy air fryer chicken delight. Enjoy your cooking! Start by marinating the chicken. In a large bowl, mix buttermilk with garlic powder, onion powder, smoked paprika, dried thyme, salt, and pepper. This mix adds flavor and makes the chicken juicy. Add the chicken thighs and cover them well. Let them sit in the fridge for at least 2 hours. If you have more time, let them marinate overnight. This step is key to great taste. Next, prepare the coating. In a separate bowl, combine flour and cornmeal. This mix creates a crispy texture. The cornmeal adds a nice crunch. Stir the two together well. You want an even mix for consistent coating on each piece of chicken. For cooking, preheat your air fryer to 400°F (200°C) for about 5 minutes. This helps the chicken cook evenly. Remove each chicken thigh from the marinade and let the extra liquid drip off. Dredge each piece in your flour and cornmeal mix. Ensure every piece is well coated. Shake off any extra flour. Place the chicken in the air fryer basket in a single layer. Make sure there is space between pieces. Spray the chicken lightly with cooking spray. This helps it turn golden and crispy. Cook for 25 to 30 minutes. Flip the chicken halfway through cooking. Use a meat thermometer to check for doneness. The internal temperature should reach 165°F (75°C) for safety. Enjoy your crispy air fryer fried chicken! To get that golden crisp, follow these steps. First, make sure to coat the chicken well. The flour and cornmeal blend creates a crunchy outside. Spray the chicken with cooking spray before air frying. This helps it crisp up nicely. Don't overcrowd the air fryer. Give each piece space to cook evenly. Want to boost flavor? Add spices to the flour mix. Try cayenne for heat or dill for freshness. You can also use buttermilk with herbs for marinating. This makes the chicken juicy and tasty. For a twist, add a splash of hot sauce to the marinade. It gives a lovely kick without being too spicy. Avoid these common errors. First, don't skip the marinating step. It makes a big difference in taste. Also, don't rush the cooking time. If the chicken is not fully cooked, it can be unsafe. Always check the internal temperature with a meat thermometer. Lastly, resist the urge to flip the chicken too early. Let it cook for a bit to form that nice crust. For the complete guide, check the Full Recipe. {{image_2}} You can change the flavor by mixing different spices. Try using Italian herbs like oregano and basil for a nice twist. Cajun seasoning adds a spicy kick. Just mix about two teaspoons into the buttermilk marinade or the flour mix. This lets you have fun with flavor. You can use other meats besides chicken. Turkey thighs or wings work well too. For a lighter choice, use chicken breasts. You can also try plant-based options like tofu or tempeh. Just marinate them the same way and coat with flour and cornmeal for a tasty result. Don’t stop at just seasoning! Add garlic slices or fresh herbs to the marinade for more taste. You can even toss in grated cheese with the flour mix. This gives the chicken a cheesy crust. For a zesty touch, add lemon zest or hot sauce to the marinade. These small changes make your air fryer fried chicken even better. For the full recipe, check out the Crispy Air Fryer Chicken Delight. To keep your air fryer fried chicken fresh, store it in an airtight container. Place a paper towel at the bottom to absorb moisture. This will help maintain its crispiness. Keep it in the fridge for up to 3 days. If you want to enjoy it later, consider freezing it. When reheating, I recommend using the air fryer again. It makes the chicken crispy without drying it out. Preheat the air fryer to 350°F (175°C). Heat the chicken for about 5-7 minutes. Check that it reaches an internal temperature of 165°F (75°C) before serving. You can freeze air fryer fried chicken for longer storage. Wrap each piece in plastic wrap, then place them in a freezer bag. This helps prevent freezer burn. You can freeze it for up to 3 months. When ready to eat, thaw overnight in the fridge and reheat as mentioned above. For more details on making this dish, check the Full Recipe. To make air fryer fried chicken crispy, you need a great coating. Use a mix of flour and cornmeal. The cornmeal adds crunch. After marinating, dredge the chicken well in this mix. Lightly spray the chicken with cooking spray before cooking. This helps it brown nicely. Cook at 400°F (200°C) for 25-30 minutes. Flip halfway for even crispiness. Yes, you can use chicken breasts. They will cook faster than thighs. Make sure to adjust the cooking time. Breasts may need about 20-25 minutes. They can be drier, so marinate them well. Use the same buttermilk marinade for great flavor. Just keep an eye on the temperature. Aim for 165°F (75°C) for safe eating. Air fryer fried chicken is healthier than traditional fried chicken. It uses less oil, so it has fewer calories. The skin can still get crispy and golden. However, the texture may differ slightly. Traditional fried chicken has a richer flavor from the oil. Air frying gives a lighter taste. It’s a great option for a tasty meal without the mess of frying. You can find the full recipe for air fryer fried chicken above. In this blog post, I covered the key steps to make air fryer fried chicken. We explored the important ingredients and their substitutes. I provided detailed cooking steps, tips for crispiness, and flavor boosts. You learned about different variations and how to store leftovers too. In summary, with the right ingredients and techniques, you can achieve tasty, crispy chicken. Enjoy experimenting and making this dish your own!
Air Fryer Fried Chicken Crisp and Tasty Delight
Are you ready to enjoy chicken that’s both crispy and tasty? In my guide to Air Fryer Fried Chicken, I’ll show you how to make
- 1 pound boneless, skinless chicken thighs - 1 cup all-purpose flour - 1/2 cup cornstarch - 1/2 cup honey - 4 cloves garlic, minced - 1 tablespoon soy sauce - 1 tablespoon apple cider vinegar - 1 teaspoon fresh ginger, grated - A pinch of red pepper flakes (optional) - 1 teaspoon baking powder - 1 teaspoon garlic powder - 1 teaspoon salt - 1/2 teaspoon black pepper - Oil for frying When I make crispy Chinese honey garlic chicken, I start with fresh ingredients. Choosing good chicken is key. I like using boneless and skinless chicken thighs. They stay juicy and tender. The flour and cornstarch create a nice crispy coating. The mix of both gives that crunch we love. For the sauce, honey is a must. It brings sweetness and depth. Minced garlic adds a punch. I also throw in soy sauce and apple cider vinegar. This gives a nice balance of sweet and tangy. If you want some heat, add red pepper flakes. I use baking powder in my batter. This helps the coating puff up and stay light. Garlic powder adds more flavor. Don't forget salt and black pepper for the seasoning. Finally, oil is crucial for frying. It should be hot enough to get that golden brown color. This crispy chicken dish is easy to make at home. You can find the full recipe above. Enjoy the cooking process and the tasty results! - Mix dry ingredients: - 1 cup all-purpose flour - 1/2 cup cornstarch - 1 teaspoon baking powder - 1 teaspoon garlic powder - 1 teaspoon salt - 1/2 teaspoon black pepper - Gradually add cold water to form a smooth batter. Aim for a thick consistency. - Heat oil in a skillet over medium-high heat. Make sure the oil is hot. - Dip chicken pieces into the batter. Let the excess batter drip off. - Fry the chicken until golden brown, about 4-5 minutes. - Remove the chicken and place it on paper towels to drain excess oil. - In a saucepan, combine: - 1/2 cup honey - 4 cloves garlic, minced - 1 tablespoon soy sauce - 1 tablespoon apple cider vinegar - 1 teaspoon fresh ginger, grated - A pinch of red pepper flakes (optional) - Simmer the sauce until it thickens. This takes about 2-3 minutes. - Coat the fried chicken in the honey garlic sauce. Toss gently for an even coat. You can find the full recipe for more details. - Ensure the oil is hot enough before frying. - Do not overcrowd the frying pan. To get that golden crunch, heat your oil to 350°F. A hot oil bath cooks the chicken fast. This keeps the meat juicy while giving it a crispy coat. If the oil isn’t hot enough, the chicken will absorb too much oil. This makes it soggy instead of crispy. When frying, place just a few pieces in the pan. Crowding the pan lowers the oil temperature. This can lead to uneven cooking. Fry the chicken in batches if needed, keeping it crisp and tasty. - Add fresh herbs like cilantro for garnishing. - Serve with steamed rice or stir-fried vegetables. Fresh herbs brighten up the dish. Cilantro offers a fresh taste that complements the honey garlic sauce. You can also try green onions for a nice crunch. Pair your chicken with steamed rice. The rice soaks up the extra sauce and balances the flavors. Stir-fried vegetables add color and nutrition. This creates a complete meal that looks and tastes great. - Using too much water in the batter. - Skipping the sauce simmering step. A thick batter sticks better to the chicken. If you add too much water, it becomes runny. This can lead to a soggy coating that won’t crisp up right. Don’t rush the sauce. Simmering it for a few minutes helps blend the flavors. It thickens the sauce and makes the chicken taste even better. Take this step seriously for the best results. For the full recipe, check out the details to create your crispy, flavorful dish. {{image_2}} When it comes to Crispy Chinese Honey Garlic Chicken, you can mix things up. There are many ways to enjoy this dish while keeping it tasty. - Use skinless chicken breasts instead of thighs. This cuts down on fat. - Substitute honey with maple syrup for a different flavor. It gives a nice twist. - Use gluten-free flour for the batter. This makes it safe for those with gluten issues. - Substitute cornstarch with a gluten-free starch. This keeps the crispy texture. - Experiment with spicy sauces or teriyaki for variety. This adds a fun kick to the dish. - Add more spices like chili powder for a kick. It gives a nice heat without overpowering. Feel free to try these variations. You can find the full recipe above to guide you through the process. Enjoy your cooking adventure! Store any leftovers in an airtight container for up to 3 days. This helps keep the chicken fresh and tasty. Make sure to let it cool before sealing the container. This way, you keep moisture from building up inside. The best way to reheat this chicken is in the oven. Set it to 350°F (175°C) and bake for about 10-15 minutes. This keeps the chicken crispy and delicious. Avoid using the microwave, as it can make the chicken soggy. Crispiness is key for this dish! You can freeze the chicken before adding the sauce. This gives it a longer shelf life. For best results, freeze in portions. This way, you can take out what you need without thawing the whole batch. Just remember to label your containers so you know what you have! Total preparation and cook time is approximately 40 minutes. Yes, chicken breasts can be used but may result in a drier texture. It pairs well with steamed rice, stir-fried vegetables, or a fresh salad. Yes, adding red pepper flakes or hot sauce can increase the heat level. Place it on a cooling rack instead of paper towels to prevent moisture buildup. In this blog post, I covered how to make Crispy Chinese Honey Garlic Chicken. You learned about the main ingredients, including chicken thighs, flour, and honey. I shared step-by-step instructions for preparing and cooking the chicken. I also included tips for achieving perfect crispiness and suggested fun variations. Remember, practice makes perfect. Try different flavors and don’t be afraid to experiment. Enjoy making this dish your own, and impress your friends and family with your cooking skills!
Crispy Chinese Honey Garlic Chicken Savory and Tasty
Get ready to dive into a plate of Crispy Chinese Honey Garlic Chicken! This dish combines crunchy chicken thighs with a sweet and savory sauce
- 4 boneless, skinless chicken breasts - 1 packet ranch seasoning mix - 1 cup buttermilk (or 1 cup milk + 1 tablespoon vinegar) - 1 cup breadcrumbs (preferably panko for extra crunch) - 1/2 cup grated Parmesan cheese - 1 teaspoon garlic powder - 1 teaspoon onion powder - Salt and pepper, to taste - Fresh parsley, chopped (for garnish) When I make Easy Baked Ranch Chicken, I love to gather fresh ingredients first. The chicken breasts are the star of this dish. You want them boneless and skinless so they cook evenly and stay tender. Next, I grab a packet of ranch seasoning mix. This adds that creamy, herby flavor we all adore. For the marinade, buttermilk works wonders. If you don’t have it, mix milk and vinegar for a quick substitute. Then, I prepare breadcrumbs. I prefer panko because it gives a wonderful crunch. This texture contrasts nicely with the juicy chicken. Grated Parmesan cheese adds rich flavor. To kick things up, I add garlic powder and onion powder. These spices enhance the overall taste. A bit of salt and pepper rounds it all out. Finally, fresh parsley makes a beautiful garnish. It adds color and a fresh note to the dish. With these ingredients, you're set for a simple, flavorful meal. Check out the Full Recipe for the detailed steps! Preparing the Chicken Marinade - Preheat the oven to 400°F (200°C). - In a mixing bowl, combine buttermilk and ranch seasoning. This creates a tasty marinade. Marinating the Chicken - Coat the chicken breasts in the marinade. Make sure every piece is covered. - Refrigerate for at least 30 minutes. For the best flavor, try to marinate for up to 4 hours. Coating and Baking - In a shallow dish, mix breadcrumbs, Parmesan cheese, garlic powder, onion powder, salt, and pepper. - Remove the chicken from the marinade. Let the extra drip off, then dredge it in the breadcrumb mixture. Ensure it's coated on all sides. - Place the coated chicken on a greased baking sheet. - Bake for 25-30 minutes. The chicken should be golden brown and reach an internal temperature of 165°F (75°C). This method ensures a juicy, flavorful chicken every time. For the full recipe, check the ingredients and instructions listed above. To make your chicken juicy, marinate it longer. I suggest at least 30 minutes. If you have time, go for up to 4 hours. This helps the chicken absorb all those tasty flavors. After baking, let the chicken rest for about 5 minutes. This step keeps the juices inside, making it even more delicious. For that extra crispy bite, use panko breadcrumbs. They give a fantastic crunch compared to regular breadcrumbs. If you want even more crunch, consider a double coating. First, dip the chicken in the breadcrumbs, then back into the buttermilk mixture, and finally coat again. This trick adds a nice texture to your baked ranch chicken. To ensure perfect cooking, use a meat thermometer. Check for an internal temperature of 165°F (75°C). This temperature means your chicken is safe to eat and fully cooked. Keep in mind that cooking time may change based on the thickness of the chicken breast and your oven's performance. Thin pieces will cook faster, so adjust accordingly. {{image_2}} You can easily change the flavor of your Easy Baked Ranch Chicken. Add herbs like thyme or rosemary for a fresh twist. These herbs add depth and aroma that enhance the dish. If you want a spicy kick, incorporate paprika or cayenne. Just a pinch can make your chicken pop with flavor. Try different coatings to change the texture. Crushed cornflakes or potato chips work well for a crunchy layer. They bring a fun twist to the classic breadcrumbs. You can also swap grated Parmesan cheese for other types. Cheddar or mozzarella can add a different taste that many will enjoy. Think about what to pair your chicken with. Seasonal vegetables or a side salad can make a wholesome meal. They add color and nutrients to your plate. Dipping sauces like ranch or BBQ can enhance the flavor even more. They give a fun way to enjoy each bite. Store cooked chicken in an airtight container in the fridge for up to 3-4 days. This keeps it fresh and safe to eat later. Avoid freezing for the best texture; however, you can freeze it for up to 2 months if needed. Reheat the chicken in the oven to keep it crispy. Set your oven to 350°F (175°C) and warm it for about 10-15 minutes. If you are in a hurry, you can use a microwave. Just know that it won't be as crunchy. Prepare chicken in advance for easy meals during the week. Cook a batch and store it in the fridge. You can combine it with grains like rice or quinoa or add veggies for quick lunches or dinners. This makes your week easier and tastier. For the full recipe, check the recipe section above. Marinating for at least 30 minutes is key; longer marination adds more taste. The buttermilk helps tenderize the chicken and brings out its flavor. You can leave it for up to 4 hours for a richer taste. Just remember to cover the bowl while it chills in the fridge. Yes, but adjust the cooking time, as skin-on pieces may require longer to cook through. Skin-on chicken can add more flavor and moisture, but keep an eye on it. Use a meat thermometer to ensure it reaches 165°F (75°C). Fresh garden salads, steamed vegetables, and rice or quinoa dishes are great accompaniments. These sides balance the rich flavors of the chicken. You can also add some roasted potatoes for a heartier meal. Absolutely! Homemade ranch seasoning can provide a fresher taste in the recipe. Mix dried herbs like dill, parsley, and garlic powder to create your blend. This way, you can customize the flavor to fit your palette. Refer to the detailed instructions provided in the recipe section above. You can make a tasty Easy Baked Ranch Chicken with just a few ingredients. We learned how to marinate, coat, and bake the chicken for big flavor and crunch. Remember to let it rest for juiciness. Feel free to mix in herbs or try different coatings for fun. Store your leftovers safely for easy meals later. Enjoy cooking! This dish can be a hit at any dinner. Your family will love it, and it’s simple to prepare. Happy cooking!
Easy Baked Ranch Chicken Irresistible and Simple Meal
Are you ready to make dinner easier and tastier? This Easy Baked Ranch Chicken recipe combines juicy chicken breasts with flavorful ranch seasoning for a
For the perfect crispy fried chicken, you need the right ingredients. Here’s the list: - Chicken thighs: bone-in, skin-on - Buttermilk: for marinating - All-purpose flour: for coating - Seasonings: garlic powder, onion powder, smoked paprika, cayenne pepper, salt, black pepper - Vegetable oil: for frying - Optional garnishes: fresh parsley Using chicken thighs adds flavor and moisture. Buttermilk helps tenderize the meat, making it juicy. The all-purpose flour coats the chicken, creating that crunchy crust we love. Seasonings bring depth to your dish. Garlic powder and onion powder add savory notes. Smoked paprika gives a hint of smokiness, while cayenne pepper adds spice. Using fresh parsley as a garnish brightens the plate and adds color. This crispy fried chicken recipe is all about balance and flavor. Don’t forget to check the Full Recipe for detailed steps! First, I take the chicken thighs and combine them with buttermilk in a large bowl. Make sure each piece is fully submerged. This helps to tenderize the chicken and add flavor. I recommend marinating for at least four hours, but overnight is best for maximum flavor. Trust me; the difference is huge! Next, I prepare the coating. I mix two cups of all-purpose flour with garlic powder, onion powder, smoked paprika, cayenne pepper, salt, and black pepper in a separate bowl. I want this mixture to be well combined. This blend gives the chicken its amazing taste and crunch. Now, I heat the oil in a deep skillet or Dutch oven. I pour in enough vegetable oil to cover the chicken, about two to three inches deep. It's crucial to heat the oil to 350°F (175°C). If the oil is too cool, the chicken won’t crisp up. If it's too hot, the outside will burn before the inside cooks. After marinating, I remove the chicken from the buttermilk. I let the excess drip off before dredging each piece in the seasoned flour. I ensure every part is coated evenly and shake off any extra flour. This step is key to achieving that crispy texture. Next, I carefully place the coated chicken into the hot oil, skin side down. I fry them in batches to avoid overcrowding. Each piece cooks for about 10-12 minutes on each side. I look for a golden brown color and check that the internal temperature reaches 165°F (75°C). This means the chicken is safe to eat and perfectly cooked. Once cooked, I transfer the chicken to a wire rack set over a baking sheet. This lets the excess oil drain off. I let the chicken rest for at least five minutes before serving. Resting helps the juices redistribute, making the chicken juicy. You can garnish with fresh parsley for a nice touch. Serve your crispy fried chicken with sides like coleslaw or cornbread for a perfect meal. For the complete process, check out the Full Recipe. To get that crunchy bite, use a few key tricks. First, soak the chicken in buttermilk. This adds moisture and helps the flour stick. Next, coat the chicken thoroughly in seasoned flour. Shake off any extra flour. A thicker coating gives more crunch. You can also double-dip the chicken. Dip it back in the buttermilk and then back in the flour. This adds even more layers of crispiness. Oil temperature is very important. You want the oil at 350°F (175°C). If it’s too hot, the chicken burns outside but stays raw inside. If it’s too cool, the chicken absorbs too much oil and becomes soggy. Use a thermometer to check the oil. Fry in small batches to keep the oil hot. This helps each piece cook evenly. Avoid some common mistakes for the best fried chicken. Don’t skip marinating. It makes the chicken tender and flavorful. Never overcrowd the pan. This drops the oil temperature and leads to soggy chicken. Also, don’t rush the cooking time. Let the chicken fry until it’s golden brown. Check the internal temperature to ensure it’s safe to eat. {{image_2}} To give your crispy fried chicken a spicy kick, add cayenne pepper. You can adjust the amount based on your heat preference. A little goes a long way! Try using a blend of hot spices like chili powder or crushed red pepper for more flavor. You can also add some hot sauce to the buttermilk for extra zing. This will make your chicken not just crispy, but bursting with flavor. Using buttermilk makes your chicken more tender. The acidity helps break down the proteins. This leads to juicy, flavorful meat. Regular milk can work too but won't give the same results. If you need a substitute, try a mix of milk and vinegar. Just add one tablespoon of vinegar to a cup of milk. Let it sit for a few minutes before using. For a gluten-free crispy fried chicken, swap out regular flour for gluten-free flour. You can use almond flour or a gluten-free blend. Make sure to check labels to avoid any hidden gluten. Additionally, cornstarch can help create a super crispy coating. Just mix it with your gluten-free flour. This will make your chicken delicious and safe for gluten-free diets. You can find the Full Recipe for crispy fried chicken, which includes all these variations, and more! To keep your fried chicken juicy and tasty, store it properly. Place the leftover chicken in an airtight container. Make sure it cools to room temperature before sealing. Store it in the fridge for up to four days. For the best flavor, eat it within two days. When it's time to reheat your chicken, keep it crispy. The oven works best for this. Preheat your oven to 350°F (175°C). Place the chicken on a wire rack over a baking sheet. This helps air circulate around the chicken. Heat for about 10-15 minutes until it’s warm and crispy again. Avoid microwaving, as it makes the chicken soggy. Freezing is a great way to save your crispy chicken for later. First, let the chicken cool completely. Wrap each piece in plastic wrap or foil. Place them in a freezer-safe bag or container. You can freeze it for up to three months. When you’re ready to eat, thaw it in the fridge overnight. Reheat in the oven to restore crispiness. This way, you can enjoy your delicious fried chicken anytime! For the full recipe, check the section above. I recommend marinating your chicken for at least 4 hours. For the best flavor and texture, try marinating it overnight. The buttermilk helps to tenderize the meat and adds moisture. This step is key to achieving that crispy, juicy bite that everyone loves. You can use chicken breasts, but the cooking time will change. Breasts cook faster than thighs, so watch them closely. Thighs stay juicy and tender, while breasts can dry out if overcooked. If you choose breasts, aim for an internal temperature of 165°F (75°C) and adjust frying time accordingly. Many sauces go great with fried chicken. Here are a few favorites: - Honey mustard: sweet with a bit of tang. - Barbecue sauce: smoky and rich flavor. - Ranch dressing: creamy and herby. - Hot sauce: adds a kick for those who enjoy spice. Serve with coleslaw or cornbread on the side for a complete meal. To check if your fried chicken is done, look for golden brown skin. The meat should reach an internal temperature of 165°F (75°C). You can use a meat thermometer for accuracy. Additionally, the juices should run clear when you cut into it. These signs confirm that your chicken is perfectly cooked. This blog post covered all the key steps for making crispy fried chicken. We discussed the essential ingredients, proper marinating, and techniques for a crunchy coating. I shared tips to avoid common mistakes and variations for different tastes. Remember, the secret lies in the oil temperature and your marinating time. Whether you want it spicy or gluten-free, there’s a version for everyone. With these tips, you can create delicious fried chicken that everyone will enjoy.
Crispy Fried Chicken Flavorful Dinner Delight
Are you ready to make the best crispy fried chicken of your life? This flavorful dinner delight is a go-to for any night when you
- 2 packs of instant ramen noodles - 4 cups vegetable broth - 1 cup coconut milk - 2 tablespoons gochujang (Korean chili paste) - 1 tablespoon soy sauce - 1 tablespoon sesame oil - 1 tablespoon minced garlic - 1 teaspoon grated ginger - 1 medium carrot, julienned - 1 cup baby spinach - 2 green onions, sliced - 2 eggs (optional) - Sesame seeds for garnish - Chili flakes for extra heat (optional) This dish shines due to its blend of rich flavors and creamy texture. The instant ramen noodles serve as the base. They cook quickly and soak up all the tasty broth. The vegetable broth brings depth and warmth. Coconut milk adds a creamy, sweet note that balances the spice. Gochujang is the star here. It gives the ramen a rich heat that you can adjust. Soy sauce adds a savory touch, while sesame oil brings a hint of nuttiness. Fresh garlic and ginger provide a fragrant kick. The carrots add sweetness and crunch, while spinach adds color and nutrition. Toppings like green onions, eggs, and sesame seeds bring brightness and texture. For a complete experience, check out the Full Recipe to explore the steps and variations. To make your creamy Korean spicy ramen, start with the broth. Heat sesame oil in a large pot over medium heat. Add minced garlic and grated ginger. Sauté them for about one minute until they smell great. Next, pour in four cups of vegetable broth. Bring it to a simmer. This broth will be the heart of your ramen. Stir in two tablespoons of gochujang and one tablespoon of soy sauce. Mix well until the gochujang dissolves fully. Now, add one cup of coconut milk to the pot. This makes the soup creamy and rich. You can taste it now and add more gochujang for extra heat if you want. While the broth simmers, it's time to cook the noodles. Place two packs of instant ramen noodles into the pot. Cook them according to the package instructions, usually around three to four minutes. Once the noodles are almost done, it’s time to mix in the veggies. Add one medium carrot, julienned. Let it cook for about three to four minutes until it is slightly tender. Next, add one cup of baby spinach to the pot. Stir it until it wilts, which takes just a minute. This step adds color and nutrients to your ramen. For serving, divide the ramen into bowls. If you want, you can add soft-boiled eggs for extra richness. To make these, boil eggs in a separate pot for six to seven minutes. Then, place them in cold water to cool. Garnish your ramen with sliced green onions, sesame seeds, and chili flakes for more spice. This makes each bowl look beautiful and appetizing. Enjoy a warm bowl of creamy Korean spicy ramen that you made from scratch! For the complete recipe, check out [Full Recipe]. To make your ramen super creamy, use full-fat coconut milk. It gives a rich taste. You can also try light coconut milk for less fat. If you want it creamier, add more coconut milk. Start with a little and taste as you go. If the heat is too much, you can reduce it. Use less gochujang. You can also add a splash of coconut milk to cool it down. Try serving with plain rice or bread. These side dishes help tone down the spice. Sauté garlic and ginger in sesame oil first. This step brings out their flavors. Cook your noodles for just a few minutes. They should be soft but not mushy. Add vegetables like spinach at the end so they stay fresh. This keeps your ramen tasty and colorful. For more detailed instructions, check the Full Recipe. {{image_2}} You can easily change up the proteins in your ramen. For a plant-based option, use tofu. It soaks up flavors well. For meat lovers, shredded chicken or beef works great too. If you need gluten-free noodles, look for rice noodles or specific gluten-free ramen. These swaps keep the dish tasty while fitting your needs. To boost flavor, try adding miso paste. It brings a rich, savory taste. You can also explore different chili pastes, like sambal oelek, for a unique twist. Adding vegetables like mushrooms or bell peppers can add more texture and nutrients. Feel free to mix and match to find your perfect balance. Korean ramen varies by region, each with its own flair. For example, some areas prefer a spicier broth or unique toppings. You can also borrow ideas from other Asian cuisines. Adding Thai basil or lemongrass gives a fresh twist. Experiment with these flavors to create a dish that excites your taste buds. For the full recipe, check the link! To keep your creamy ramen fresh, store it in an airtight container. This prevents air from spoiling the dish. Place it in the fridge within two hours of cooking. It will stay good for up to three days. If you want to freeze it, separate the noodles from the broth. The noodles can become mushy when frozen with the broth. For best results, freeze the broth and noodles in separate bags. When reheating your ramen, avoid the microwave if possible. It can make the noodles tough. Instead, use a pot on the stove. Heat the broth gently, then add the noodles. Stir carefully to warm them without breaking. If using a microwave, heat in short bursts and stir often. For the broth, keep it covered to retain moisture. Cooked ramen lasts about three days in the fridge. Uncooked noodles can last for several months if stored in a cool, dry place. Always check for spoilage signs. If you see mold or an off smell, it's time to toss it. To ensure quality, keep your ingredients fresh and check packaging dates. For the full recipe, visit the link. You can use sriracha or chili paste. These add heat and flavor. Another option is red pepper flakes. Mix them with a little soy sauce for depth. If you want less spice, use sweet chili sauce instead. It gives a nice sweet kick without too much heat. Yes, you can easily make this ramen vegetarian or vegan. Use tofu or tempeh for protein. Both work well with the creamy broth. You can also add mushrooms for a nice texture. Swap the eggs for avocado or simply skip them. This keeps the dish light and plant-based. To lower the heat, use less gochujang. Start with one tablespoon and taste as you go. You can also add more coconut milk to balance the spice. Another trick is to serve with a side of plain rice. This helps tone down the overall heat while enjoying the ramen. In this blog post, we explored making creamy Korean spicy ramen. I covered key ingredients, like instant noodles, vegetable broth, and coconut milk. We discussed flavor enhancers, fresh additions, and tips for the perfect dish. Remember, adjusting spice levels and using the right cooking methods can elevate your ramen. Try different proteins and veggies to find your favorite combo. With proper storage and reheating techniques, you can enjoy this dish fresh or as leftovers. Embrace your creativity in the kitchen, and enjoy your flavorful creation!
Creamy Korean Spicy Ramen Delicious and Simple Recipe
Looking for a new cozy dish? Try my creamy Korean spicy ramen! This recipe blends rich flavors and spice in a simple, quick way. With
To make garlic butter steak and potatoes, you need simple, fresh ingredients. Here’s what you’ll need: - 1 lb sirloin steak, cut into bite-sized pieces - 1 lb baby potatoes, halved - 4 tablespoons unsalted butter - 6 cloves garlic, minced - 1 teaspoon dried rosemary - 1 teaspoon dried thyme - Salt and pepper to taste - 2 tablespoons fresh parsley, chopped (for garnish) - 1 tablespoon olive oil These ingredients come together to create a hearty and flavorful dish. The sirloin steak gives great flavor, while the baby potatoes add a nice texture. Herbs and seasonings can take your garlic butter steak to the next level. I use dried rosemary and thyme. They add a warm and earthy taste. You can also use fresh herbs if you have them. Salt and pepper are key. They enhance the natural flavors of the steak and potatoes. Garnishes add a pop of color and freshness. For this dish, I suggest using fresh parsley. It adds a bright flavor. You can also sprinkle some extra cracked pepper for a bit of kick. If you like, add a squeeze of lemon juice for a zesty finish. For the full recipe, check the section above. Enjoy cooking! Start by heating a large skillet over medium-high heat. Add one tablespoon of olive oil. Once the oil is hot, toss in the bite-sized pieces of sirloin steak. Season with salt and pepper. Cook the steak for about 4-5 minutes. You want it browned and cooked to your liking. When it's done, remove the steak from the skillet and set it aside. Next, use the same skillet for your potatoes. Add the halved baby potatoes directly to the skillet. Cook them for about 10-15 minutes. Stir them occasionally until they turn tender and golden brown. If you want to speed up cooking, you can cover the skillet for a few minutes. This helps the potatoes cook quicker and evenly. Once the potatoes are ready, lower the heat to medium. Add the minced garlic, dried rosemary, and thyme to the skillet. Stir everything together and cook for about 1-2 minutes. You will smell the garlic's strong aroma. Now, return the cooked steak to the skillet along with four tablespoons of butter. Mix well to coat the steak and potatoes in the melting garlic butter. Taste your dish and adjust the seasoning with more salt and pepper if needed. Let everything cook together for an extra 1-2 minutes so the flavors can blend beautifully. This is where the magic happens! You will end up with a delightful Garlic Butter Steak and Potatoes Skillet. For the full recipe, check back with the ingredients section. For the best steak, choose sirloin. It’s flavorful and tender. Cut it into bite-sized pieces. This helps it cook evenly. Always season with salt and pepper. This simple step boosts flavor. Sear the steak in a hot skillet. This creates a nice crust. Do not overcrowd the pan. Cook in batches if needed. Remove the steak when it’s browned. It will finish cooking later with the potatoes. Use baby potatoes for this dish. They cook evenly and taste great. Halve them to help with cooking. Start cooking them in the same skillet. Stir them often to avoid sticking. Cover the skillet for a few minutes. This helps the potatoes cook through. Remove the lid to let them crisp up. Look for a nice golden color on the outside. This means they are ready to go. Garlic is key for this recipe. Use fresh minced garlic for the best taste. Add it right before the steak returns to the skillet. This prevents burning and keeps flavor strong. Dried herbs like rosemary and thyme add depth. Sprinkle them in with the garlic. Taste your dish as you go. Adjust with more salt or pepper if needed. A little fresh parsley on top adds a nice touch. For the full recipe, check the details above. {{image_2}} You can swap sirloin for other cuts. Ribeye gives rich flavor and tenderness. Flank steak works well too; it’s lean and flavorful. Skirt steak is another option; it’s great for quick cooking. Each cut brings its own taste and texture. Experiment and find what you love best. Feel free to mix in different vegetables. Carrots add sweetness and color. Bell peppers bring crunch and flavor. You can even use green beans for a fresh taste. Just cut them to similar sizes so they cook evenly. This dish is versatile, so get creative with what you have. To make this dish gluten-free, check labels on all ingredients. Use gluten-free soy sauce or tamari for flavor. For a dairy-free version, replace butter with vegan butter or olive oil. You can still enjoy that rich taste without dairy. These changes keep the meal delicious and suitable for different diets. For the full recipe, be sure to check it out. To keep your leftover garlic butter steak and potatoes fresh, place them in an airtight container. Let the dish cool to room temperature first. Then, seal the container tightly and store it in the fridge. It will stay good for about three to four days. For the best taste, reheat your leftovers in a skillet. Heat a small amount of olive oil over medium heat. Add the steak and potatoes. Stir them gently to warm through, about five to seven minutes. This method helps keep the meat juicy and the potatoes crispy. You can also use a microwave, but it may make the potatoes a bit soft. If you want to freeze your garlic butter steak and potatoes, use a freezer-safe container. Let the dish cool completely before packing it. It can last for up to three months in the freezer. When you're ready to eat, thaw it in the fridge overnight. Then, reheat it using the skillet method for the best flavor. For the full recipe, check out the detailed cooking steps above. Yes, you can use other potatoes. Yukon Gold or red potatoes work great. These types are creamy and hold their shape well. You can even try sweet potatoes for a twist. Just cut them into small pieces for even cooking. To check your steak, use a meat thermometer. Aim for 130°F for medium-rare, 140°F for medium. If you don't have a thermometer, press the steak with your finger. A soft feel means it is rare, while a firmer touch indicates medium. You can also cut into the steak to see if it is pink inside. This dish pairs well with a fresh salad or steamed veggies. You can also serve it with crusty bread to soak up the tasty garlic butter. A glass of red wine complements the flavors nicely. For a light touch, add a dollop of sour cream or a squeeze of lemon on top. For the full recipe, check out the Garlic Butter Steak and Potatoes Skillet. This blog post explored making garlic butter steak and potatoes. We covered the key ingredients, preparation steps, and tips for perfect results. You learned about variations and storage methods, too. I shared ways to ensure tender steak and crispy potatoes. With these skills, you can impress at your next meal. Enjoy your flavorful dish and the joy it brings to your table. Happy cooking!
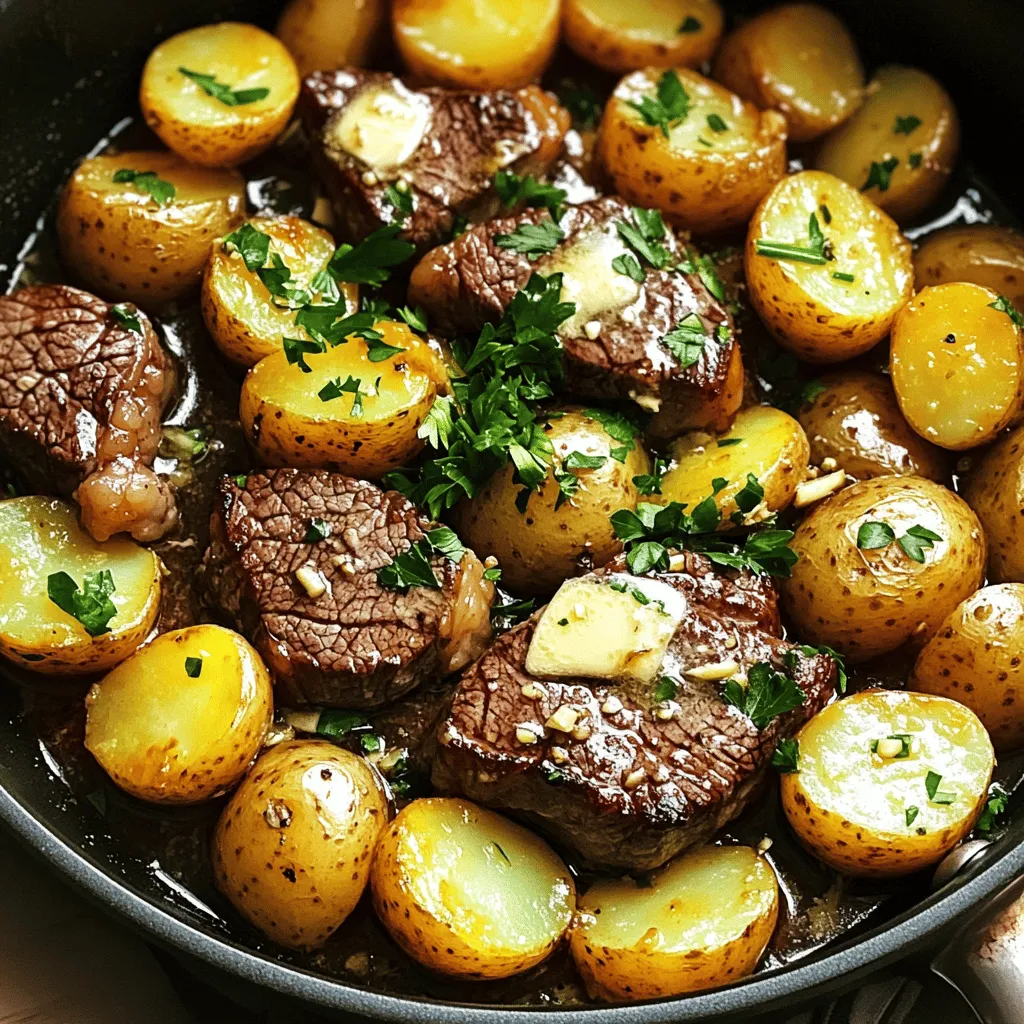
Garlic Butter Steak and Potatoes Skillet Delicious Dish
Are you ready to elevate your dinner game? My Garlic Butter Steak and Potatoes Skillet recipe is your new go-to meal. Juicy steak, crispy potatoes,