Dinner

One Pan Balsamic Chicken Flavorful and Easy Dinner
Looking for a quick and tasty dinner? You’ve found it! One Pan Balsamic Chicken is easy to make and packed with flavor. In just a
. To store leftover stuffed shells, let them cool first. Place them in an airtight container. This keeps them fresh. They will last for about 3 to 4 days in the fridge. When you want to reheat, preheat your oven to 350°F (175°C). Place the shells in a baking dish. Cover them with foil to keep moisture in. Bake for about 20 minutes or until warm. To freeze your stuffed shells, follow these steps. First, let them cool completely. Then, arrange the shells in a single layer on a baking sheet. Freeze them for about 1 to 2 hours. Once they are firm, place them in a freezer-safe container or bag. This method prevents them from sticking together. For reheating, move the shells from the freezer to the fridge the night before. Thaw them overnight. Once thawed, follow the reheating steps mentioned above. In the fridge, your stuffed shells will last about 3 to 4 days. Make sure to check for any signs of spoilage. In the freezer, they can last for up to 2 to 3 months. After that, they may lose flavor. To enjoy the best taste, try to eat them within this time frame. For the full recipe, check the details above! To make Creamy Garlic Mushroom Stuffed Shells from scratch, follow these steps: 1. Cook the pasta: Boil the jumbo shells in salted water until al dente. 2. Sauté mushrooms: Heat olive oil in a skillet, add chopped mushrooms, and cook until golden. Add minced garlic and cook for two minutes. 3. Mix the filling: In a bowl, combine ricotta, cooked spinach, sautéed mushrooms, and half of the cheese. Mix well. 4. Make the sauce: In the same skillet, add heavy cream and melt the remaining cheese until creamy. 5. Stuff the shells: Fill each shell with the cheese mixture and place them in a baking dish. 6. Bake: Pour sauce over the shells and bake at 375°F for about 30-35 minutes. Common mistakes to avoid: - Overcooking the pasta: Cook shells until just al dente; they will finish cooking in the oven. - Not cooling the shells: Let them cool before stuffing to avoid burns and make handling easier. - Skipping the seasoning: Don’t forget to add salt and pepper for flavor. Yes, you can prepare Creamy Garlic Mushroom Stuffed Shells ahead of time. Suitable storage options: - Refrigerate: Assemble the dish, cover it tightly with foil, and store in the fridge for up to 24 hours. - Freeze: You can also freeze unbaked stuffed shells. Wrap the dish well and store for up to three months. Time-saving tips: - Prep the filling: Make the filling and sauce the day before. - Cook shells in advance: You can cook the shells early in the day and stuff them later. Creamy Garlic Mushroom Stuffed Shells pair well with several sides. Recommended side dishes: - Garlic bread: The perfect crunchy contrast to the creamy shells. - Roasted vegetables: Carrots and broccoli add color and nutrition. Salad pairing ideas: - Caesar salad: Crisp romaine with creamy dressing complements the dish. - Mixed greens: Light vinaigrette adds freshness and balances richness. For the full recipe, check out the details provided above. Enjoy your cooking adventure! Stuffed shells are tasty and fun to make. You can use jumbo pasta shells with a rich cheese filling and sautéed mushrooms. Optional ingredients like spinach and herbs can enhance the flavor. Follow the steps carefully for perfect results, and enjoy the tips for storage and serving suggestions. In the end, experimenting with variations keeps the dish exciting. You can adapt it with different sauces or make it vegan. These small changes can make a big impact. Enjoy your cooking journey and share it with others!](https://tossedrecipes.com/wp-content/uploads/2025/06/aa1c3bfb-a0fe-455b-ba1e-8ba858b3e5d9.webp)
Creamy Garlic Mushroom Stuffed Shells Rich and Flavorful
Get ready to delight your taste buds with Creamy Garlic Mushroom Stuffed Shells! This dish brings together jumbo pasta shells filled with a rich cheese
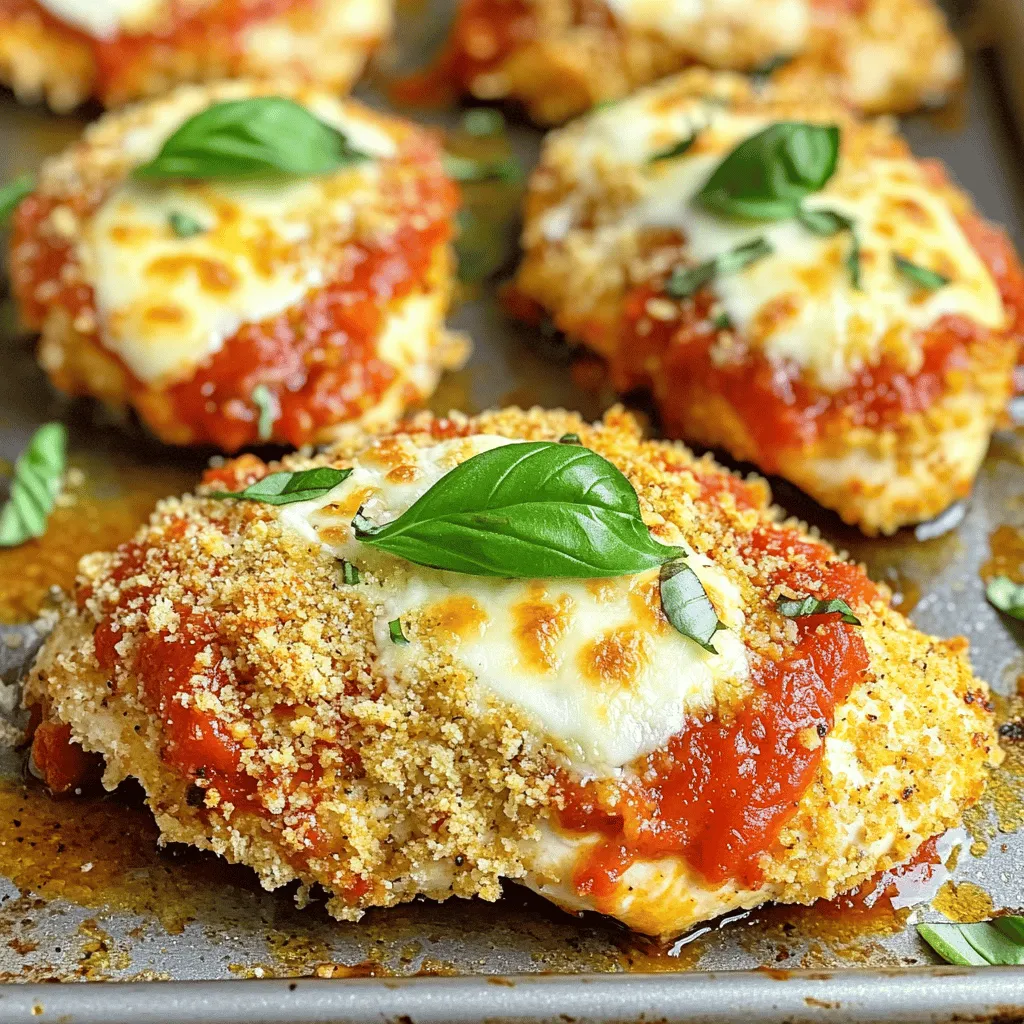
Baked Chicken Parmesan Flavorful and Easy Recipe
Are you ready to elevate your dinner game with a dish that’s both easy and delicious? My Baked Chicken Parmesan recipe promises rich flavors and

Greek Turkey Meatballs Flavorful and Simple Recipe
Ready to delight your taste buds? My Greek Turkey Meatballs recipe offers a simple, flavorful twist on a classic favorite. Packed with fresh herbs, spices,
. To keep your stuffed peppers fresh, store any leftovers in an airtight container. Refrigerate them within two hours of cooking. They will stay good for up to three days. If you want to save them longer, freeze the peppers. Wrap each one in plastic wrap and then place them in a freezer-safe bag or container. They can last for up to three months in the freezer. When you're ready to enjoy your stuffed peppers again, you have a few options. The best method is to reheat them in the oven. Preheat your oven to 350°F (175°C). Place the peppers in a baking dish and cover with foil. Heat them for about 20 minutes, or until they are hot throughout. You can also use the microwave for a quick option. Place a pepper on a microwave-safe plate, cover it, and heat for 2-3 minutes. Check to ensure it's hot all the way through. Making stuffed peppers ahead of time is easy and fun. You can prepare the filling a day in advance. Cook the ground turkey and mix in all the ingredients. Store this mixture in the fridge. When you're ready, stuff the peppers and bake them. This saves time on busy days. You can also make a big batch and freeze them. Just follow the storing tips above. Then, you can enjoy a healthy meal anytime! For the full recipe, check out the Turkey Fiesta Stuffed Peppers. Yes, you can make this recipe ahead of time. Prepare the stuffed peppers but do not bake them. Cover the baking dish tightly and store it in the fridge for up to 24 hours. When ready to bake, add about 10 minutes to the cooking time. If you want to freeze them, wrap each pepper in plastic wrap and place them in a freezer bag. They can last up to three months in the freezer. Thaw them in the fridge overnight before baking. If you want to swap quinoa, there are several great options. You could use brown rice, couscous, or farro. For a low-carb choice, try cauliflower rice. Each option gives a different flavor and texture. Choose what you enjoy most or what you have at home. Ground turkey is safe to eat when it reaches an internal temperature of 165°F (74°C). The meat should be no longer pink and the juices should run clear. Use a meat thermometer to check the temperature. If you do not have one, you can cut into the meat to check for any pink color. Always prioritize food safety. Yes, this recipe can be gluten-free. All the main ingredients, like ground turkey and bell peppers, are gluten-free. Just ensure the canned beans and diced tomatoes do not contain gluten. You can also use gluten-free quinoa or rice. Always check labels to be safe. Stuffed peppers offer a tasty way to enjoy healthy meals. We discussed key ingredients like ground turkey, bell peppers, and flavorful seasonings. I shared step-by-step instructions to make cooking easy. Tips and variations help you customize your dish. Proper storage and reheating methods keep leftovers fresh and delicious. Overall, this recipe fits well into meal prep while being flexible and fun. Enjoy making these stuffed peppers!](https://tossedrecipes.com/wp-content/uploads/2025/06/d14d7a24-2bb4-4b4a-88bd-295267c79331.webp)
Ground Turkey and Peppers Healthy Meal Guide
Are you ready to whip up a delicious and healthy meal? Ground Turkey and Peppers is your new go-to dish! Packed with flavor and nutrients,
![- 4 salmon fillets - 1/2 cup teriyaki sauce - Juice of 1 orange - Zest of 1 orange - 2 tablespoons fresh ginger, grated - 2 cloves garlic, minced - 2 tablespoons honey - 1 tablespoon sesame oil - 1 tablespoon olive oil - 1/4 teaspoon black pepper - 1/4 cup green onions, sliced (for garnish) - Sesame seeds (for garnish) - Chili flakes for heat - Fresh herbs, such as cilantro or parsley Each serving of Orange Teriyaki Salmon has about 350 calories. The dish is rich in key vitamins and nutrients. You get protein from salmon, vitamin C from orange juice, and healthy fats from sesame oil. The ginger and garlic add more health benefits, like aiding digestion and boosting immunity. This blend of flavors and nutrients makes it a smart choice for any meal. For the complete cooking guide, check out the Full Recipe. To start, gather your marinade ingredients. You will need teriyaki sauce, orange juice, orange zest, grated ginger, minced garlic, honey, sesame oil, and black pepper. In a medium bowl, whisk these together until well mixed. This step is key to getting a great flavor. If you want the best taste, use fresh ginger and freshly squeezed orange juice. The more fresh, the better! Now, let’s marinate the salmon. Place the salmon fillets in a shallow dish or a zip-top bag. Pour the marinade over the salmon, ensuring each piece is coated. Cover and refrigerate for at least 30 minutes. If you have time, marinate for up to one hour. This helps the salmon absorb all those tasty flavors. Remember to flip the salmon once if you can, to ensure even marination. You can cook your salmon in different ways. If you want to grill it, preheat the grill to medium-high heat. Lightly oil the grates to prevent sticking. Grill the salmon for 5-7 minutes on each side. The salmon should flake easily with a fork when done. If you prefer baking, preheat your oven to 400°F (200°C). Line a baking sheet with parchment paper. Bake the salmon for 12-15 minutes. Brush with the reserved marinade halfway through for extra flavor. For both methods, let the salmon rest for a couple of minutes after cooking. This helps keep it juicy. Enjoy your meal with steamed rice or roasted veggies! For the full recipe, check out the complete guide. To know when salmon is perfectly cooked, look for its color. The flesh should be opaque and flake easily with a fork. You can also check the internal temperature. It should be around 145°F (63°C). Avoid common mistakes like overcooking. Salmon can dry out quickly, so keep an eye on it. If you’re grilling, use a timer. It should take about 5-7 minutes per side. For baking, aim for 12-15 minutes. You can adjust the sweetness or zest of your salmon. For a sweeter taste, add more honey or orange juice. If you want more zest, add extra orange zest or a bit of lime juice. To add depth, try different sauces. Soy sauce or a dash of sriracha can bring a nice twist. You might also blend in sesame oil for more richness. Serving and plating can elevate your dish. Try serving the salmon on a bed of rice or greens. You can also arrange it with colorful vegetables. For garnishing, sliced green onions and sesame seeds add a nice touch. A few orange slices on the side can brighten the plate. Make sure to keep everything neat for visual appeal. For a stunning look, drizzle extra teriyaki sauce on top. For the complete Orange Teriyaki Salmon recipe, check out [Full Recipe]. {{image_2}} You can use an Instant Pot or air fryer for this dish. Both methods save time and keep the salmon juicy. For the Instant Pot, cook on high for 3 minutes with a quick release. For the air fryer, set it to 375°F and cook for 10-12 minutes. You can also try other types of fish. Tilapia, trout, or cod work well with the same marinade. Each fish adds a unique twist to the dish. If you need a gluten-free option, use tamari instead of regular teriyaki sauce. This switch keeps the flavors intact while meeting dietary needs. For a low-calorie version, reduce the oil in the marinade. You can also substitute honey with a sugar-free sweetener. This keeps the sweetness while cutting calories. To switch up the flavor, add citrus variations like lime or lemon. These fruits brighten the dish and add a different zing. You can also incorporate spices or herbs. Try adding a pinch of chili flakes for heat or fresh herbs like cilantro for a fresh touch. These small changes can make your meal exciting and new. Remember to check out the Full Recipe for all the details! To keep your Orange Teriyaki Salmon fresh, store it well. If you have leftovers, refrigerate them right away. Use an airtight container to keep moisture in and air out. Cooked salmon stays good in the fridge for up to three days. If you have raw salmon, keep it in its original packaging or place it in a resealable bag. Raw salmon is best used within two days. Freezing salmon is easy and keeps it fresh. To freeze, wrap the salmon tightly in plastic wrap, then place it in a freezer bag. Remove as much air as you can before sealing. This method helps avoid freezer burn. Frozen salmon can last up to three months. To thaw, move the salmon from the freezer to the fridge the night before you cook it. For quicker thawing, place the sealed salmon in cold water for about an hour. Reheating salmon can be tricky. You want to avoid drying it out. The best way to reheat is in the oven. Preheat your oven to 275°F (135°C). Place the salmon on a baking sheet and cover it with foil. Heat it for 10 to 15 minutes until warm. You can also use a microwave, but be careful. Heat it in short bursts of 30 seconds. This keeps it moist and tasty. You can enjoy Orange Teriyaki Salmon with many tasty sides. Here are some great options: - Steamed rice - Quinoa - Roasted vegetables - Stir-fried greens - Asian-style slaw These sides balance the rich flavors of the salmon. Pairing rice helps soak up the tasty teriyaki sauce. Roasted vegetables add both color and nutrients. For a crunchy twist, serve with a slaw that has a citrus dressing. This brings out the fresh orange notes in the dish. Yes, you can use canned salmon, but there are pros and cons. Pros: - Canned salmon is convenient and ready to use. - It often costs less than fresh salmon. - It has a long shelf life. Cons: - Canned salmon can have a softer texture. - It may lack the fresh taste you get from grilling or baking. If you choose canned salmon, drain it well. You can mix it with the marinade, but be gentle when handling. This way, you can still enjoy that zesty teriyaki flavor. You can store leftover Orange Teriyaki Salmon in the fridge for up to three days. Here are some tips for safety: - Place the salmon in an airtight container. - Keep it in the fridge at 40°F (4°C) or below. Signs of spoilage: - Off smell - Slimy texture - Change in color If you notice any of these signs, it's best to discard the salmon. Enjoy your leftovers safely! This article covered how to prepare a delicious Orange Teriyaki Salmon dish. You learned the key ingredients, cooking techniques, and expert tips for perfect results. Remember, marinating the salmon is crucial for flavor. Try different methods and variations to suit your taste. Storing and reheating tips help maintain quality. Enjoy your cooking journey with this vibrant recipe!](https://tossedrecipes.com/wp-content/uploads/2025/06/9984da87-171f-4fcc-b3f3-91eb62a2bc58.webp)
Orange Teriyaki Salmon Flavorful and Easy Recipe
Looking for a dish that’s both tasty and easy? You’ve found it! My Orange Teriyaki Salmon recipe brings vibrant flavors to your kitchen in just
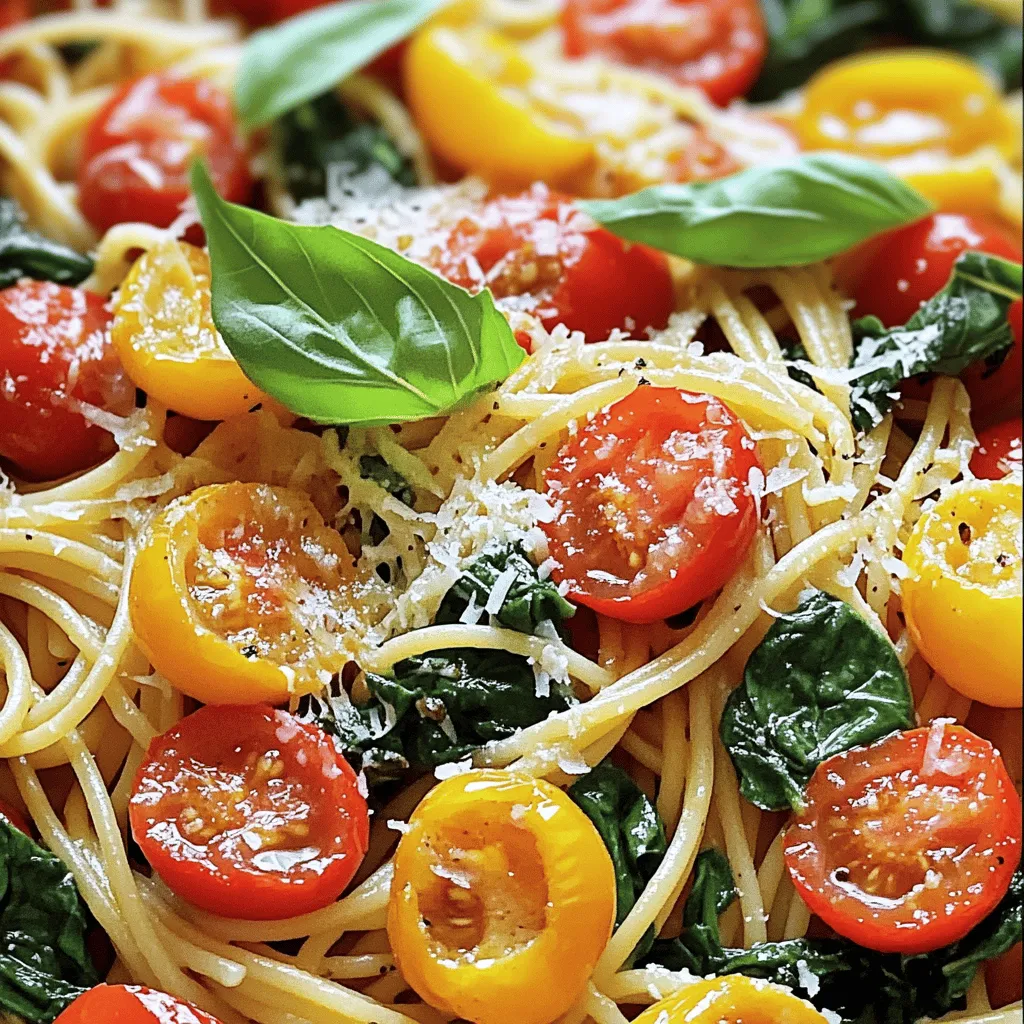
Tomato Spinach Pasta Flavorful and Simple Recipe
Looking for a quick and tasty dish? You’re in the right place! This Tomato Spinach Pasta recipe is simple and packed with flavor. With just
. To make sure your chicken cooks right, cut the breasts thin. This helps them cook faster and stay juicy. Use a meat thermometer to check the inside. Aim for 165°F (75°C). This way, your chicken will be safe and tasty. For a creamy sauce, use heavy cream when you add the broth. Stir it in slowly to keep it smooth. If the sauce is too thick, add some reserved pasta water. It will make the sauce rich and delicious. If you want a twist, try different pasta types. Whole grain or gluten-free pasta works well. They add their own flavors and textures. You can also use noodles like penne or rotini if you prefer. Need a lower-sodium option? Use homemade broth or water with herbs. This helps keep the flavor strong without too much salt. You can mix in some lemon juice for a fresh kick. Pair your Cozy Chicken Marsala Pasta with a light salad. A simple green salad with lemon vinaigrette complements the dish well. Garlic bread is also a great side. It lets you soak up that creamy sauce. For wine, try a light red like Pinot Noir. It matches the flavors of the dish nicely. If you want white, a dry Chardonnay works too. Both wines enhance the meal and make it special. For the full recipe, check out the Cozy Chicken Marsala Pasta section above. {{image_2}} You can easily change this recipe to fit your diet. For gluten-free options, use gluten-free pasta. Many brands offer great alternatives that taste similar to regular pasta. You can also make it dairy-free. Instead of heavy cream, try coconut milk or cashew cream. These substitutes still make the dish creamy and delicious. Want to boost the flavor? You can add fresh spinach or sun-dried tomatoes. Both ingredients bring a nice touch to the dish. The spinach adds color and nutrients, while sun-dried tomatoes give a sweet, tangy taste. You can also experiment with different types of mushrooms. Try shiitake or portobello for a richer flavor. Each type of mushroom adds its unique taste to the sauce. You can take this dish on a journey. For an Italian twist, add some fresh basil or a splash of white wine. This brings out the classic Italian flavors. If you want to use local ingredients, think of what's fresh in your area. Seasonal vegetables like asparagus or zucchini can add freshness. Adding local cheese instead of Parmesan can also give it a unique taste. These small changes make the dish special and personal. For a full recipe, check out the Cozy Chicken Marsala Pasta. To keep your Cozy Chicken Marsala Pasta fresh, store it in an airtight container. Make sure it cools down before sealing. The pasta can stay good in the fridge for about 3 to 4 days. Just remember, the sooner you eat it, the better it tastes! When you’re ready to enjoy your leftovers, reheat them gently. Use a pan over low heat for the best results. Add a splash of chicken broth or water to avoid dryness. Stir often to keep everything heated evenly. This method helps prevent sogginess in your pasta. For long-term storage, you can freeze the Chicken Marsala Pasta. Place it in a freezer-safe container and label it with the date. It can last for about 2 to 3 months in the freezer. When you’re ready to eat, thaw it in the fridge overnight. Reheat as mentioned above for the best taste. Chicken Marsala Pasta is a warm and tasty dish. It blends chicken, mushrooms, and pasta in a rich sauce. This dish has roots in Italian cuisine, especially from Sicily. Originally, Chicken Marsala was a main dish served with wine. Over time, it became popular worldwide, inspiring many pasta recipes. The sauce uses Marsala wine, adding depth and flavor. This comfort food is perfect for cozy nights at home. Yes, you can prepare parts of this recipe ahead of time. Cook the pasta and store it in the fridge. You can also slice the chicken and mushrooms in advance. Keep them in airtight containers to stay fresh. When you are ready to cook, just sauté the chicken and mushrooms. Then, add the broth and other ingredients. This saves time and makes dinner easy. To thicken your Marsala sauce, you have a few options. First, let the sauce simmer longer. This reduces the liquid and makes it thicker. You can also add a cornstarch slurry. Mix cornstarch with cold water, then stir it into the sauce. Another method is to use a bit of grated Parmesan cheese. This not only thickens the sauce but adds a nice flavor too. Adjust until you reach your desired thickness. This blog post covered how to make Chicken Marsala Pasta from scratch. You learned about the main ingredients, step-by-step cooking instructions, and useful tips. I shared variations to suit different diets and preferences, plus storage and reheating tips. Remember, cooking should be fun and creative. Feel free to change the recipe to make it your own. Enjoy crafting a delicious meal that brings joy to your table!](https://tossedrecipes.com/wp-content/uploads/2025/06/e53ee9a3-2c1b-4835-ace0-16652a4e2628.webp)
Cozy Chicken Marsala Pasta Comfort in Every Bite
Welcome to cozy comfort! Today, I’ll show you how to make Chicken Marsala Pasta, a dish that wraps you in warmth with every bite. Imagine
Brown Sugar Glazed Salmon Simple and Tasty Dish
Are you ready to elevate your dinner game with a simple and tasty dish? Brown sugar glazed salmon is not just easy to make—it’s delicious!
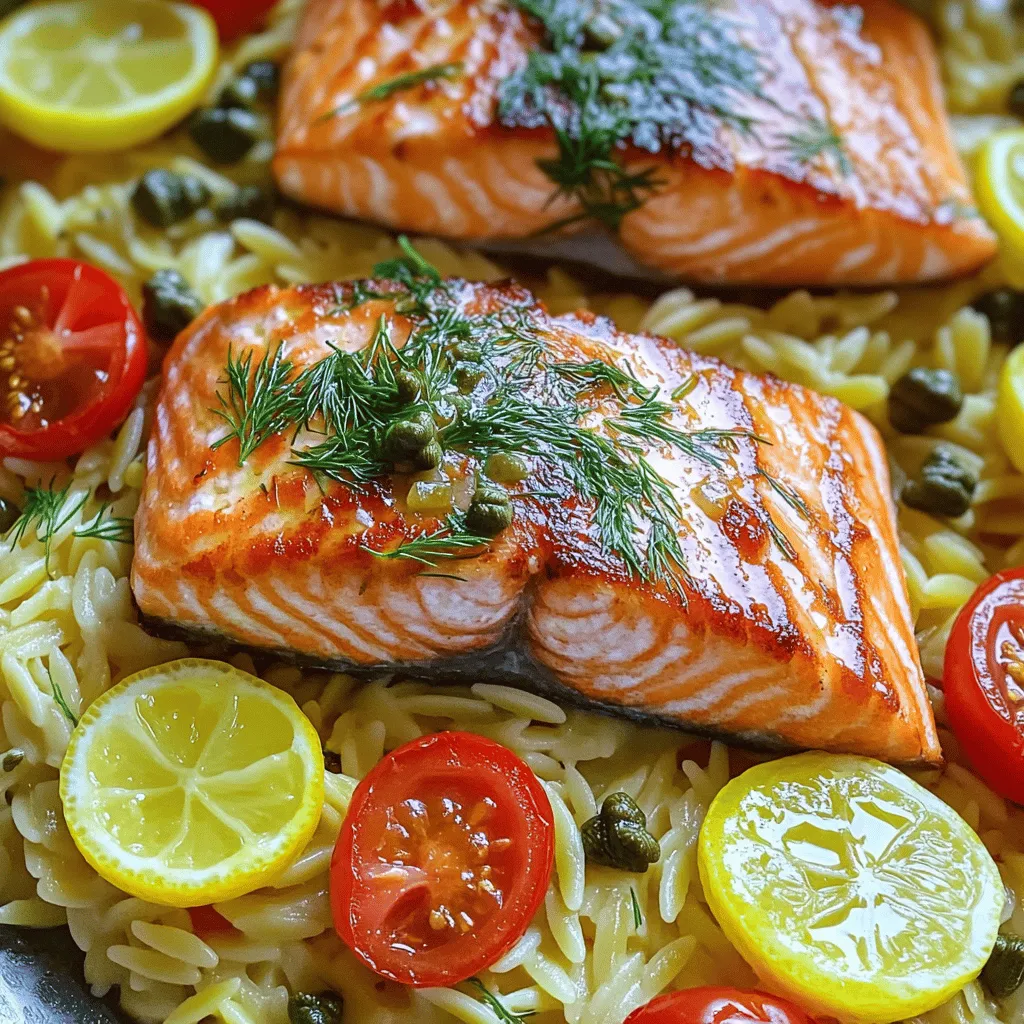
Seared Salmon with Lemon Orzo Tasty and Simple Meal
Are you ready to impress your taste buds? Seared Salmon with Lemon Orzo is a quick, delicious meal that you can whip up in no