Dinner

- 1.5 lbs chicken breast, cut into 1-inch cubes - 1 red bell pepper, cut into 1-inch pieces - 1 yellow bell pepper, cut into 1-inch pieces - 1 red onion, cut into wedges - 1 zucchini, sliced into half-moons - 3 tablespoons olive oil - 2 tablespoons lemon juice For this dish, I focus on chicken and fresh veggies. The chicken breast gives a tasty base. I love adding red and yellow bell peppers. They add sweetness and color. The red onion brings a nice bite, while zucchini adds a soft texture. Olive oil and lemon juice help blend the flavors and keep everything moist. - 3 cloves garlic, minced - 2 teaspoons dried oregano - 1 teaspoon paprika - 1 teaspoon cumin - Salt and pepper to taste The seasonings are key for flavor. Garlic infuses a rich taste. Oregano brings a hint of earthiness. Paprika adds warmth and a bit of smokiness. Cumin gives a unique touch. I always recommend adjusting salt and pepper to suit your taste. These seasonings make the chicken kabobs shine. - Skewers (wooden or metal) - Parchment paper for baking If you want to use skewers, wooden ones need soaking for 30 minutes. This helps prevent burning. Parchment paper makes cleanup easy. I love using it for roasting. It keeps the pan clean and allows for more even cooking. {{ingredient_image_1}} 1. Preheat the oven and prepare the baking sheet: Set your oven to 400°F (200°C). Line a baking sheet with parchment paper. This makes for easy cleanup later. 2. Make the marinade mixture: In a large bowl, mix together the olive oil, lemon juice, minced garlic, dried oregano, paprika, cumin, salt, and pepper. Stir until everything blends well. This marinade adds great flavor to the chicken. 1. Combine chicken with marinade: Add the 1.5 lbs of chicken breast cubes to the bowl. Toss the chicken in the marinade until each piece is covered. 2. Recommended marination time: Let the chicken sit in the marinade for at least 15 minutes. For more flavor, you can marinate it in the fridge for up to 2 hours. 1. Arranging chicken and vegetables on the baking sheet: Take the marinated chicken and arrange it on the parchment-lined baking sheet. Add the red and yellow bell peppers, red onion, and zucchini around the chicken. Spread them out in a single layer for even cooking. 2. Roasting time and technique: Place the baking sheet in the oven and roast for about 20-25 minutes. Flip the chicken and vegetables halfway through the cooking time. This helps everything cook evenly. The chicken should be fully cooked and reach an internal temperature of 165°F (74°C). 3. Instructions for broiling for extra char: For an extra char, turn on the broiler for 2-3 minutes at the end of cooking. Keep a close eye on it to prevent burning. This step adds a nice crisp to the kabobs. Now you have a delicious, easy meal ready to serve! To get the best flavor from your chicken, marinate it well. I like to use a mix of olive oil, lemon juice, garlic, and herbs. This blend adds a nice kick. For the tastiest chicken, marinate for at least 15 minutes. If you have more time, let it sit for up to 2 hours in the fridge. This longer marination gives the chicken a deeper flavor. When cooking, arrange the chicken and veggies in a single layer. This helps everything cook evenly. Flip them halfway through to avoid burning. Keep an eye on the cooking time. The chicken needs to reach an internal temperature of 165°F (74°C). A quick check with a meat thermometer ensures it’s done. This way, you avoid undercooked or dry chicken. Serving the kabobs is fun and easy. I recommend placing them on a large platter. A colorful display of chicken and veggies looks great. For garnish, sprinkle fresh parsley on top. Add lemon wedges on the side for a pop of color. This makes the dish look fresh and inviting. You’ll impress your guests with this simple touch. Pro Tips Marinate Longer for Flavor: For the best flavor, marinate the chicken for at least 2 hours in the refrigerator. The longer it marinates, the more flavorful it becomes. Cut Vegetables Uniformly: Ensure that all vegetables are cut into similar sizes to promote even cooking. This way, everything will be perfectly tender at the same time. Use High-Quality Olive Oil: Invest in a good quality olive oil for the marinade. A premium oil will enhance the flavor of the chicken and vegetables. Experiment with Seasonings: Feel free to experiment with different spices and herbs. Adding a pinch of chili flakes or fresh herbs can elevate the dish even further! {{image_2}} You can switch up the veggies in these kabobs. Try mushrooms or cherry tomatoes for fun flavors. You can also use other proteins. Shrimp or beef work great too. Just adjust cooking times to ensure everything cooks well. Want some heat? Add chili powder or diced jalapeños for a spicy kick. Fresh herbs like basil or thyme can also give new tastes. Consider using different sauces, like teriyaki or barbecue, to mix things up. If you have an air fryer, you can use it for these kabobs. Set it to 375°F and cook in batches for about 15 minutes. For grilling, soak wooden skewers first. Then, cook on medium heat, turning until the chicken is cooked through. These methods keep your kabobs juicy and full of flavor. To store leftovers in the refrigerator, let the kabobs cool first. Place them in an airtight container. This keeps them fresh and prevents odors from mixing. I find glass containers work best because they do not stain or hold smells. You can also use plastic containers if that's what you have. Just make sure they seal well. For long-term storage, you can freeze the kabobs. Wrap them tightly in plastic wrap and then place them in a freezer bag. This helps avoid freezer burn. When you want to eat them, thaw the kabobs in the fridge overnight before reheating. To reheat, place them in the oven at 350°F (175°C) for about 15-20 minutes. This keeps them juicy and warm throughout. In the fridge, the dish lasts about 3 to 4 days. If you freeze them, they can last for up to 3 months. Always check for any signs of spoilage before eating. If they smell off or look strange, it’s best to toss them. Keeping track of storage times helps ensure you enjoy your kabobs at their best! You can make chicken kabobs without skewers by using a sheet pan. This method is simple. Just marinate the chicken and vegetables as usual. Instead of threading them onto skewers, spread them out on a baking sheet. This way, the chicken and veggies roast evenly. You get all the great flavors without the fuss of skewers. Yes, you can prep kabobs ahead of time. Marinate the chicken and cut the veggies a few hours before cooking. Store them in the fridge until you're ready to bake. If you want to prep even earlier, marinate the chicken the night before. This makes dinner quick and easy. Just remember to let them sit at room temperature for about 15 minutes before cooking. Sheet pan chicken kabobs pair well with many sides. Here are some great options: - Rice or quinoa: They soak up the juices well. - Fresh salad: A simple green salad adds crunch. - Grilled corn: Sweet corn complements the flavors nicely. - Pita bread: Soft pita is perfect for dipping. These sides create a balanced meal that everyone will enjoy. This blog post walks you through making delicious chicken kabobs, highlighting main ingredients, seasonings, and cooking tips. I shared preparation steps, marination advice, and variations to suit your taste. Remember to experiment with different ingredients and cooking methods. Proper storage tips ensure your kabobs stay fresh, making them perfect for meal prep. By following these steps, you can enjoy flavorful kabobs that impress at any meal. Happy cooking!
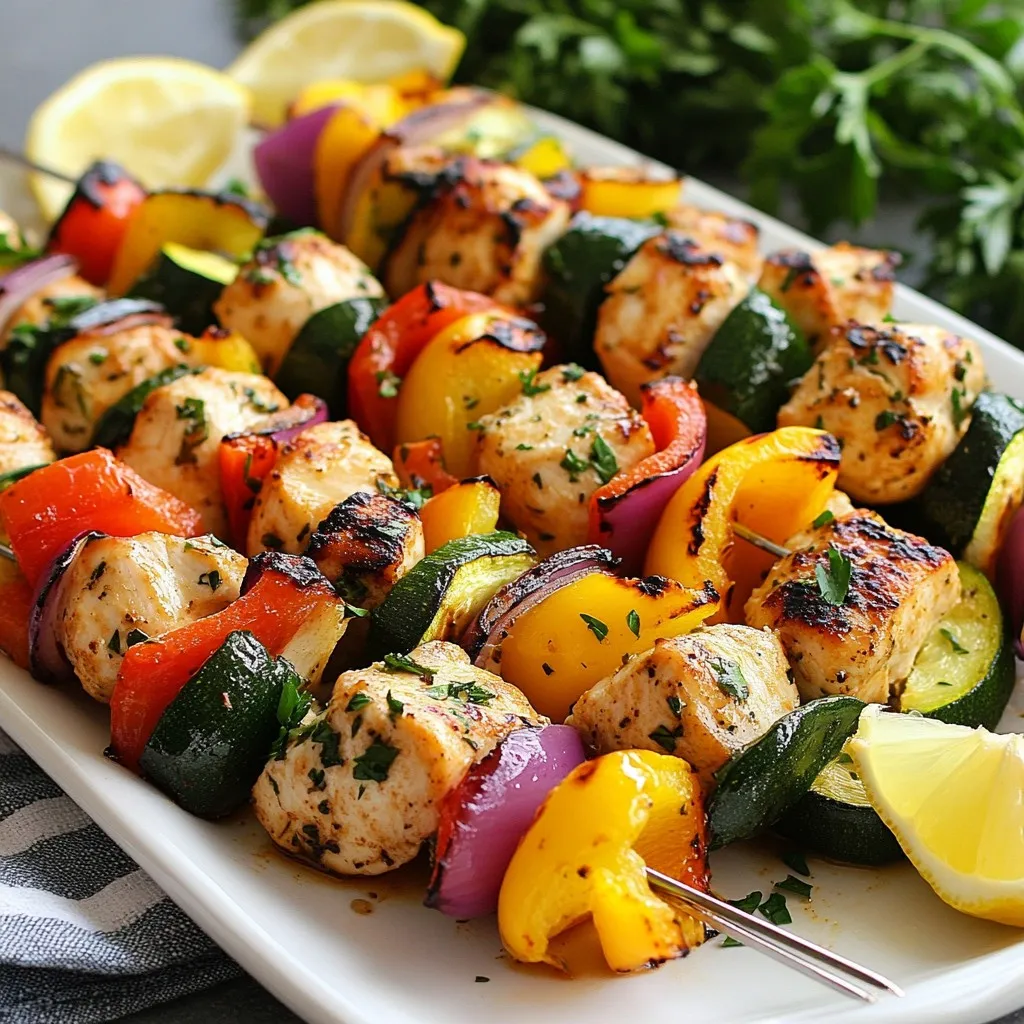
Sheet Pan Chicken Kabobs Flavorful and Easy Meal
Looking for a simple, tasty dinner? You’ve come to the right place! My Sheet Pan Chicken Kabobs are packed with flavor and easy to make.
- Fish and Marinade Components - 1 lb firm white fish (like cod or tilapia), cut into strips - 1 tablespoon olive oil - 1 teaspoon cumin - 1 teaspoon paprika - Salt and pepper to taste - Mango Salsa Ingredients - 1 ripe mango, diced - 1 small red onion, finely chopped - 1 jalapeño, deseeded and minced - Juice of 1 lime - 1/4 cup fresh cilantro, chopped - Tortilla and Serving Items - 8 small corn tortillas - 1 avocado, sliced (for serving) - Optional: lime wedges (for serving) These ingredients come together to create a fresh and vibrant dish. The firm white fish gives a nice texture, while the spices add warmth. The mango salsa brings a sweet and zesty kick. Together, they make a perfect taco filling. You can easily find these ingredients at your local grocery store. Each element plays a key role in creating the perfect flavor balance. Enjoying these tacos will surely make your meal special! {{ingredient_image_1}} First, mix your marinade. In a bowl, combine 1 tablespoon olive oil, 1 teaspoon cumin, 1 teaspoon paprika, salt, and pepper. Stir well. Next, cut 1 pound of firm white fish, like cod or tilapia, into strips. Add the fish to the marinade. Make sure each piece is coated evenly. Let it marinate for about 15 minutes. This step helps the fish absorb the spice flavors. Now, it’s time to cook the fish. Preheat a non-stick skillet over medium-high heat. Once the skillet is hot, add the marinated fish strips. Cook for 3 to 4 minutes on each side. The fish should be opaque and flake easily with a fork. Remove the fish from heat. To make the salsa, gather your ingredients. Dice 1 ripe mango into small pieces. Finely chop 1 small red onion. Mince 1 jalapeño after removing the seeds. In a bowl, mix the mango, onion, and jalapeño together. Add the juice of 1 lime and 1/4 cup of chopped fresh cilantro. Stir well and season with salt to taste. Allow the salsa to sit for a few minutes. This helps the flavors come together. Now, let’s warm the tortillas. Take another skillet and lightly toast 8 small corn tortillas over medium heat. Warm them for about 30 seconds on each side. This makes them soft and easy to fold. To assemble the tacos, place some cooked fish on each tortilla. Top each taco with a generous spoonful of mango salsa. For an extra touch, add slices of avocado on top. You can serve the tacos with lime wedges on the side for a zesty finish. Enjoy your delicious creation! To achieve perfect flakiness in your fish, choose firm white fish, like cod or tilapia. Make sure to cut it into strips. This helps it cook evenly. Marinate the fish for at least 15 minutes to soak in those tasty spices. When cooking, use medium-high heat and do not overcrowd the pan. This keeps the fish from steaming. Common mistakes to avoid include cooking fish too long. Overcooked fish becomes dry and tough. Also, avoid skipping the marination step. It adds flavor and helps the fish stay moist. To amp up your mango salsa, try adding diced bell peppers or a pinch of salt. These add more color and taste. You can also mix in some chopped tomatoes for extra freshness. If you like heat, keep the seeds in the jalapeño. For storage, keep salsa in an airtight container. It stays fresh in the fridge for about two days. If you notice it getting watery, just drain the excess juice before serving. This keeps the salsa vibrant and tasty! Pro Tips Fish Freshness: Ensure your fish is as fresh as possible for the best flavor and texture. Look for clear eyes and a mild scent. Spice Variation: Feel free to experiment with different spices like chili powder or garlic powder to customize the flavor of your fish. Perfectly Ripe Mango: Choose a mango that gives slightly to pressure for the best sweetness and texture in your salsa. Warm Tortillas: Always warm your tortillas just before assembling to prevent them from breaking and to enhance their flavor. {{image_2}} You can easily make these tacos gluten-free. Choose corn tortillas, as they are naturally gluten-free. Just check the label to be sure. The fish and salsa ingredients are already gluten-free too. Enjoy a delicious meal without worry! To make this recipe vegan, swap the fish for grilled jackfruit or tofu. Marinate them just like the fish for great flavor. Use the same mango salsa to keep the dish fresh and vibrant. This way, you still enjoy tasty tacos. While mango shines in this salsa, feel free to experiment with other fruits. Pineapple adds a sweet and tangy twist. Peach can give a lovely summertime flavor. Even strawberries can surprise you with their sweetness. Mix and match for a fruity fiesta! You control the heat in your salsa! For a milder taste, skip the jalapeño or use a small amount. If you crave spice, add more jalapeño or even some diced serrano peppers. Adjust the heat to match your mood and enjoy your perfect taco experience! To keep your fish tacos fresh, store them in airtight containers. This helps prevent them from drying out. You should separate the fish, tortillas, and mango salsa. This keeps each part at its best. For the fish, wrap it in plastic wrap or foil. Store it in the fridge for up to two days. The tortillas can stay in a sealed bag. They will stay fresh for about three days. You can keep the mango salsa in a small container. It will last for up to three days too. To reheat the fish, use a skillet over medium heat. This method keeps the fish moist and flaky. Cook for about two minutes on each side. Make sure it is heated through but not overcooked. For tortillas, you can warm them in a dry skillet. Heat them for about 30 seconds on each side. This will keep them soft and pliable. Enjoy your tacos as if they were just made! For fish tacos, I recommend using firm white fish. Cod and tilapia are great choices. They cook well and have a mild flavor. You can also try snapper or mahi-mahi for a different taste. These fish hold up nicely in tacos and pair perfectly with mango salsa. Yes, you can make mango salsa ahead of time. Mix the diced mango, red onion, jalapeño, lime juice, and cilantro a few hours before serving. This lets the flavors blend together. Just keep the salsa in the fridge in an airtight container. It stays fresh for up to two days. To add some heat, try these ideas. Include more jalapeño in the salsa. You can also use a serrano pepper for a kick. Another option is to sprinkle cayenne pepper on the fish. If you like sauces, drizzle some hot sauce on top before serving. Adjust the heat to your taste! This blog post guided you through making delicious fish tacos. We explored key ingredients like the fish and mango salsa, then detailed step-by-step instructions for preparation and assembly. I shared tips for perfecting the cooking process and how to enhance the salsa's flavor. You also learned about dietary variations and storage tips. Remember, experimenting with flavors and ingredients can lead to your ideal taco. Enjoy the process and savor each bite!
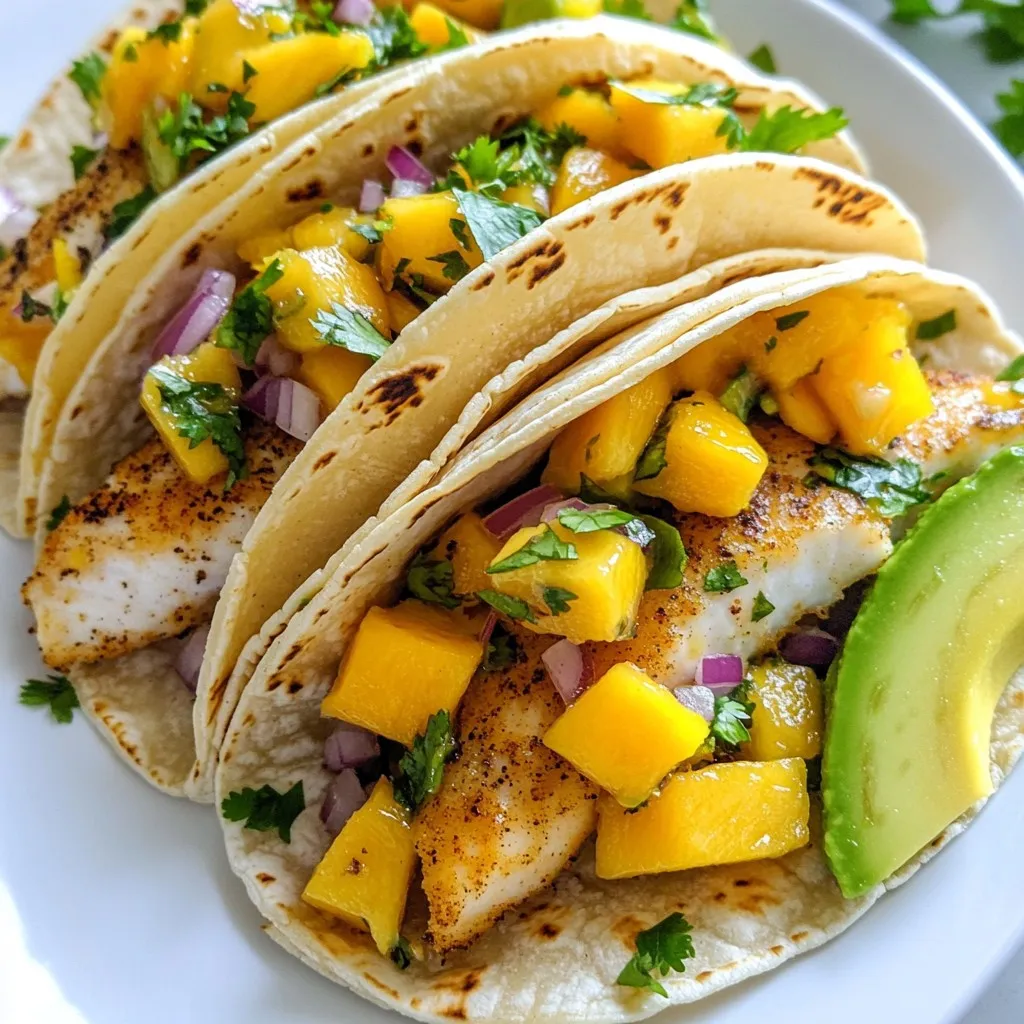
Mouthwatering Mango Salsa Fish Tacos Delightful Meal
Looking to spice up your dinner routine? Try my Mouthwatering Mango Salsa Fish Tacos! This dish combines flaky fish with sweet mango salsa for a
- 2 lbs beef chuck, cut into 1-inch cubes - 4 medium carrots, sliced - 3 medium potatoes, diced - 1 large onion, chopped - 3 cloves garlic, minced - 4 cups beef broth - 2 tablespoons tomato paste - 2 tablespoons Worcestershire sauce The main ingredients create the heart of the stew. Beef chuck is perfect. It has great flavor and tenderness when cooked. I love using fresh carrots and potatoes. They add texture and sweetness. Onions and garlic give depth to the stew. - 1 teaspoon dried thyme - 1 teaspoon smoked paprika - 2 tablespoons olive oil - Salt and pepper to taste Seasonings bring the dish to life. Dried thyme adds a nice herbal note. Smoked paprika gives a hint of smokiness. Olive oil helps to brown the meat and vegetables. Salt and pepper enhance all the flavors. - 1 tablespoon cornstarch (for thickening) - Fresh parsley, chopped (for garnish) For those who like it thick, cornstarch is great. You mix it with water to make a slurry. Fresh parsley adds a pop of color and freshness. It makes the dish look nice and adds flavor. {{ingredient_image_1}} To start, set your Instant Pot to 'Sauté' mode. Add 2 tablespoons of olive oil and let it heat until it shimmers. This step is key for flavor. Next, add 2 lbs of beef chuck, cut into 1-inch cubes. Work in batches and sear the beef until it is browned on all sides, which takes about 5-7 minutes. Once done, remove the beef and set it aside. In the same pot, add the chopped onion. Cook it until it becomes translucent, about 3-4 minutes. This helps build the base flavor. Then, add 3 cloves of minced garlic and cook for another minute. The garlic will add a nice kick to the stew. Now it’s time to bring everything together. Return the browned beef to the pot. Mix in 4 medium sliced carrots, 3 diced potatoes, and pour in 4 cups of beef broth. Add 2 tablespoons of tomato paste and 2 tablespoons of Worcestershire sauce for depth. Sprinkle in 1 teaspoon of dried thyme, 1 teaspoon of smoked paprika, and toss in a bay leaf. Season with salt and pepper to taste, then stir to combine. Close the lid of the Instant Pot, making sure the valve is set to 'Sealing'. Select 'Manual' and set the timer for 35 minutes. This step locks in all the flavors and tenderizes the beef. After cooking is complete, let the pressure release naturally for 10 minutes. This allows the flavors to meld. After 10 minutes, switch to a 'Quick Release' to let out any remaining steam. Always be careful when releasing pressure. If you want a thicker stew, mix 1 tablespoon of cornstarch with 2 tablespoons of water to make a slurry. Set the Instant Pot to 'Sauté' again and stir in the slurry. Let it simmer for a few minutes until it thickens to your liking. Before serving, discard the bay leaf and taste for seasoning. Adjust with more salt and pepper if needed. Finally, garnish with fresh chopped parsley for a pop of color and flavor. For a great stew, use beef chuck. It has lots of flavor and becomes tender when cooked. Cut the beef into 1-inch cubes. This size helps it cook evenly and quickly. If you want even more tenderness, marinate the beef in some broth and spices. This adds flavor and helps break down the meat fibers. Want to change the taste? Add herbs and spices! Fresh thyme, rosemary, or bay leaf can bring a new twist. You can also try adding chili powder for some heat. For a different sauce flavor, swap Worcestershire sauce with soy sauce or balsamic vinegar. Each choice makes the stew unique. To get a thick stew, use cornstarch. Mix it with water to make a slurry. Stir this into the stew at the end. It gives a nice, rich texture. To keep veggies crisp, add them later in the cooking process. This way, they won’t turn mushy. Try adding carrots and potatoes halfway through. This keeps them tender but firm. Pro Tips Brown the Meat Well: Searing the beef until it's nicely browned enhances the flavor of the stew, creating a rich depth that makes the dish truly hearty. Use Fresh Herbs: For a burst of flavor, consider adding fresh thyme or parsley instead of dried herbs. They can elevate the taste and aroma of your stew. Let it Rest: After cooking, letting the stew sit for a few minutes allows the flavors to meld together, resulting in a more cohesive and delicious dish. Customize Your Vegetables: Feel free to swap in your favorite root vegetables like parsnips or turnips. This allows you to tailor the stew to your taste preferences. {{image_2}} You can switch up the veggies in your beef stew. Adding or substituting different vegetables can bring exciting flavors. Here are some great choices: - Mushrooms: They add a nice umami taste. - Peas: Sweet and bright, they balance the stew. - Celery: Offers a crunchy texture and fresh flavor. - Green beans: These can add color and a slight snap. Consider seasonal veggies too. In the fall, use squash or parsnips. In spring, try asparagus or baby carrots. Each season brings a chance to refresh your dish. You can easily adjust the recipe to fit your needs. If you need gluten-free options, skip the Worcestershire sauce or find a gluten-free brand. For a low-sodium stew, use low-sodium beef broth. You can also cut back on added salt. These small changes keep the dish tasty while meeting dietary needs. If you want a lighter stew, you can swap beef for chicken or turkey. These meats cook faster, so reduce the pressure cooking time to around 25 minutes. For a vegetarian or vegan version, use hearty vegetables like mushrooms and lentils. Replace beef broth with vegetable broth. This way, you create a filling and comforting stew that everyone will enjoy. To keep your beef stew fresh, store it in an airtight container. Let the stew cool first. It stays good in the fridge for about 3 to 4 days. This way, you can enjoy it later. Just be sure to check for any bad smell or mold before eating. To freeze beef stew, let it cool completely. Pour it into freezer-safe containers or bags. Leave space at the top for expansion. The stew can last for up to 3 months in the freezer. When you're ready to eat, thaw it overnight in the fridge. Reheat beef stew on the stove for best results. Use a pot over medium heat and stir often. This helps keep the texture nice. You can also use the microwave. Just heat it in short bursts, stirring in between. Avoid overheating, as it can make the meat tough. Enjoy each bite of your comforting stew! Yes, you can use frozen beef. Just remember to adjust the cooking time. If the beef is frozen, add about 10 extra minutes to the pressure cooking time. The beef will still turn out tender and flavorful. The stew is done when the beef is fork-tender. You should be able to break it apart easily. The vegetables should also be soft but not mushy. The total cooking time is about 35 minutes in the Instant Pot. Beef stew pairs well with several sides. You can serve it with crusty bread for dipping. Mashed potatoes are a nice touch too. A simple salad can add freshness to the meal. To spice up your beef stew, add red pepper flakes or hot sauce. You can also use spicy smoked paprika instead of regular paprika. Another option is to stir in diced jalapeños for some heat. Yes, you can make this stew ahead of time. It tastes even better the next day! Just let it cool, then store it in the fridge for up to three days. You can also freeze it for later. In this post, we explored how to make a delicious beef stew in an Instant Pot. We covered the main ingredients like beef chuck, vegetables, and broth, plus seasonings that enhance flavor. I provided clear steps for cooking, from searing the meat to thickening the stew at the end. Remember, you can customize the recipe to fit your taste, whether by altering vegetables or using different proteins. Enjoy crafting this hearty meal, and don’t hesitate to experiment, as the best stew is the one made your way!
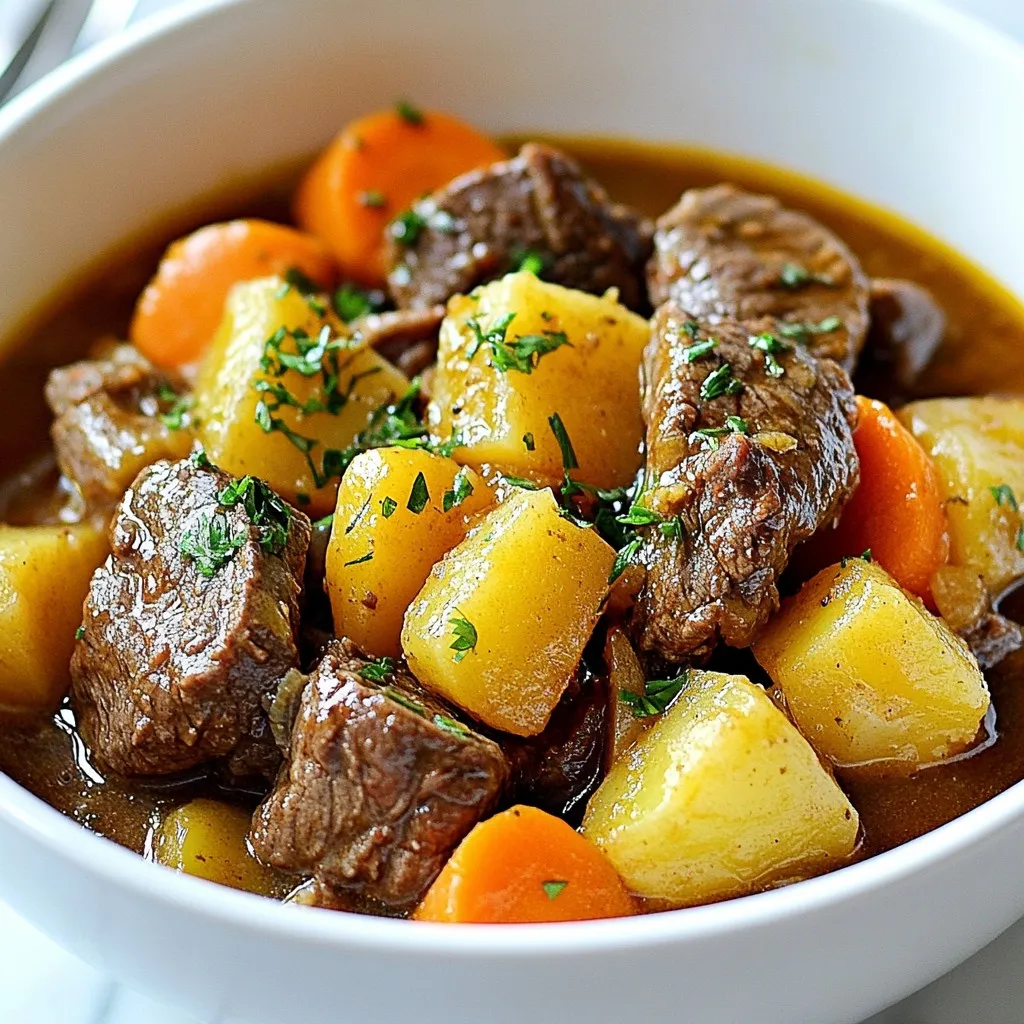
Instant Pot Beef Stew Comforting and Hearty Recipe
Are you ready to enjoy a warm, filling meal? My Instant Pot Beef Stew is the perfect comfort food for any day. With tender beef,
- 4 bone-in, skin-on chicken thighs - 1 cup heavy cream - 1 cup chicken broth - 2 tablespoons olive oil - 4 cloves garlic, minced - 1 tablespoon Dijon mustard - 1 teaspoon smoked paprika - 1 teaspoon dried thyme - Salt and pepper to taste - Fresh parsley, chopped (for garnish) Gather these ingredients before you start cooking. The chicken thighs give the dish a rich flavor. Heavy cream makes it creamy and smooth. Chicken broth adds depth and moisture. These three main ingredients work together perfectly. Next, we have the additional ingredients. Olive oil helps to cook the garlic. Garlic brings a lovely aroma and taste. Dijon mustard adds a tangy kick. Smoked paprika gives a hint of smokiness. Dried thyme brings herbaceous notes. Salt and pepper enhance all the flavors. Lastly, fresh parsley brightens the dish as a garnish. Make sure to measure everything out. It will save time later and ensure perfect results. Each ingredient plays a key role in your creamy oven-baked chicken thighs. Now you’re ready to cook! {{ingredient_image_1}} 1. First, preheat your oven to 375°F (190°C). This helps cook the chicken evenly. 2. In a skillet, add 2 tablespoons of olive oil over medium heat. Once hot, add 4 minced garlic cloves. Sauté for about 1 minute. The garlic should smell great but not burn. 3. In a bowl, mix 1 cup of heavy cream and 1 cup of chicken broth. Add 1 tablespoon of Dijon mustard, 1 teaspoon of smoked paprika, and 1 teaspoon of dried thyme. Season with salt and pepper to taste. Whisk until smooth. This creamy mixture will coat the chicken and add flavor. 1. Take a baking dish and arrange 4 chicken thighs skin-side up. Make sure they fit well without crowding. 2. Pour the creamy mixture around the chicken. Ensure the thighs are coated but not submerged. This helps keep the skin crispy while cooking. 3. Place the dish in the oven and bake for about 40 to 45 minutes. Use a meat thermometer to check for an internal temperature of 165°F (74°C). This tells you the chicken is safely cooked. 1. For crispy skin, turn your oven to broil. Broil the chicken thighs on high for 3 to 5 minutes at the end of baking. Keep an eye on them to avoid burning. 2. After broiling, remove the chicken from the oven. Let it rest for a few minutes. This helps the juices settle. 3. Before serving, garnish with freshly chopped parsley. This adds color and freshness. Serve the chicken on a platter with extra creamy sauce spooned over the top. Enjoy! To make sure your chicken thighs stay creamy, use heavy cream. This thick cream makes a rich sauce. Mix it well with chicken broth and seasonings. This blend keeps the sauce smooth and tasty. The best internal temperature for chicken is 165°F (74°C). Use a meat thermometer to check. Insert it into the thickest part of the thigh. This step ensures you cook the chicken safely and perfectly. Pair your creamy chicken thighs with roasted veggies or mashed potatoes. These sides complement the dish and add color to your plate. For a fresh touch, serve with a salad or steamed broccoli. To impress your guests, use a large platter for presentation. Arrange the chicken thighs with the creamy sauce on top. Sprinkle fresh parsley for a bright finish. This simple touch makes the meal feel special and inviting. Pro Tips Perfect Browning: For even better flavor, sear the chicken thighs skin-side down in the skillet for 3-4 minutes before baking to achieve a golden, crispy skin. Flavor Infusion: Marinate the chicken in the creamy mixture for 1-2 hours in the refrigerator to allow the flavors to penetrate the meat more deeply. Herb Variations: Experiment with different herbs like rosemary or oregano for a unique twist on the traditional flavor profile. Resting Time: Let the chicken rest for about 5 minutes after baking to allow the juices to redistribute for a more succulent bite. {{image_2}} You can change the flavor of creamy oven-baked chicken thighs. Try using different herbs and spices. For a fresh twist, add rosemary or oregano. These herbs give a lovely aroma. If you want a kick, use cayenne pepper. This spice adds heat without overpowering the dish. Another option is to substitute for lighter cream options. You can use half-and-half instead of heavy cream. This change will lower the fat but still keep a creamy texture. Coconut milk also works well for a dairy-free version. It adds a hint of sweetness that pairs nicely with the savory chicken. You can also switch the chicken thighs for boneless ones. Boneless chicken cooks faster. Just be sure to adjust the cooking time. Bake boneless thighs for about 25 to 30 minutes. Check that the internal temperature reaches 165°F (74°C). Adding vegetables to the mixture makes this dish even better. You can add carrots, potatoes, or green beans. Toss them in the creamy sauce before baking. This addition creates a one-pan meal. Plus, the veggies soak up all the delicious flavors. To store creamy chicken thighs, first let them cool down. Place the chicken in an airtight container. Make sure to add some of the creamy sauce on top. This helps keep the chicken moist. You can also use a glass dish with a lid. These containers work well for keeping flavors intact. When reheating, use the oven for the best results. Preheat your oven to 350°F (175°C). Place the chicken in a baking dish and cover it with foil. This keeps the chicken moist and helps with creaminess. Heat for about 20 minutes or until warm. You can also use a microwave if you're in a hurry. Just cover the dish with a microwave-safe lid. Heat in short bursts, stirring often, to keep the sauce creamy. Can I use chicken breasts instead of thighs? Yes, you can use chicken breasts. They cook faster than thighs. The dish may be less juicy. Thighs have more fat, which adds flavor. If using breasts, check them often to avoid drying out. How do I know when the chicken is done? The chicken is done when it reaches 165°F (74°C). Use a meat thermometer to check. Insert it into the thickest part of the thigh. If the juices run clear, it’s also a good sign. What can I use instead of heavy cream? You can use half-and-half or coconut cream. Both options will add creaminess. If you want a lighter taste, try plain yogurt. Just mix it well with broth before adding. Is it possible to make this dish dairy-free? Yes, you can make it dairy-free! Use almond milk or oat milk instead of heavy cream. Make sure to add some cornstarch to thicken the sauce. This keeps the creamy texture you love. This blog post outlines a rich and tasty creamy chicken thighs recipe. We covered the key ingredients, from chicken and cream to seasonings like garlic and thyme. I shared step-by-step instructions for prepping, baking, and finishing your dish. We explored tips for perfect texture and serving ideas. You learned about variations to make the recipe your own and how to store leftovers. Use these insights to create a dish that impresses. Cook with confidence, and enjoy sharing this meal with others. Your kitchen adventures await!
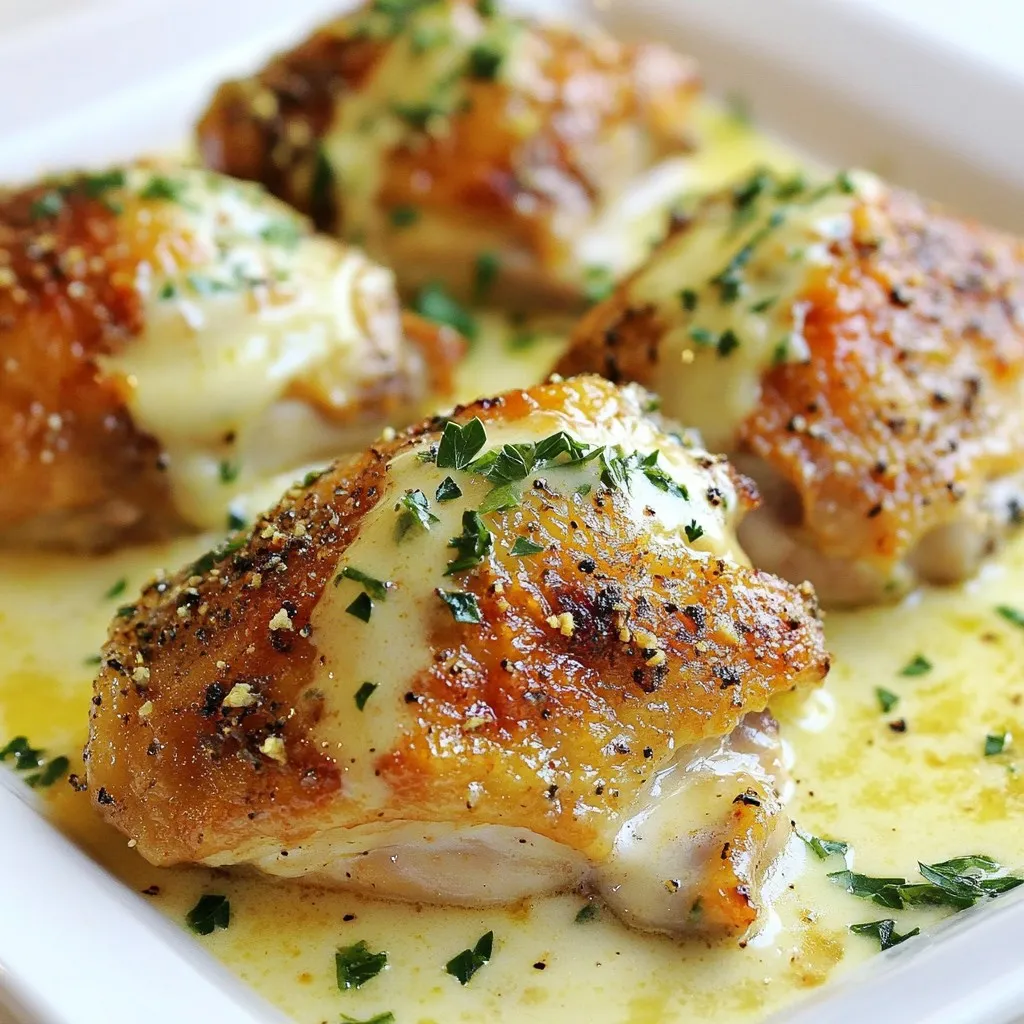
Creamy Oven-Baked Chicken Thighs Flavorful Delight
Are you ready to elevate your dinner game? In this post, I’ll share how to make creamy oven-baked chicken thighs that are a flavorful delight.
- Ground chicken and its preparation - You need 1 pound of ground chicken. Cook it until it’s brown in a skillet. This gives a nice flavor and texture. Make sure to break it into small pieces as it cooks. - Whole30 compliant hot sauce options - Use 1/4 cup of hot sauce that meets Whole30 rules. Look for brands without added sugars or artificial ingredients. This sauce brings the buffalo flavor that makes these peppers special. - Fresh herbs for garnish - Use 1/4 cup of chopped fresh cilantro and 1/4 cup of sliced green onions. These herbs add a fresh taste and bright color. They make your dish look good too. Just sprinkle them on top before serving. This mix of ingredients creates a tasty and healthy meal. You can enjoy these stuffed peppers without worry. {{ingredient_image_1}} First, you need to preheat your oven to 375°F (190°C). This temperature is key for cooking the peppers just right. If your oven is too cool, the peppers won’t soften well. On the other hand, if it’s too hot, they might burn. To make clean-up easy, line your baking dish with parchment paper. This way, any drips or spills will not stick to the dish. You can simply toss the paper when you’re done! Next, let’s prep the bell peppers. Start by washing them well under cold water. This removes any dirt or pesticides. Then, slice off the tops of the peppers and remove the seeds and membranes inside. This step is important because the seeds can be bitter. You can use any color of bell pepper you like, such as red, yellow, or green. Each adds a unique flavor! Now it’s time to cook the chicken. Heat one tablespoon of olive oil in a large skillet over medium heat. When the oil is hot, add the finely chopped onion and minced garlic. Sauté them for about three minutes until the onion turns translucent. Next, crank up the heat to medium-high and add one pound of ground chicken. Cook it for about five to seven minutes. Stir the chicken often to break it into small pieces. Make sure it cooks all the way through; there should be no pink left! After the chicken is done, mix in the cauliflower rice, hot sauce, smoked paprika, onion powder, salt, and pepper. Cook this mixture for another three to four minutes until it’s well combined and heated through. Now you’re ready to stuff those peppers! To boost the buffalo chicken flavor, adjust the spices. You can add more smoked paprika for a deeper taste. A pinch of cayenne can add heat if you like it spicy. Mixing in some celery or carrots gives a fresh crunch. These veggies can balance the heat while adding texture. Prepare your ingredients a day ahead for easy cooking. Chop the onion and garlic, and store them in the fridge. You can also cook the ground chicken mix beforehand. Store the mixture in an airtight container. Assemble the stuffed peppers when you're ready to bake. This saves time on busy nights. Serve these stuffed peppers with a crisp salad. A side of carrot sticks or cucumber slices pairs well too. For utensils, use a fork and a knife for easy eating. Enjoy every bite of this flavorful meal! Pro Tips Choose Your Peppers Wisely: Select firm and vibrant bell peppers to ensure they hold their shape while baking and provide a satisfying crunch. Customize the Spice Level: Adjust the amount of hot sauce based on your preference; for a milder flavor, start with less and add more as needed. Make Ahead: Prepare the stuffed peppers in advance and store them uncooked in the fridge for up to a day. Just bake them when you're ready to serve! Garnish for Flavor: Don't skip the garnish! Fresh cilantro and green onions add a burst of flavor and color to your dish. {{image_2}} You can switch the ground chicken for other proteins. Ground turkey works well. It has a mild flavor and cooks similarly. If you prefer beef, use lean ground beef for a richer taste. For a unique twist, try shredded chicken or even pulled pork. If you want vegan options, use lentils or chickpeas. These beans add great texture. You can also mash cauliflower instead of rice for a lighter filling. While bell peppers are tasty, try other vegetables too. Zucchini or eggplant can be fun bases. They hold up well and soak up flavors. You can also use portobello mushrooms for a meaty texture. Get creative with flavors! Add different spices like cumin or chili powder. You can even mix in some diced tomatoes for a fresh taste. Each variation can give your dish a new life. To keep your Whole30 Buffalo Chicken Stuffed Peppers fresh, use airtight containers. Glass containers work great. They help keep the peppers moist and tasty. Make sure to let them cool down before sealing. If you want to freeze them, wrap each pepper in plastic wrap. Then, put them in a freezer-safe bag. This keeps out air and prevents freezer burn. They can stay in the freezer for up to three months. When it's time to reheat, you have options. To keep the peppers moist, use the oven. Preheat it to 350°F (175°C). Place the peppers in a baking dish and cover with foil. Heat for about 20 minutes. If you're in a rush, the microwave works too. Just heat them for 2-3 minutes. Check if they are warm throughout. Enjoy your meal without losing that delicious flavor! Yes, you can make these stuffed peppers ahead of time. Prepare the filling first. Cook the chicken, onions, and spices as directed. Then, let the mixture cool. Stuff the peppers and cover them with plastic wrap. Store them in the fridge for up to 24 hours. When you are ready to eat, bake them as instructed. They may need a few extra minutes in the oven if they are cold from the fridge. This method saves time and keeps flavors fresh. If you want alternatives to cauliflower rice, try these options: - Riced broccoli - Finely chopped zucchini - Shredded carrots - Riced turnips These substitutions keep the dish compliant with Whole30. Choose any that you like best. Each option brings its own flavor and texture. Yes, stuffed peppers fit the Whole30 guidelines. This recipe uses ground chicken, fresh vegetables, and Whole30 compliant hot sauce. The peppers themselves are a great low-carb option. All ingredients support the Whole30 plan, making this dish a healthy choice. Enjoy these stuffed peppers guilt-free while following your Whole30 journey. In this blog post, we explored making Whole30 Buffalo Chicken Stuffed Peppers. You learned about the key ingredients, from ground chicken to fresh herbs. We followed step-by-step instructions for prepping and cooking, including tips for perfect flavor. Variations let you mix proteins and peppers for more fun. Lastly, we covered storage and reheating tips for leftovers. Buffalo chicken peppers are tasty and easy. With this recipe, you can create a healthy meal sure to impress. Enjoy your cooking adventure!
Whole30 Buffalo Chicken Stuffed Peppers Tasty Meal
Looking for a meal that’s both satisfying and Whole30-compliant? You’ll love these Whole30 Buffalo Chicken Stuffed Peppers! In this easy recipe, I’ll show you how
- 2 cups cooked chicken, shredded - 1 cup cream cheese, softened - 1 cup shredded mozzarella cheese - 2 cloves garlic, minced - 1 tablespoon fresh parsley, chopped The main ingredients are key to making these wraps tasty. Use cooked chicken to save time. Shredded chicken mixes well with cream cheese and mozzarella cheese. These cheeses add creaminess and flavor. Fresh garlic gives a strong taste. Parsley adds a nice touch of color and freshness. - 4 large tortillas (flour or whole wheat) - 1 cup baby spinach - 1/2 cup cherry tomatoes, halved - 1 teaspoon smoked paprika - Salt and pepper to taste - Olive oil for cooking Tortillas serve as the wrap base. You can choose flour or whole wheat based on your taste. Baby spinach adds crunch and nutrients. Cherry tomatoes bring a pop of color and sweetness. Smoked paprika adds depth and a hint of smoke. Don't forget salt and pepper to enhance all the flavors. A little olive oil helps crisp the wraps when cooking. {{ingredient_image_1}} First, gather your ingredients in a bowl. You need 2 cups of shredded chicken, 1 cup of cream cheese, and 1 cup of shredded mozzarella cheese. Mix these together well. Then, add 2 minced garlic cloves, 1 tablespoon of chopped parsley, and 1 teaspoon of smoked paprika. Season with salt and pepper to your taste. This cheesy filling is rich and full of flavor. Now it’s time to assemble your wraps. Lay out 4 large tortillas on a clean surface. Take a portion of the cheesy chicken mixture and spread it evenly on each tortilla. Leave about an inch of space at the edges. Next, add a handful of baby spinach and a few halved cherry tomatoes on top of the filling. This adds crunch and color to your dish. Heat a skillet over medium heat and drizzle in some olive oil. Place the wraps seam-side down in the skillet. Cook them for 3 to 4 minutes until they turn golden brown. Flip the wraps carefully and cook the other side for another 3 to 4 minutes. The cheese should melt, and the tortillas should be crispy. Once done, remove the wraps from the skillet and let them cool slightly before slicing in half. To make your wraps shine, choose the right seasonings. I love using smoked paprika. It adds a nice depth to the chicken. You can also try garlic powder or onion powder for extra flavor. If you have leftover chicken, use it! Shred it and mix it into the cheese blend. This saves time and tastes great. You can use rotisserie chicken too. It has great flavor and makes cooking easier. Crispy wraps are a must. To get this, heat your skillet well before adding the wraps. Use medium heat and a splash of olive oil. This helps make the outside nice and crunchy. To avoid soggy tortillas, don’t overload them with filling. Keep a good balance. Also, let the wraps cool a bit after cooking. This way, steam won’t make them soft. Enjoy your crispy, cheesy garlic chicken wraps! Pro Tips Use Leftover Chicken: This recipe is perfect for using up leftover rotisserie chicken, saving both time and effort. Customize Your Veggies: Feel free to add any vegetables you enjoy, such as bell peppers or onions, to the cheesy filling for extra flavor and nutrition. Cooking Method: For a healthier option, you can bake the wraps instead of frying. Just place them on a baking sheet and bake at 375°F (190°C) for 15-20 minutes until golden and crispy. Make Ahead: These wraps can be assembled ahead of time and stored in the refrigerator for up to a day. Just cook them when you’re ready to eat! {{image_2}} You can switch up the flavor of your cheesy garlic chicken wraps in fun ways. Try using different cheeses like cheddar or pepper jack. These cheeses add a unique taste and kick. You can also add spices like Italian seasoning or chili flakes for an extra zing. If you want a lighter option, swap the chicken for grilled veggies. Zucchini, bell peppers, and mushrooms work great. They add color and flavor. Plus, grilled veggies bring a nice crunch to each bite. If you need gluten-free options, use gluten-free tortillas. These wraps still taste great and hold all your fillings. For those who are vegan, you can replace the chicken with chickpeas or tofu. Use vegan cream cheese and dairy-free cheese for a tasty twist. These changes keep the meal delicious while meeting your dietary needs. To store your cheesy garlic chicken wraps, first let them cool down. Place them in an airtight container. This keeps them fresh. You can also wrap them in plastic wrap. Make sure they are sealed well. In the fridge, they last about 3 to 4 days. If you plan to eat them later, use the freezer instead. For freezing, wrap each wrap tightly in foil or plastic wrap. This helps prevent freezer burn. Place the wrapped wraps in a freezer bag. Be sure to label the bag with the date. They can stay frozen for up to 2 months. When you're ready to eat, take one out. To reheat, you can use the oven or a skillet. If using the oven, preheat it to 375°F (190°C). Bake for about 15-20 minutes. If using a skillet, heat it over medium heat. Cook until warm, about 5-7 minutes. Enjoy your cheesy garlic chicken wraps anytime! You can boost the spice with a few simple steps. Try adding some crushed red pepper flakes to the cheesy mixture. You can also mix in diced jalapeños for a fresh kick. If you want more heat, consider using pepper jack cheese instead of mozzarella. For a smoky flavor, add a bit more smoked paprika. These small changes will make your wraps flavorful and exciting. Yes, you can! Make the cheesy filling a day before. Store it in the fridge in an airtight container. Assemble the wraps just before you cook them. This keeps the tortillas fresh and avoids sogginess. If you must prepare them all at once, wrap them tightly in foil. This helps keep them warm until serving. Pair your wraps with fun sides and dips. A fresh salad adds crunch and color. Try a light dressing with lemon and olive oil. You can serve salsa or guacamole for a tasty dip. Marinara sauce is also a great choice. It adds flavor and moisture to each bite. These sides make your meal complete and enjoyable. In this article, we explored how to make Cheesy Garlic Chicken Wraps. You learned about key ingredients like chicken, cream cheese, and spices. We discussed easy steps for preparation, assembly, and cooking. I shared tips to enhance flavor and achieve crispy wraps. Plus, we covered variations, storage tips, and common questions. Now, it’s time to enjoy your delicious wraps! Try customizing them to fit your taste. These wraps are simple, tasty, and perfect for any meal. Happy cooking!
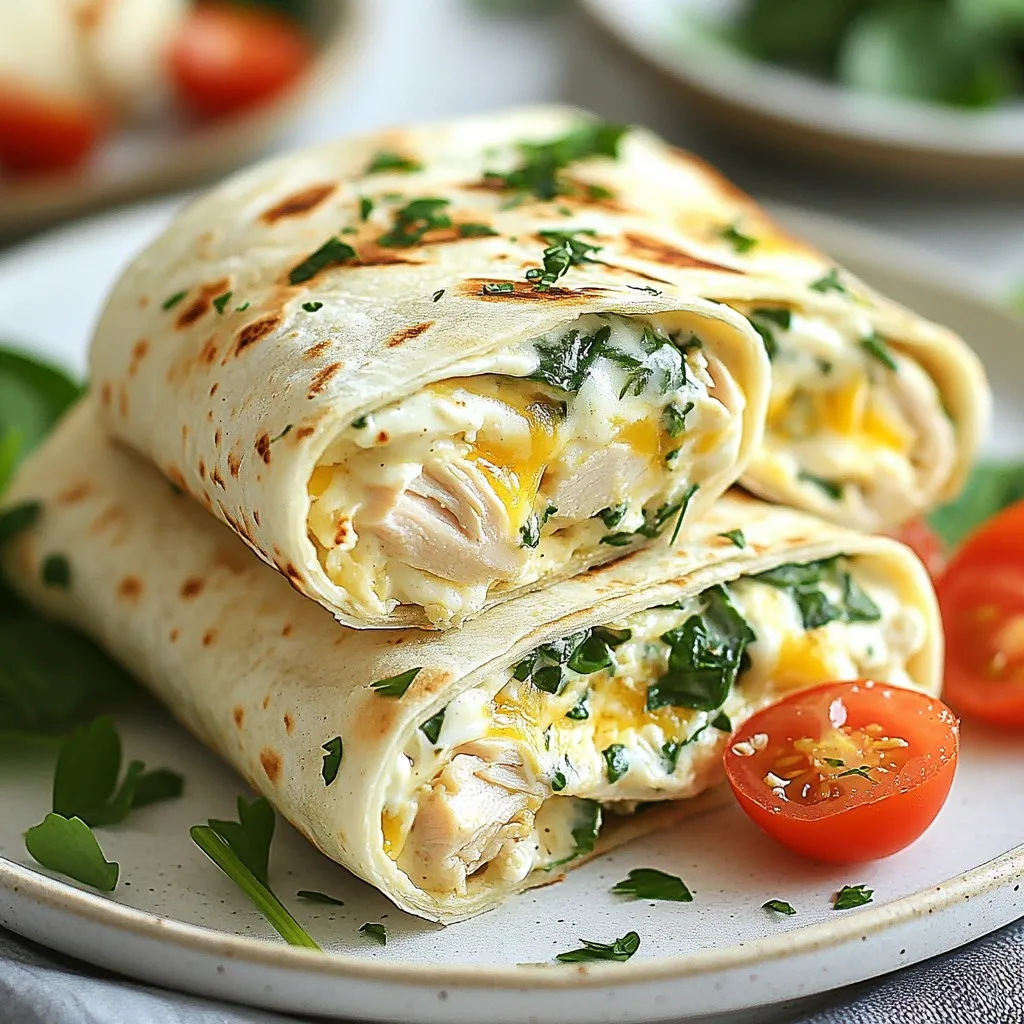
Cheesy Garlic Chicken Wraps Simple and Tasty Meal
If you’re looking for a simple, tasty meal that’s easy to make, you’ve hit the jackpot! Cheesy Garlic Chicken Wraps pack a flavor punch with
To make a tasty Chicken Broccoli Stir Fry, gather these main ingredients: - 1 lb (450g) boneless, skinless chicken breast, thinly sliced - 2 cups broccoli florets - 1 red bell pepper, sliced - 1 cup snap peas - 3 cloves garlic, minced - 1 tablespoon fresh ginger, grated - 3 tablespoons soy sauce - 2 tablespoons sesame oil - 1 tablespoon honey - 1 teaspoon cornstarch - 1 tablespoon water - Salt and pepper to taste These ingredients create a balance of flavors. The chicken gives protein, while the veggies add crunch and color. To make your dish look great, consider these optional garnishes: - Sesame seeds - Chopped green onions Garnishes not only add flavor. They also enhance the dish's visual appeal. You can switch some ingredients for variety or dietary needs: - Use tofu instead of chicken for a vegetarian option. - Swap snap peas with green beans for a different crunch. - Try coconut aminos instead of soy sauce for a gluten-free choice. These substitutions keep the dish interesting and adaptable. You can enjoy it your way! {{ingredient_image_1}} Start by slicing the chicken breast into thin pieces. In a bowl, mix the chicken with one tablespoon of soy sauce. Add a pinch of salt and pepper. Make sure the chicken is well coated. Let it marinate for at least 15 minutes. This step adds flavor and helps tenderize the chicken. You can prepare the sauce while the chicken marinates. In a small bowl, combine the remaining soy sauce, sesame oil, honey, cornstarch, and water. Whisk the mixture until smooth. This sauce will add a sweet and savory taste to your stir fry. Set it aside until you are ready to cook. Heat a large non-stick skillet or wok over medium-high heat. Once hot, add the marinated chicken. Stir-fry the chicken for about 5 to 7 minutes. Cook until it is golden brown and no longer pink. Remove the chicken from the pan and set it aside. Next, add a bit more sesame oil if needed. Sauté minced garlic and grated ginger for about 30 seconds. This step brings out their flavors. Then, add broccoli, red bell pepper, and snap peas. Stir-fry these veggies for 4 to 5 minutes until they are tender-crisp. Finally, return the cooked chicken to the pan. Pour the prepared sauce over the mix. Toss everything together for an additional 2 to 3 minutes. This allows the sauce to thicken and coat your chicken and veggies nicely. To make a great stir fry, heat is key. Use a large skillet or wok. Preheat it well before adding any food. This helps cook your chicken and veggies fast, keeping them juicy. Stir constantly to avoid burning. The goal is to cook quickly while keeping flavors fresh. For tender-crisp veggies, cut them into small, even pieces. This ensures even cooking. Add the vegetables to the pan in a specific order. Start with the hardest ones, like broccoli. Cook them for a minute before adding softer ones like snap peas. This method keeps your veggies bright and crunchy. The sauce can be adjusted to suit your taste. Start with the basic mix of soy sauce, sesame oil, honey, and cornstarch. If you want it sweeter, add more honey. Prefer a saltier taste? Increase the soy sauce. You can even add chili sauce for some heat. Taste the sauce before mixing it with the chicken and veggies. Adjust as needed, and enjoy your perfect stir fry! Pro Tips Marinate for Flavor: Allow the chicken to marinate longer than 15 minutes if possible. This enhances the flavor and tenderness of the meat. High Heat Cooking: Stir-frying works best at high heat. Ensure your skillet or wok is hot enough before adding ingredients to achieve that perfect sear. Veggie Crunch: To keep your vegetables crunchy, avoid overcooking them. Aim for tender-crisp by cooking them just until bright in color. Garnish for Appeal: A sprinkle of sesame seeds and chopped green onions not only adds flavor but also enhances the visual appeal of your dish. {{image_2}} You can switch the chicken for other proteins. Try thinly sliced beef or shrimp. Tofu is also a great choice for a plant-based dish. Each protein will bring a different flavor. Adjust cooking times based on what you choose. Beef may need a bit longer, while shrimp cooks fast. Keep the rest of the recipe the same for a quick meal. If you want a vegetarian or vegan dish, replace the chicken with tofu. Use firm tofu for the best texture. Press it to remove extra water, then cut it into cubes. You can also use tempeh or seitan for extra protein. For a vegan sauce, swap honey with maple syrup. This keeps the sweet flavor without any animal products. Feel free to add more veggies. Carrots, bell peppers, or mushrooms work well. They add color and nutrients to your stir fry. You can also use leafy greens like spinach or kale. Just toss them in near the end of cooking. This helps them stay bright and fresh. More veggies mean more flavor and health benefits. To store leftover stir fry, let it cool first. Then, place it in an airtight container. Make sure to seal the container well to keep out air. You can keep it in the fridge for up to three days. If you want to enjoy it later, freezing is a good choice too. When reheating your stir fry, use the stovetop for the best taste. Heat a bit of oil in a pan over medium heat. Add the stir fry and cook until it’s hot. Stir it often to ensure even heating. You can also use a microwave, but it may not taste as fresh. If you use the microwave, heat in short bursts and stir in between. Freezing is great for saving stir fry. First, let it cool completely. Then, portion it into freezer-safe bags or containers. Remove as much air as you can to prevent freezer burn. You can freeze it for up to three months. To eat, thaw in the fridge overnight before reheating. This keeps the flavors fresh and tasty. Chicken Broccoli Stir Fry lasts about 3 to 4 days in the fridge. Store it in an airtight container. Make sure it cools down before sealing it. When you're ready to eat, just reheat it in a pan or microwave. This keeps the flavors fresh and tasty. Yes, you can use frozen broccoli for this recipe. Just remember to thaw it first. This helps avoid extra water in your stir fry. Stir-fry it for a shorter time, about 3 to 4 minutes. This way, it stays bright and crunchy. You can customize this stir fry in many fun ways. Here are some ideas: - Add proteins: Try shrimp, beef, or tofu. - Mix veggies: Use bell peppers, carrots, or mushrooms. - Change sauces: Swap soy sauce for teriyaki or oyster sauce. - Spice it up: Add chili flakes or sriracha for heat. These changes add variety and keep meals exciting! You learned how to make a tasty Chicken Broccoli Stir Fry. We covered essential ingredients and optional garnishes. I detailed simple steps to marinate chicken, mix sauce, and cook everything right. You also discovered tips for perfecting your dish and making it your own. Remember, this dish is flexible. You can swap proteins or add veggies. Keep the leftovers fresh by storing them correctly. Enjoy this fun, easy meal anytime you want! Now, go ahead and stir-fry your own delicious feast!
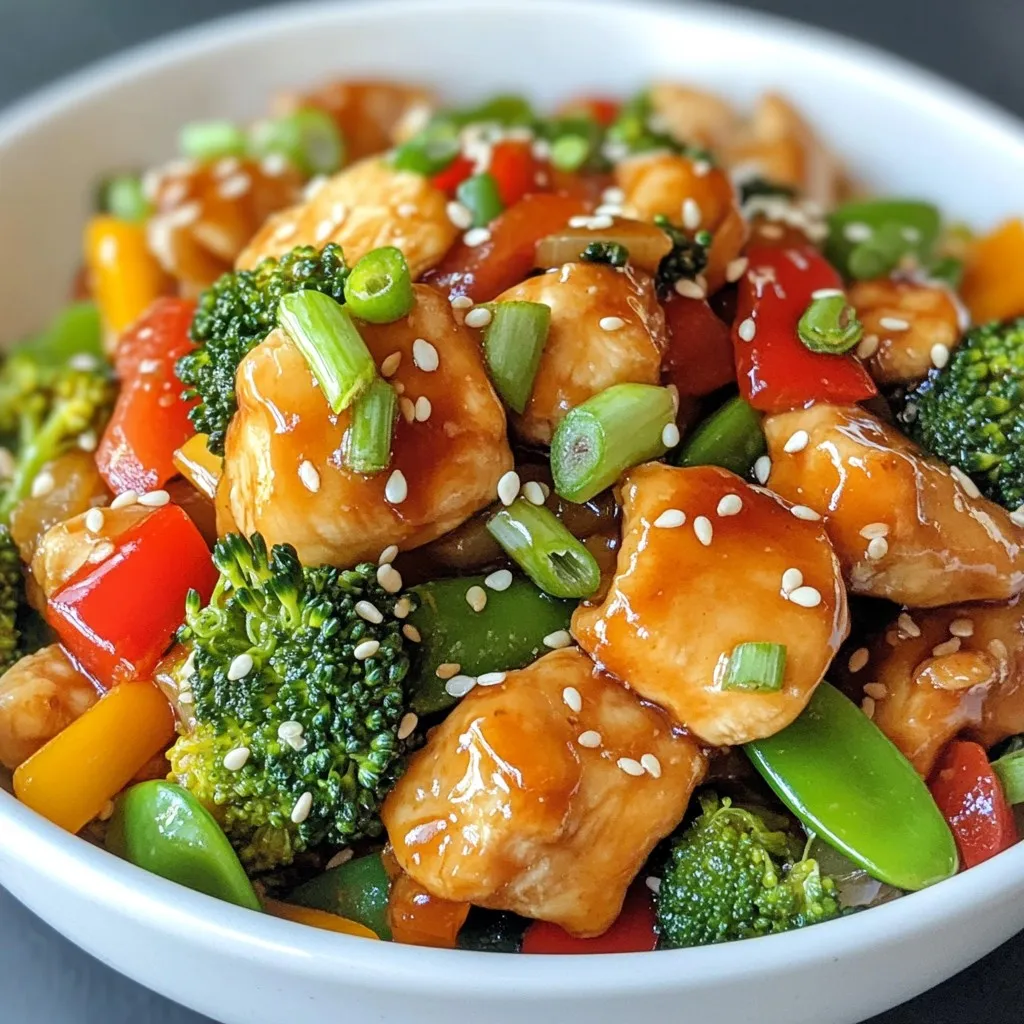
Savory Chicken Broccoli Stir Fry Quick and Easy Meal
Looking for a quick and tasty meal? You’ve come to the right place! My Savory Chicken Broccoli Stir Fry is just what you need. Not
- 2 lbs beef chuck roast, cut into chunks - 1 lb beef short ribs - 4 cloves garlic, minced - 2 tablespoons chili powder - 1 tablespoon ground cumin - 1 teaspoon dried oregano - 1 teaspoon smoked paprika - 1 teaspoon salt - ½ teaspoon black pepper - 4 cups beef broth - 4 dried guajillo chiles, stems and seeds removed - 2 dried ancho chiles, stems and seeds removed - 2 medium onions, chopped (one for sauce, one for tacos) - 2 bay leaves - 2 tablespoons vegetable oil - 12 corn tortillas - Fresh cilantro, chopped for garnish - Lime wedges, for serving - Blender - Large pot or Dutch oven - Skillet To make juicy birria tacos, you need quality meat. Beef chuck roast and short ribs give the best flavor and texture. The chiles add a rich, smoky taste. Guajillo and ancho chiles are classic choices. They enhance the dish with unique flavors. You also need spices. Chili powder, cumin, oregano, smoked paprika, salt, and black pepper create a tasty blend. Garlic is key for depth. Don't forget the onions! They add sweetness and a nice base for the sauce. Essential garnishes include fresh cilantro and lime wedges. They brighten up the tacos and add freshness. For equipment, a blender makes smooth marinades. A large pot or Dutch oven is perfect for slow cooking. Lastly, a skillet is great for toasting the tortillas. Gather these ingredients and tools. You are ready to create delicious birria tacos! {{ingredient_image_1}} To start, we need to prepare the chiles. First, boil water in a small pot. Add the guajillo and ancho chiles. Let them soak for about 15 minutes. This will soften them. Once soft, drain and set them aside. Next, we blend the marinade. In a blender, combine the soaked chiles, minced garlic, chili powder, ground cumin, dried oregano, smoked paprika, salt, and black pepper. Pour in 1 cup of beef broth. Blend until smooth. This rich marinade will add great flavor to the meat. Now, let's cook the meat. In a large pot or Dutch oven, heat vegetable oil over medium-high heat. Add the beef chuck and short ribs. Sear the meat on all sides until browned. This step locks in the juices. Once browned, remove the meat and set it aside. It's time to combine the ingredients in the pot. In the same pot, add chopped onions. Sauté until they are translucent. Return the seared meat to the pot. Add the blended chili paste, bay leaves, and the remaining beef broth. Stir well to mix everything together. Now we need to simmer the meat. Bring the mixture to a boil. Then reduce the heat to low. Cover and let it simmer for about 2 to 3 hours. The meat should become fork-tender. If you prefer, use a slow cooker on low for 6 to 8 hours. Once the meat is cooked, it's time to shred it. Remove the meat from the pot with a slotted spoon. Use two forks to shred the meat. Discard any bones and bay leaves. Return the shredded meat to the broth for extra flavor. This step helps keep the meat juicy and delicious. To boost the flavor of your birria, consider enhancing the marinade. You can add a touch of orange juice for brightness. A splash of vinegar can also add a nice tang. When searing the meat, make sure the pot is hot. This helps lock in the juices. Sear the meat until it gets a nice brown color on all sides. This step adds depth to the taste. Toasting your tortillas is key. Use a dry skillet over medium heat. Toast each side for about 30 seconds. This makes them warm and flexible. For the best flavor, choose corn tortillas. They have a nice taste that pairs well with birria. Look for fresh, thick ones for added durability. Pair your tacos with fresh sides. Chopped onions and cilantro add crunch and flavor. A side of pickled radishes gives a tangy kick. For drinks, try a light Mexican beer or a refreshing agua fresca. These drinks complement the rich flavors of the tacos perfectly. Enjoy them with lime wedges for that extra zest! Pro Tips Marinate the Meat: For even more flavor, marinate the meat in the blended chili mixture overnight in the refrigerator before cooking. Use a Pressure Cooker: If you're short on time, using a pressure cooker can significantly reduce the cooking time to about 1 hour while still achieving tender meat. Adjust Spice Levels: Feel free to adjust the amount of chili powder or add some chipotle peppers if you prefer a spicier birria. Serve with Toppings: Enhance your tacos with toppings like diced radishes, avocado slices, or crumbled queso fresco for extra flavor and texture. {{image_2}} You can switch up the meat in your birria tacos. If you prefer chicken, use boneless thighs for a juicy option. Chicken cooks faster, so adjust your cooking time accordingly. For pork lovers, pork shoulder works well. It gives a rich flavor and tender texture. For a vegetarian twist, consider using jackfruit or mushrooms. Jackfruit has a meaty texture and absorbs flavors well. Mushrooms like portobello or oyster provide a savory taste. Cook them in the same marinade for a delicious veggie birria. Do you prefer mild or spicy? You can control the heat in your birria tacos. For a mild version, use fewer chiles. Just skip one guajillo or ancho chile. You still get great flavor without too much heat. For spice lovers, add extra chili powder or diced jalapeños. Consider using fresh chiles for more heat. You can also try unique spices like smoked chipotle for a smoky kick or cumin for earthiness. Birria tacos aren’t the only way to enjoy this dish. You can make birria burritos by wrapping the meat and toppings in a larger tortilla. This makes for a hearty meal. Quesadillas are another option. Just add cheese and cook until melty, then fill with the birria meat. Don't forget about toppings! Try avocado slices for creaminess. Pickled onions add a tangy crunch. You can also add crumbled queso fresco for extra flavor. Each topping brings a new twist to your birria experience! After enjoying your juicy birria tacos, store any leftovers right away. Cool the meat and broth first, then place them in airtight containers. You can keep them in the fridge for up to three days. If you want to store them longer, freeze the meat and broth separately. In the freezer, they last for about three months. To reheat the meat, place it in a pot over low heat. Add a bit of the broth to keep it moist. Stir often until warm. For the broth, heat it in a separate pot over medium heat. This keeps the flavor strong. You can also use the microwave, but be careful not to overheat. To store the consomé, let it cool in a container. You can keep it in the fridge for three days. If freezing, pour it into ice cube trays. Once frozen, transfer the cubes to a freezer bag. This way, you can use small amounts when you need them. Always label your containers with the date for easy tracking. Corn tortillas work best for birria tacos. They hold the juicy meat well. Look for soft, fresh tortillas. They add a nice flavor and texture. If you need gluten-free options, choose corn tortillas. They are naturally gluten-free and perfect for this dish. To make your tacos spicy, add more chiles. You can use extra guajillo or ancho chiles. Mix in chili powder or cayenne pepper. Taste the marinade before cooking. Adjust the spice level to your liking. Remember, you can always add more spice, but you cannot take it away! Yes, you can use a slow cooker for birria. It makes the meat tender and juicy. Cook on low for 6 to 8 hours. This method lets the flavors blend well. Just follow the same steps for the marinade and meat. Enjoy the rich taste of slow-cooked birria tacos! This guide covered everything you need for juicy birria tacos. You learned about key ingredients, necessary tools, and step-by-step cooking methods. I shared tips for flavor, tortilla prep, and even creative variations. Remember, you can switch meats or adjust spice levels to suit your taste. Storing leftovers properly keeps the flavors intact. With these insights, you can now enjoy delicious birria tacos that impress. Get ready to share delicious meals with friends and family. Happy cooking!
Juicy Birria Tacos Flavorful and Easy Recipe
Are you ready to savor the rich flavors of Juicy Birria Tacos? I’ll guide you through an easy recipe that transforms simple ingredients into a
To make a delicious creamy chicken and gnocchi pot pie, gather these key ingredients: - Chicken - 1 lb boneless, skinless chicken breasts, cut into bite-sized pieces - Vegetables - 1 medium onion, diced - 2 garlic cloves, minced - 2 carrots, diced - 2 celery stalks, diced - 2 cups frozen peas - Seasonings - 1 teaspoon dried thyme - 1 teaspoon dried rosemary - Salt and pepper to taste - Liquid Ingredients - 4 cups chicken broth - 1 cup heavy cream - Gnocchi - 1 ½ cups store-bought gnocchi (fresh or frozen) - Puff Pastry - 1 cup frozen puff pastry (1 sheet), thawed - Egg - 1 egg, beaten (for egg wash) Each ingredient adds flavor and texture. The chicken gives protein, while the gnocchi adds heartiness. Fresh and frozen vegetables bring color and nutrients. The heavy cream and broth create a rich, creamy filling. Puff pastry tops it all off with a flaky crust. {{ingredient_image_1}} - Preheat Oven Start by preheating your oven to 400°F (200°C). This step is key for getting a nice, golden crust. - Sauté Vegetables In a large pot, heat 1 tablespoon of olive oil over medium heat. Add 1 medium diced onion, 2 diced carrots, and 2 diced celery stalks. Sauté these for 5-7 minutes. You want them soft and the onion to turn translucent. - Cook Chicken Add 1 pound of bite-sized chicken pieces to the pot. Season with salt and pepper. Cook the chicken for about 5-7 minutes. The chicken should no longer be pink. - Add Broth and Cream Pour in 4 cups of chicken broth. Bring this to a gentle boil. Then, reduce the heat and stir in 1 cup of heavy cream and 1½ cups of gnocchi. Let this simmer for about 5 minutes. The gnocchi should be cooked, and the mixture should look creamy. - Transfer Filling to Baking Dish Carefully transfer your creamy chicken and gnocchi mixture into a baking dish. Spread it out evenly for the best results. - Prepare Puff Pastry Top Roll out the thawed puff pastry on a floured surface. Cut it to fit your baking dish, leaving some overhang. - Seal and Cut for Steam Place the puff pastry over the filling. Press the edges down with a fork to seal them well. Cut a few slits in the top for steam to escape while baking. - Brush with Egg Wash Brush the top of the pastry with a beaten egg. This gives it a beautiful, golden color when baked. - Bake Until Golden Put the pot pie in the oven and bake for 25-30 minutes. You want the pastry to puff up and turn golden brown. - Cooling Time Once baked, remove the pot pie from the oven. Let it sit for 5 minutes before serving. This cooling time helps the filling set a bit. Selecting Gnocchi When choosing gnocchi, look for quality. Fresh gnocchi often has a light, fluffy texture. If you use frozen gnocchi, check the packaging for the best results. Both types cook quickly, so keep an eye on them. They should float to the top when done. Perfecting the Creamy Filling To create a rich and creamy filling, use heavy cream. It adds a wonderful texture. Stir in the cream slowly after the broth simmers. This helps blend the flavors well. Don't rush this step; let the flavors develop. Taste and adjust salt and pepper as needed. Avoiding Soggy Pastry To prevent soggy pastry, ensure your filling is not too wet. Let the mixture cool a bit before adding the puff pastry. This helps the pastry stay crisp. Also, brush the top with egg wash for a golden finish. Cut slits in the pastry to let steam escape. Garnishing Options Once baked, garnishing makes your pot pie look appealing. Use fresh thyme sprigs or parsley for color. A sprinkle of black pepper adds a nice touch, too. These simple additions enhance both the look and flavor of the dish. Pairing with Sides Serve your pot pie with simple sides. A fresh green salad pairs well. You can also add steamed green beans for a nice crunch. These sides balance the creamy filling and add a fresh taste to your meal. Enjoy your delicious creation! Pro Tips Use Leftover Chicken: If you have leftover rotisserie chicken, it’s a great time-saver and adds extra flavor to the pot pie. Experiment with Vegetables: Feel free to add other vegetables like mushrooms or bell peppers for added flavor and nutrition. Perfect Puff Pastry: Ensure your puff pastry is cold when you place it on the filling for the best puff and flakiness. Serving Suggestion: Serve with a side salad or crusty bread to soak up the delicious creamy filling! {{image_2}} Chicken Alternatives You can use turkey instead of chicken. Shredded rotisserie chicken also works well. For a vegetarian option, try chickpeas or tofu. Vegetable Substitutions Feel free to swap veggies based on what you have. Zucchini, mushrooms, or bell peppers can add great flavor. You can also use fresh spinach for a pop of color. Dairy-Free Options To make this dish dairy-free, swap heavy cream with coconut milk. Use a dairy-free puff pastry for the top. This keeps the creaminess without the dairy. Herbs and Spices Adding fresh herbs brings a bright flavor. Try fresh parsley or chives for a fresh taste. A pinch of red pepper flakes adds a nice kick. Adding Cheeses Mixing in cheese can elevate the dish. Try shredded cheddar or mozzarella for a creamy texture. You can also sprinkle some parmesan on top before baking for a rich flavor. - Storing Leftovers: After your meal, let the pot pie cool. Cover it tightly with plastic wrap or foil. You can also use an airtight container. It stays fresh in the fridge for up to three days. - Reheating Methods: To reheat, preheat your oven to 350°F (175°C). Place the pot pie in an oven-safe dish. Cover it with foil to keep it from getting too brown. Heat for about 20-25 minutes. You can also microwave individual portions for about 2-3 minutes, but this might make the pastry less crispy. - Preparing for Freezing: If you want to freeze the pot pie, do this before baking. Wrap the dish tightly with plastic wrap, then with foil. This keeps out air and prevents freezer burn. It can last in the freezer for up to three months. - Thawing and Reheating: To use a frozen pot pie, take it out the night before and let it thaw in the fridge. When ready to bake, preheat your oven to 400°F (200°C). Unwrap the pot pie and bake for 30-35 minutes, until golden and bubbly. If baking from frozen, increase the time to about 50-60 minutes. Check for doneness by making sure the filling is hot and the pastry is golden. Can I make this dish ahead of time? Yes, you can. Prepare the filling and store it in the fridge. Then, add the puff pastry before baking. This keeps the crust fresh. What can I substitute for puff pastry? If you don’t have puff pastry, use pie crust or biscuit dough. Both options give a nice, flaky top. Is this pot pie gluten-free? The original recipe is not gluten-free due to puff pastry. To make it gluten-free, use a gluten-free crust instead. How to know when the pot pie is done? Look for a golden-brown crust. The filling should bubble slightly. If both are true, it’s ready to serve. Can I use cooked chicken? Absolutely! Using cooked chicken saves time. Just add it to the pot with the broth and cream. How can I make it spicier? To spice it up, add red pepper flakes or a dash of hot sauce. Adjust the amount to your taste. In this post, we explored how to make a delicious pot pie. We covered the ingredients, step-by-step instructions, tips, variations, storage info, and FAQs. You now have the tools to create this dish your way. Remember, cooking is about fun and creativity. Don't hesitate to experiment with flavors and ingredients. Enjoy making and sharing your tasty pot pie!
Creamy Chicken and Gnocchi Pot Pie Delightful Meal
If you’re craving a cozy meal that warms the heart and fills the belly, look no further than this Creamy Chicken and Gnocchi Pot Pie.
- 8 ounces elbow macaroni - 2 cups sharp cheddar cheese, grated - 1 cup mozzarella cheese, grated - 1/2 cup grated Parmesan cheese - 2 cups milk - 1/4 cup unsalted butter - 1/4 cup all-purpose flour - 1 teaspoon garlic powder - 1 teaspoon onion powder - 1/2 teaspoon mustard powder - Salt and pepper to taste - 1 cup panko breadcrumbs - 1 tablespoon olive oil - Fresh parsley, chopped (for garnish) To make this crunchy baked mac and cheese, you will need a few key tools. Here’s what you’ll need: - A large pot for boiling pasta - A medium pot for making cheese sauce - A whisk for mixing - A baking dish (9x13 inch) - A wooden spoon for stirring - A small bowl for mixing breadcrumbs - An oven for baking Using fresh ingredients makes a big difference. Here are my tips: - Choose high-quality cheese. Sharp cheddar gives great flavor. - Use fresh mozzarella for a creamy texture. - Select whole milk for a rich sauce. - Look for panko breadcrumbs. They provide the best crunch. - Use unsalted butter to control salt levels in your dish. These choices enhance the taste and texture of your mac and cheese. Enjoy the process of gathering these ingredients! {{ingredient_image_1}} Start by gathering all your ingredients. You will need elbow macaroni, cheddar cheese, mozzarella cheese, and Parmesan cheese. Also, grab milk, butter, flour, garlic powder, onion powder, mustard powder, and panko breadcrumbs. Prepare a large pot for boiling water and another pot for making the cheese sauce. Fill a large pot with water. Add a pinch of salt and bring it to a boil. Once boiling, add 8 ounces of elbow macaroni. Cook it for about 7 to 8 minutes until it is al dente. Drain the pasta in a colander and set it aside. In a clean pot, melt 1/4 cup of unsalted butter over medium heat. Once melted, whisk in 1/4 cup of all-purpose flour. Cook this for about 2 minutes until it is bubbly and slightly golden. Gradually pour in 2 cups of milk while whisking. Stir in 1 teaspoon of garlic powder, 1 teaspoon of onion powder, and 1/2 teaspoon of mustard powder. Add salt and pepper to taste. Cook this mixture for 5 to 7 minutes until the sauce thickens. Remove the pot from heat and stir in 2 cups of grated cheddar and 1 cup of grated mozzarella cheese until it melts and becomes creamy. Fold the cooked macaroni into the cheese sauce until well mixed. Pour this mixture into a greased 9x13 inch baking dish. In a small bowl, combine 1 cup of panko breadcrumbs with 1 tablespoon of olive oil and a pinch of salt. Mix well until the breadcrumbs are coated. Sprinkle this breadcrumb mixture evenly over the mac and cheese. Add 1/2 cup of grated Parmesan cheese on top for a crunchy finish. Bake in the oven at 350°F for 25 to 30 minutes until the top is golden brown and crispy. Once done, let it cool for 5 minutes and garnish with fresh chopped parsley before serving. Enjoy your crunchy baked mac and cheese! To get that perfect crunch on top, use panko breadcrumbs. They are lighter than regular breadcrumbs. Mix them with a little olive oil for flavor. This step makes a huge difference! Sprinkle them evenly over your mac and cheese. For extra crunch, add grated Parmesan on top before baking. The cheese will melt and create a golden crust. Bake until you see a nice brown color on top. For a rich flavor, pair sharp cheddar with mozzarella. Cheddar gives a tangy bite while mozzarella adds creaminess. You can also try Gruyère or Gouda for something different. These cheeses melt well and add depth. If you like a little spice, add pepper jack cheese. This gives a nice kick to your dish. One common mistake is overcooking the pasta. Cook it until it's al dente, as it will bake longer in the oven. Another mistake is using low-quality cheese. Always choose good cheese for the best flavor. Also, don’t skip the salt in the pasta water. This step helps season the pasta. Lastly, let it cool briefly after baking. This helps it set and makes serving easier. Pro Tips Use Quality Cheese: Always opt for high-quality cheese for the best flavor. Sharp cheddar enhances the taste significantly. Don’t Overcook the Pasta: Cook the macaroni until just al dente, as it will continue to cook in the oven and avoid a mushy texture. Experiment with Toppings: Feel free to mix in herbs or spices into the breadcrumb topping for added flavor and texture. Let It Rest: Allow the baked mac and cheese to cool for a few minutes before serving; this helps it set and makes for easier serving. {{image_2}} You can make your Crunchy Baked Mac and Cheese even better by adding protein. Cooked chicken or crispy bacon works well. To add chicken, use grilled or rotisserie chicken. Shred it and mix it with the cheese sauce. To use bacon, cook it until crispy, then crumble it over the top. Both options add great flavor and make this dish more filling. For a vegetarian twist, consider adding veggies. Broccoli, spinach, or mushrooms blend well. Steam or sauté the veggies before mixing them in. You can also replace the cheese with a plant-based version. This keeps the dish creamy without meat while still being tasty. You can boost the flavor with spices and herbs. Try adding a pinch of paprika or cayenne for heat. Fresh herbs like thyme or rosemary can add a nice aroma. Mix in these spices when you make the cheese sauce to let them blend well. This small change makes a big difference in taste. Cool the Crunchy Baked Mac and Cheese to room temperature. Place leftovers in an airtight container. Store in the fridge for up to three days. Make sure to cover it well to keep it fresh. To reheat, use the oven for the best results. Preheat your oven to 350°F (175°C). Place the mac and cheese in a baking dish. Add a splash of milk to keep it moist. Cover the dish with foil. Bake for about 20 minutes. Remove the foil for the last 5 minutes for extra crunch. You can also microwave it. Heat on medium for 2-3 minutes, stirring halfway through. You can freeze Crunchy Baked Mac and Cheese for up to three months. Cool it completely before freezing. Use a freezer-safe container or bag. For best flavor, wrap it tightly. When ready to eat, thaw it overnight in the fridge. Reheat it in the oven or microwave as described above. Crunchy Baked Mac and Cheese lasts about 3 to 5 days in the fridge. Store it in an airtight container to keep it fresh. The longer it sits, the softer the texture becomes. Yes, you can use other types of pasta. Shells, penne, or rotini work well. Just make sure to adjust cooking times based on the pasta shape. Absolutely! You can prepare the dish a day in advance. Just assemble it, cover it, and refrigerate. Bake it just before serving for the best crunch. This dish pairs well with salads, steamed veggies, or grilled chicken. You can also serve it as a side with your favorite meats. To make it gluten-free, use gluten-free pasta and substitute the all-purpose flour with a gluten-free blend. This way, you can enjoy the same great taste! In this article, we explored the tasty world of Crunchy Baked Mac and Cheese. We discussed key ingredients, essential cooking tools, and tips for choosing the best items. We shared step-by-step instructions for preparation, cooking, and baking. You learned valuable tips for the perfect crunch and common mistakes to avoid. Feel free to experiment with protein and vegetarian options to suit your taste. Remember to store your leftovers properly for later enjoyment. Enjoy your cooking journey, and have fun making this dish!
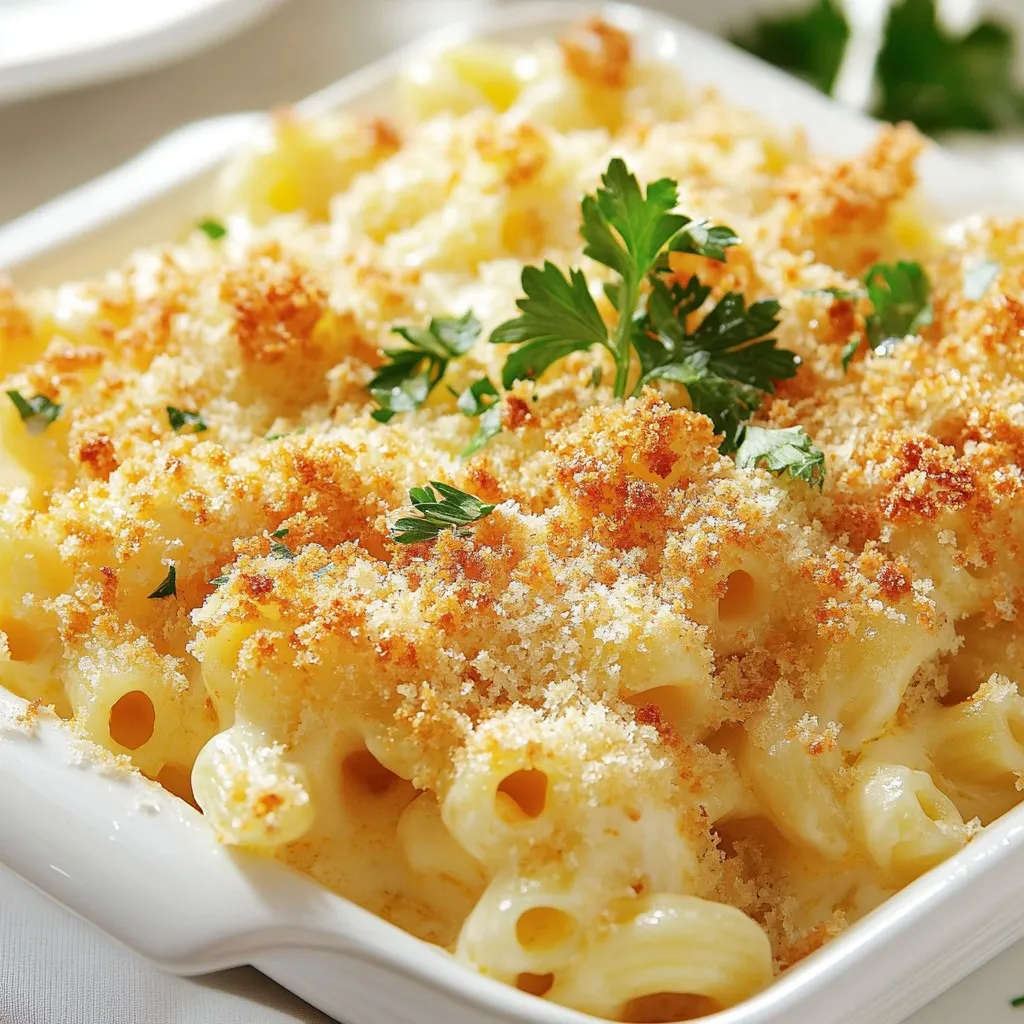
Crunchy Baked Mac and Cheese Irresistible Delight
Are you ready for a cheesy joy that crunches with every bite? Today, I’m sharing my ultimate recipe for Crunchy Baked Mac and Cheese! This