Salads

Fruit Salad with Cool Whip Refreshing Summer Treat
Looking for a quick, yummy treat to cool off this summer? This Fruit Salad with Cool Whip is your answer! Mixing fresh fruits with a
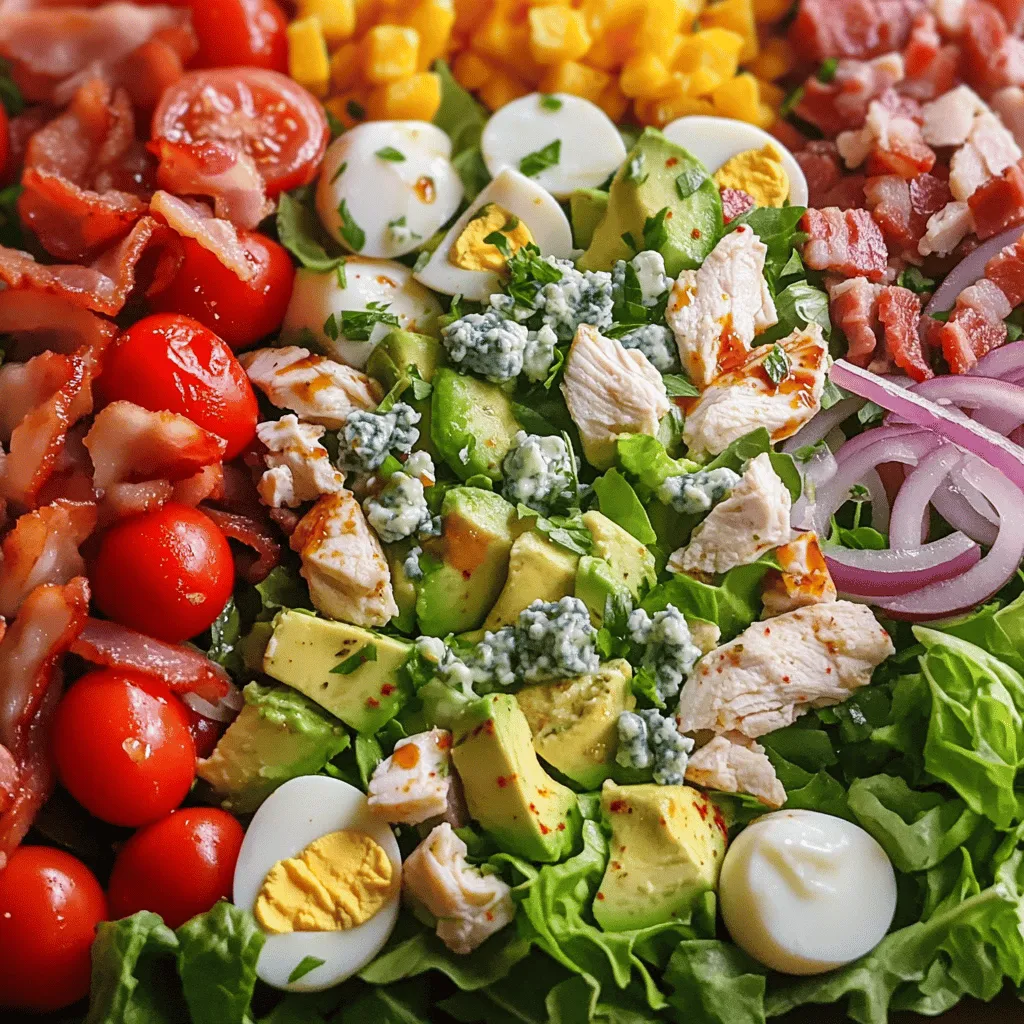
Cobb Salad Recipe Flavorful and Fresh Delight
Are you ready to whip up a fresh and flavorful Cobb salad? This delightful dish combines crisp romaine, juicy tomatoes, creamy avocado, and smoky bacon—making
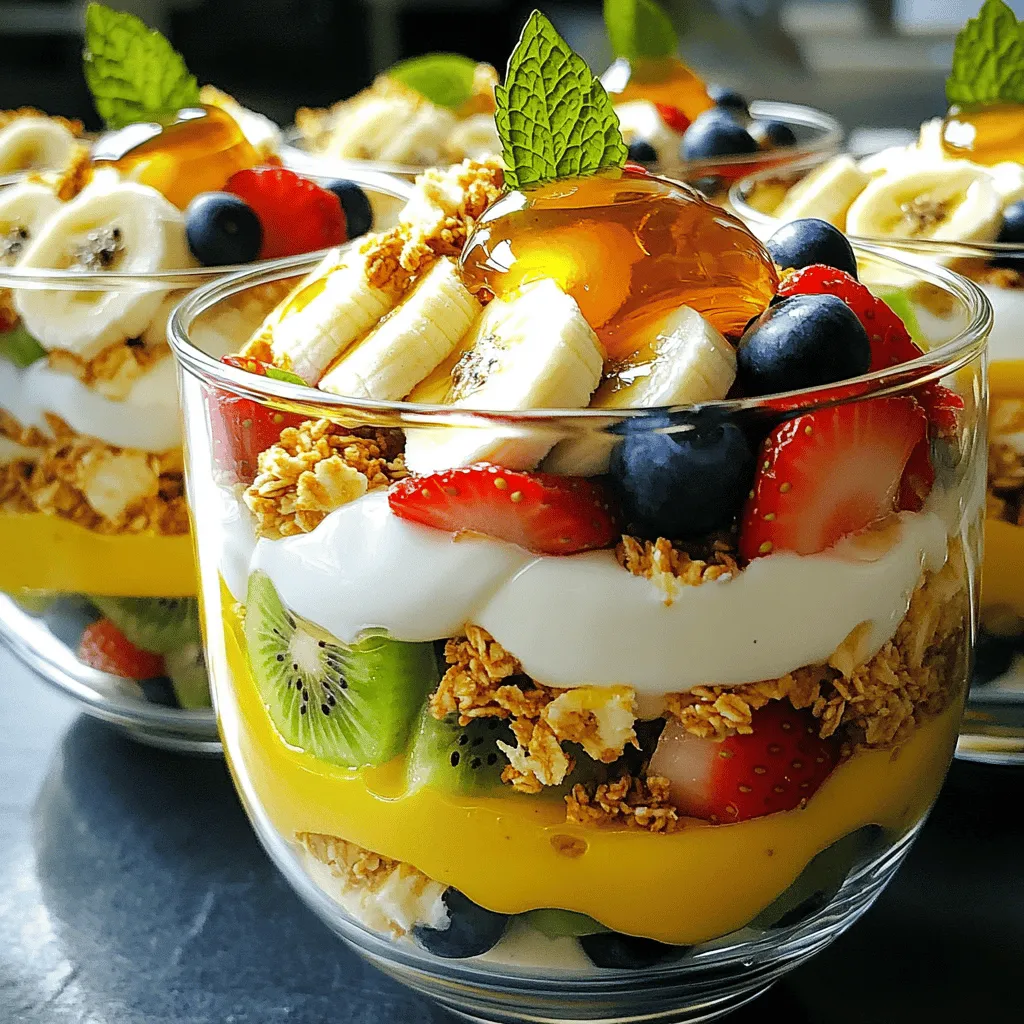
Honey Yogurt Fruit Salad Quick and Tasty Delight
Looking for a quick and tasty snack? Honey Yogurt Fruit Salad is perfect for you! It’s colorful, fresh, and easy to make. Plus, it’s a
![For a tasty fall fruit salad, you will need: - 2 crisp apples, diced (such as Honeycrisp or Fuji) - 1 cup fresh cranberries, rinsed - 1 cup ripe pears, diced - 1 cup grapes, halved - 1/2 cup pomegranate seeds These fruits create a lovely mix of sweet and tart. Apples and pears add crunch, while cranberries give a burst of flavor. Grapes are juicy and fun to eat. Pomegranate seeds add color and a bit of chew. You can make your fall fruit salad even better by adding: - 1/4 cup walnuts, chopped - 1/4 cup maple syrup - 1 tablespoon fresh lemon juice Chopped walnuts add a nice crunch. Maple syrup gives a sweet touch. A splash of lemon juice keeps the fruits bright and fresh. To dress your salad, you will need: - 1 teaspoon ground cinnamon - Pinch of salt Cinnamon brings warmth and spice to the salad. A pinch of salt balances the sweetness and enhances all the flavors. For the full recipe, check the details above. Start by washing all the fruits. Use two crisp apples and dice them into small pieces. I love Honeycrisp or Fuji apples for their sweetness. Next, rinse one cup of fresh cranberries. Cut one cup of ripe pears into small cubes. Halve one cup of grapes and toss them into a large mixing bowl. Lastly, gently fold in half a cup of pomegranate seeds. This adds a pop of color and flavor to your salad. In a small bowl, whisk together the dressing. Combine one-fourth cup of maple syrup with one tablespoon of fresh lemon juice. Add one teaspoon of ground cinnamon and a pinch of salt. Mix until all ingredients blend well. This sweet and tangy dressing will enhance your fruit salad. Drizzle the dressing over the fruit mixture in the large bowl. Toss gently to coat all the fruits evenly. Sprinkle one-fourth cup of chopped walnuts on top for a nice crunch. Give the salad one last gentle toss to mix everything together. Now, cover the bowl and chill it in the refrigerator for at least 30 minutes. This waiting time lets the flavors meld beautifully. Enjoy your fresh and flavorful treat! For the full recipe, click [Full Recipe]. Choose fruits that are in season for the best taste. For this salad, I love using crisp apples, ripe pears, and juicy grapes. Look for firm apples like Honeycrisp or Fuji. Select pears that yield slightly when pressed. Fresh cranberries should be bright and firm. When buying grapes, pick plump, unblemished ones. Seasonal fruits not only taste better but also add color. To boost the flavor, add a splash of fresh lemon juice. The citrus brightens the whole salad. A sprinkle of ground cinnamon adds warmth and spice. For presentation, use a festive bowl. Layer the fruits for a beautiful look. Top with extra pomegranate seeds for a pop of color. A sprinkle of chopped walnuts gives a nice crunch. You want your salad to be as tasty as it is pretty. Kids love fun shapes and colors. Use cookie cutters to create fun fruit shapes. Mix in some mini marshmallows for sweetness. You can even let kids help with mixing. They may be more excited to eat what they made. Consider serving the salad in fun, themed cups. This makes it feel special and more appealing. A colorful, fun fruit salad is a hit with kids. For more details on how to create this delicious dish, check out the Full Recipe. {{image_2}} You can change this salad to fit your taste. Try adding bananas or citrus fruits. Sliced strawberries add brightness too. For nuts, consider almonds or pecans. They give crunch and flavor. Each fruit or nut brings its own twist. Make it yours by mixing what you love. If you want a sweet treat, turn this salad into a dessert. Add a dollop of whipped cream or yogurt. Drizzle some chocolate sauce on top for extra sweetness. You can also sprinkle granola for a crunchy layer. This makes a fun dessert that kids will enjoy. While cinnamon is great, you can try other spices. Nutmeg or ginger adds warmth and depth. A splash of vanilla extract can also enhance the flavors. You might even mix in some fresh mint for a refreshing note. Experiment and find your favorite combinations. For the full recipe, check out the Autumn Harvest Fruit Salad. Store your fall fruit salad in an airtight container. This keeps the fruit fresh and prevents browning. You can use a glass or plastic container with a tight lid. If you have any nuts, keep them in a separate bag. Adding them right before serving helps keep them crunchy. When stored properly, your fall fruit salad lasts about three days in the fridge. After that, the fruit may start to lose its crispness. If you notice any browning or mushy spots, it’s best to toss it out. Always check for freshness before eating. Before serving leftovers, give the salad a gentle toss. This helps mix the flavors again. If the fruit looks a bit dry, you can add a splash of lemon juice or maple syrup. This will brighten the flavors and make it taste fresh. Enjoy your salad again with a new twist! This Fall Fruit Salad is packed with nutrients. Apples are great for your heart. Pears boost your digestion. Cranberries help fight infections. Grapes are full of antioxidants. Pomegranate seeds add vitamins and minerals. Walnuts provide healthy fats. Maple syrup gives a natural sweetness. Together, these fruits support overall health and taste great. Yes, you can make this salad ahead of time. Prepare the fruit and dressing separately. Mix them just before serving. Chilling the salad for 30 minutes helps the flavors blend. If you make it too early, the fruit may get mushy. Store leftovers in the fridge for up to three days. You can use many dressings for fruit salad. Try yogurt for a creamy option. Honey adds more sweetness without the syrup. Citrus dressings with orange or lime juice brighten the flavors. A simple balsamic glaze brings a unique twist. Experiment with your favorites to find what you love best. This blog post shared how to make a tasty Fall Fruit Salad. We covered key ingredients, from required fruits to dressings. You learned how to prepare, mix, and chill for maximum flavor. I shared tips on picking the best fruits and even making it kid-friendly. You can customize it with extras, like nuts or dessert elements. Remember, storing leftovers properly can keep your salad fresh. Enjoy creating your own unique salad this season!](https://tossedrecipes.com/wp-content/uploads/2025/06/5c8eed1f-957b-4ffc-9a87-5414514064ce.webp)
Fall Fruit Salad Fresh and Flavorful Treat
As the leaves turn and the air cools, savor the season with a vibrant Fall Fruit Salad. This fresh and flavorful treat combines the best
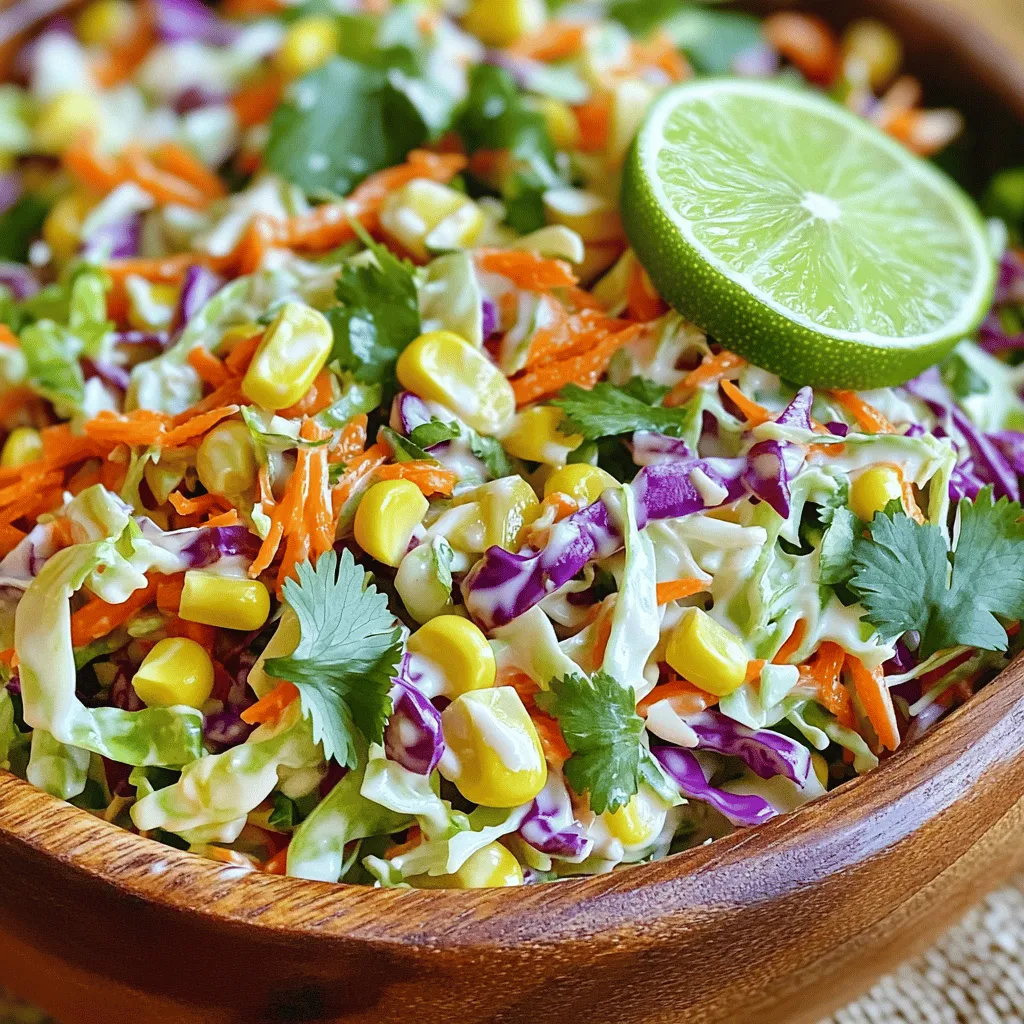
Easy Mexican Coleslaw Fresh and Flavorful Delight
Looking for a fresh and tasty side dish? You’ll love this Easy Mexican Coleslaw! It’s bright, colorful, and packed with crunch. Whether you’re grilling, having
![- 1 cup low-fat Greek yogurt - 1 tablespoon honey (or to taste) - 1 cup canned mandarin oranges, drained - 1 cup fresh pineapple, diced - 1 cup strawberries, hulled and sliced - 1 cup mini marshmallows (optional for sweetness) - ½ cup shredded coconut (unsweetened) - 1 teaspoon vanilla extract - Fresh mint leaves for garnish (optional) These ingredients create a light and tasty fruit salad. The Greek yogurt gives it a creamy base. Honey adds sweetness, while the fruits bring a burst of flavor. You can use mini marshmallows to make it sweeter, but they are optional. If you want to change things up, you can swap Greek yogurt for any yogurt you like. Try dairy-free options like coconut or almond yogurt. For sweeteners, use maple syrup or agave. If you want to switch fruits, you can add blueberries, mangoes, or even kiwi. This salad is flexible and lets you play with flavors. - Mixing bowl - Spatula or spoon - Measuring cups - Plastic wrap Having the right tools makes cooking easier. A mixing bowl is key for combining your ingredients. Use a spatula or spoon for gentle mixing. Measuring cups help ensure you get the right amounts. Finally, plastic wrap keeps your salad fresh while it chills in the fridge. For the Full Recipe, you can see the complete steps to make this delicious Skinny Ambrosia Fruit Salad. To start, gather your ingredients. In a large mixing bowl, combine 1 cup of low-fat Greek yogurt, 1 tablespoon of honey, and 1 teaspoon of vanilla extract. Stir these together well until you get a smooth and creamy mix. This base adds rich flavor and a nice creamy texture. Next, gently fold in the fruits. Add 1 cup of drained canned mandarin oranges, 1 cup of diced fresh pineapple, and 1 cup of hulled and sliced strawberries. If you want extra sweetness, add 1 cup of mini marshmallows. For a tropical twist, include ½ cup of unsweetened shredded coconut. Mix slowly to coat the fruit with the yogurt dressing without breaking it apart. After mixing, cover the bowl with plastic wrap. Refrigerate the salad for at least 30 minutes. This chilling time lets the flavors meld together, making each bite tastier. When ready to serve, give the salad a gentle stir to mix again. Serve it in small bowls or a large dish. For a nice touch, garnish with fresh mint leaves if you like. This adds color and a fresh scent. Mixing gently is crucial. It keeps the fruit intact and maintains the salad's light feel. Too much stirring can mush the fruit. Before serving, ensure the salad is cold. This makes it refreshing, especially on warm days. Enjoy the bright flavors and creamy texture of your Skinny Ambrosia Fruit Salad! For the complete recipe, refer to the [Full Recipe]. To cut calories and sugar, use less honey. You can also skip the mini marshmallows. They add sweetness but pack on extra sugar. Using fresh fruits can help too. They bring natural sweetness to the salad. For protein-rich options, swap Greek yogurt for protein-fortified versions. You could also stir in some cottage cheese. Both options boost the protein without adding too many calories. Add a burst of flavor by using citrus zest. Lemon or lime zest adds a fresh kick. A little zest goes a long way in brightening the taste. Consider adding nuts or seeds for crunch. Almonds, walnuts, or chia seeds are great choices. They give your salad a nice texture and healthy fats too. Get creative with how you serve the salad. Use small cups or clear bowls to show off the colors. Layering the fruits makes it look fancy. Choose colorful fruits to make your salad pop. Red strawberries, orange mandarins, and yellow pineapple create a vibrant look. They not only taste good but also make the dish visually appealing. Check out the full recipe for more ideas! {{image_2}} Mixing fruits can make your Skinny Ambrosia Fruit Salad exciting. You can use seasonal fruits based on what is fresh. In summer, berries shine bright. Think blueberries, raspberries, and blackberries for vibrant colors. In fall, apples and pears add a crisp bite. For tropical vibes, consider mangoes or kiwi. These fruits add sweetness and a fun twist. You can even add some passion fruit for a unique flavor. Each mix brings a new taste and look to your salad. If you want a vegan version, swap Greek yogurt for almond or coconut yogurt. These options still give you a creamy texture. For sweetness, use maple syrup instead of honey. This keeps it plant-based and delicious. If gluten is a concern, you’re in luck! All the ingredients in this salad are naturally gluten-free. You can enjoy it without worry. Just be sure to check your yogurt and marshmallows if they are certified gluten-free. You can make themed ambrosia salads for special events. For holidays, add colors to match the season. For Halloween, use oranges, blackberries, and purple grapes. For Christmas, think red and green with cherries and kiwi. Color-themed salads are fun too! Create a rainbow salad with a mix of colorful fruits. Each layer adds a new hue and flavor. This makes your dish as pretty as it is tasty. For more ideas, check the Full Recipe and let your creativity flow! To keep your Skinny Ambrosia Fruit Salad fresh, use an airtight container. Glass containers work well because they do not absorb smells. Before sealing, make sure the salad is cool. This keeps moisture from forming inside the lid. If you plan to eat it later, cover the container tightly with plastic wrap. To maintain freshness, store the salad in the fridge. Avoid leaving it out for long periods. The yogurt can spoil if it sits too long. If you have leftover salad, eat it within three days for the best taste. The optimal time to enjoy your ambrosia salad is within three days. After this, the fruits may lose their texture and flavor. Check for signs of spoilage before eating. If you see any mold or the salad smells sour, it is best to throw it away. Fresh fruits will start to brown and become mushy after a few days. If you have leftover salad, consider remixing it. You can add more fresh fruit for a new twist. Chopped apples or bananas can bring in new flavors. Another fun idea is to use it as a topping for yogurt or pancakes. You could also blend it into a smoothie for a refreshing drink. For a creative twist, try adding leftover ambrosia to baked goods. You can mix it into muffin batter or use it as a filling for cakes. This way, you reduce waste while enjoying tasty treats. Skinny Ambrosia Fruit Salad has about 150 calories per serving. This number can vary based on the fruits you choose. Here’s a quick breakdown of the calories in each ingredient: - 1 cup low-fat Greek yogurt: 100 calories - 1 tablespoon honey: 64 calories - 1 cup canned mandarin oranges: 60 calories - 1 cup fresh pineapple: 82 calories - 1 cup strawberries: 50 calories - 1 cup mini marshmallows: 100 calories (optional) - ½ cup shredded coconut: 200 calories You can adjust the amounts to fit your needs. Yes, you can prepare this salad a day in advance. Just mix the fruits and yogurt base, then store it in the fridge. To keep it fresh, cover it well. If you want a nice crunch, add mini marshmallows just before serving. This will help them stay soft. If Greek yogurt isn't your favorite, you can use regular yogurt or dairy-free yogurt. Almond, coconut, or soy yogurts work great. Choose a type that fits your taste and diet. These alternatives will still give you that creamy texture. Absolutely! Kids love the sweet flavors and fun textures. To make it more appealing, you can cut the fruits into smaller pieces. You can also let them help with the mixing. It’s a fun way to get kids excited about healthy food. To boost protein, you can add nuts like almonds or walnuts. Chia seeds are also a great choice. You can mix in a scoop of protein powder into the yogurt. This keeps the salad tasty while increasing its nutrition. Yes, you can use canned fruits. They save time, but fresh fruit usually has better taste and texture. Canned fruits may be sweeter, so check the labels for added sugars. If you go canned, drain and rinse the fruits to reduce extra syrup. This blog post covered easy steps to make a tasty ambrosia fruit salad. You need basic ingredients like Greek yogurt, fruits, and maybe some marshmallows. Remember, you can swap out ingredients to fit your taste. Think about serving it cool for the best flavor. Add a sprinkle of nuts for crunch and color for beauty. With the right tips, you can make delicious variations, store it well, and enjoy leftovers. Enjoy this fun, healthy dish with friends or family!](https://tossedrecipes.com/wp-content/uploads/2025/06/5e2e1739-102e-4422-ac59-59a313e883ae.webp)
Skinny Ambrosia Fruit Salad Healthy and Refreshing Treat
Looking for a delicious and guilt-free treat? My Skinny Ambrosia Fruit Salad is the perfect answer! Packed with fresh fruits, creamy Greek yogurt, and a
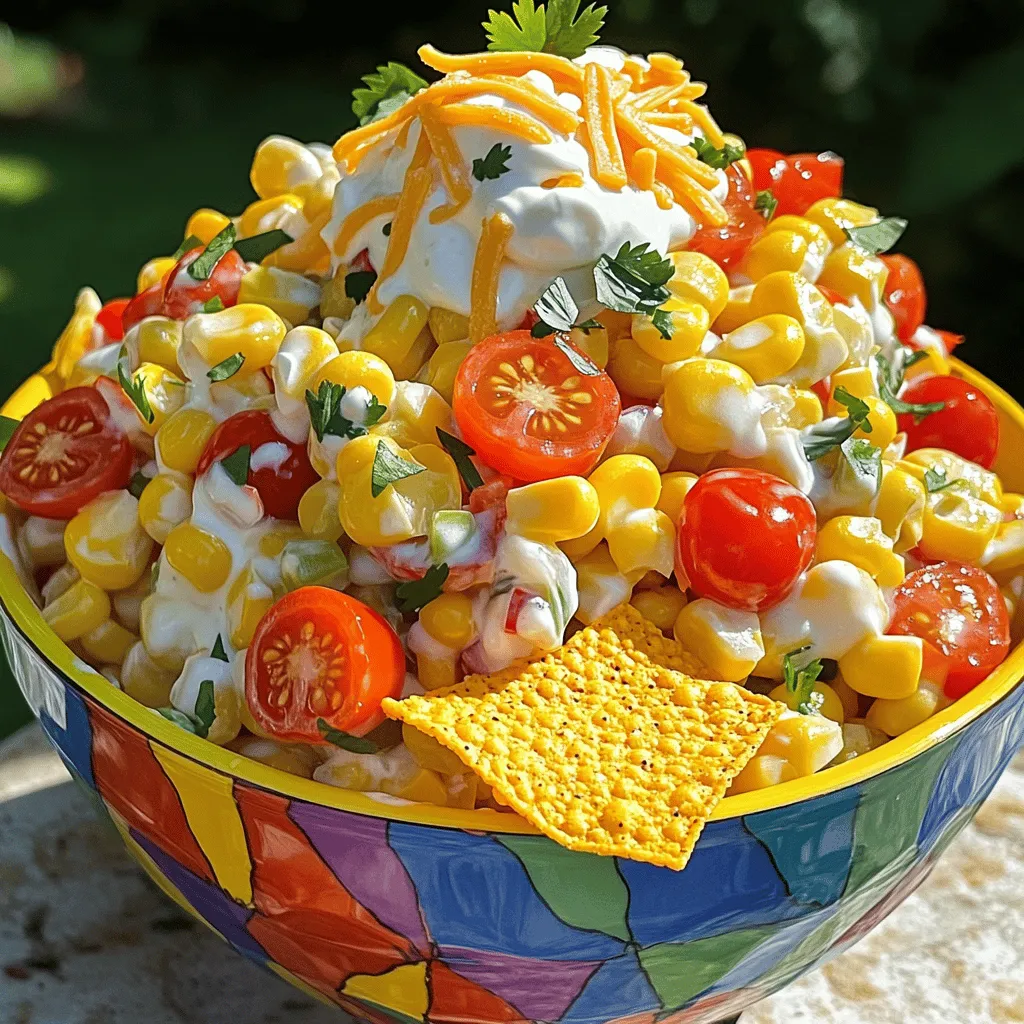
Easy Frito Corn Salad Simple and Tasty Recipe
Looking for a fun, easy dish to impress your friends? My Easy Frito Corn Salad is the perfect fit. Packed with fresh corn, juicy tomatoes,
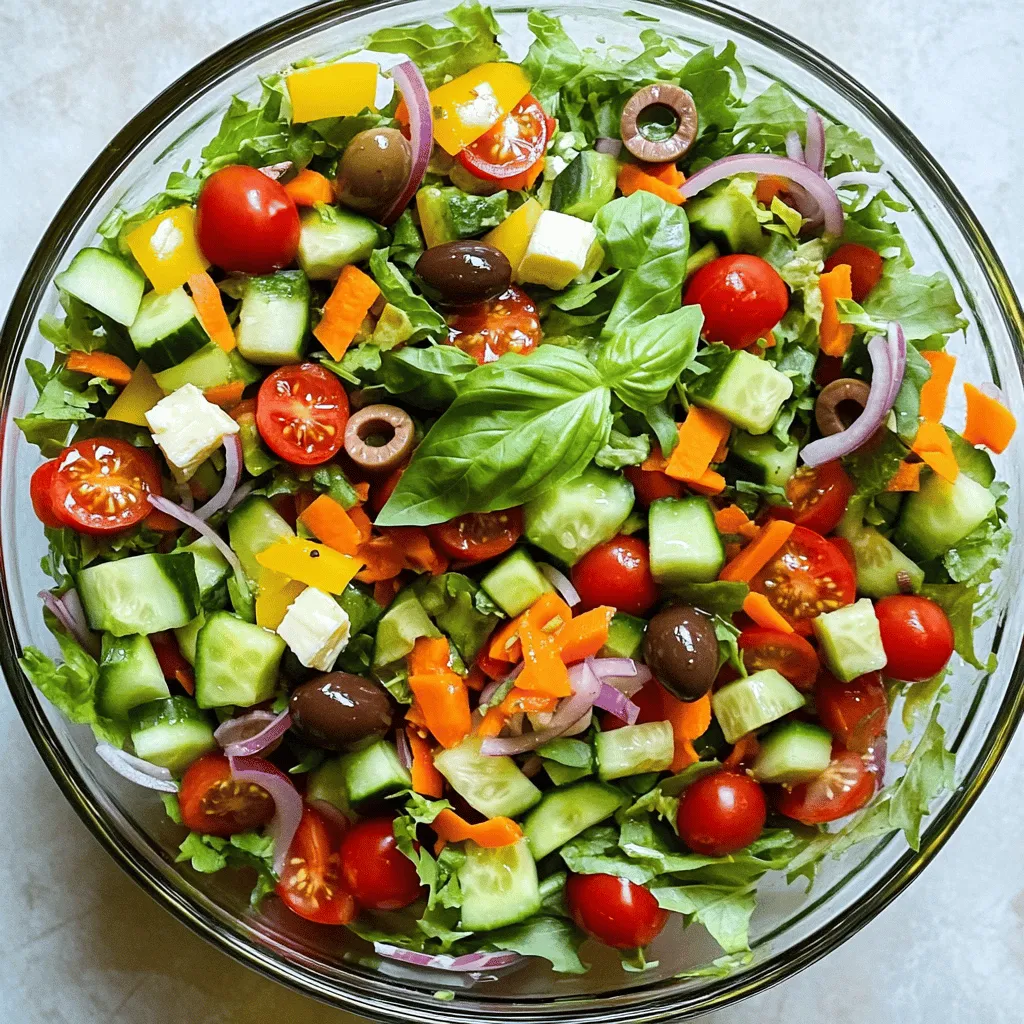
Grinder Salad Tasty and Colorful Veggie Mix
If you’re looking for a fresh, vibrant dish that’s packed with flavor, look no further than Grinder Salad! This tasty mix of colorful veggies will
![- 2 cups cooked chicken breast, shredded - 1 ripe avocado, mashed - 1/2 cup Greek yogurt (can use low-fat) - 1 tablespoon Dijon mustard - 1 tablespoon lemon juice - 1/4 cup red onion, finely chopped - 1/4 cup celery, finely chopped The main ingredients create a creamy and tasty salad. I love using shredded chicken because it adds protein and heartiness. A ripe avocado gives the salad a rich, buttery flavor. Greek yogurt serves as a healthy base and adds creaminess. The Dijon mustard brings a nice tang, while the lemon juice brightens the dish. The finely chopped red onion adds crunch and zest, and the celery gives it a nice, fresh bite. - Salt and black pepper to taste - Fresh parsley, chopped (for garnish) Adding salt and black pepper helps to enhance all the flavors. I like to sprinkle fresh parsley on top for a pop of color and freshness. It makes the dish look beautiful and inviting. - Whole-grain or lettuce leaves (for serving) You can serve this salad in a few ways. I often scoop it onto whole-grain bread for a hearty sandwich. If you prefer something lighter, use lettuce leaves as a wrap. Both options are tasty and satisfying. For the full recipe, check out the details above. - Combine chicken and avocado in a bowl. - Mix in Greek yogurt, mustard, and lemon juice. To start, take a large mixing bowl. Add the shredded chicken and the mashed avocado together. Use a fork to mix these two ingredients. You want them to combine well. Next, add the Greek yogurt. This makes the salad creamy and rich. Then, include the Dijon mustard and lemon juice. These ingredients give a nice tang to the dish. Stir everything until it looks smooth and well blended. - Fold in veggies. - Season and combine. Now it’s time to add some crunch! Fold in the finely chopped red onion and celery. These veggies add flavor and texture to your salad. Make sure they get mixed throughout the chicken and avocado. After that, season with salt and black pepper to taste. This step is important because it brings out the flavors. Stir gently to ensure everything is combined well. - Refrigerate for flavor enhancement. - Serve chilled with garnish. Once your salad is mixed, cover the bowl with plastic wrap. Pop it in the fridge for about 30 minutes. This helps the flavors blend better. After chilling, it’s ready to serve! Scoop the salad onto whole-grain bread, or use lettuce leaves for a low-carb option. Don’t forget to garnish with freshly chopped parsley. It adds a pop of color and extra flavor. For the full recipe, you can check the detailed instructions above. Enjoy your easy and healthy avocado chicken salad! To find the best avocado, check its color and feel. A ripe avocado should be dark green to black. Gently squeeze it in your palm. If it yields slightly, it’s ready to eat. If it feels hard, let it ripen for a few days at room temperature. For storage, keep ripe avocados in the fridge. This slows down the ripening process. To store cut avocados, sprinkle lemon juice on the flesh. Wrap it tightly in plastic wrap. This helps prevent browning. To boost the taste of your salad, consider adding fresh herbs. Chopped cilantro or dill adds a nice touch. For spice, a dash of cayenne or paprika can elevate the flavor. Want a creamier texture? Try adding a bit more Greek yogurt or a splash of olive oil. Pair your avocado chicken salad with a side for a complete meal. Whole-grain crackers or pita chips work well. You can also serve it in lettuce cups for a fresh crunch. For a light meal, serve it over mixed greens, topped with tomatoes and cucumbers. You can find the full recipe [here]. {{image_2}} For those watching carbs, you can make this salad low-carb. Use shredded rotisserie chicken and skip the yogurt. Replace the Greek yogurt with a bit of olive oil or just add more avocado. This keeps the salad creamy and tasty without the extra carbs. If you want a vegetarian option, swap the chicken for chickpeas. Mash them lightly for a nice texture. You can also use tofu or tempeh for protein. Both options still give you that nice creaminess from the avocado. You can play with proteins in this salad. Try using canned tuna or salmon instead of chicken. These options will add a different flavor and are still healthy. You can also use shredded turkey if that’s what you have on hand. For a healthier mayonnaise substitute, use more Greek yogurt or mashed avocado. You can also try silken tofu blended until smooth. It gives a creamy texture and keeps it light. Adding fruit can really brighten up this salad. Chopped apples or diced mango gives a sweet burst. You can mix in a handful of grapes for a juicy twist. These fruits pair well with the savory chicken and creamy avocado. Incorporating nuts or seeds can add a nice crunch. Try chopped walnuts, pecans, or sunflower seeds. These ingredients add flavor and healthy fats to the dish. It’s great to mix and match to find your favorite combination. For the full recipe, check out the [Full Recipe]. Avocado chicken salad can last up to three days in the fridge. To keep it fresh, store it in an airtight container. This helps prevent air from making it brown. I like to place a piece of plastic wrap directly on the salad before sealing the container. This extra layer keeps it tasty longer. You can freeze avocado chicken salad, but it may change texture. Avocado can get mushy when thawed. If you still want to freeze it, scoop portions into freezer-safe bags. Remove as much air as you can before sealing. When you’re ready to eat, let it thaw in the fridge overnight. After refrigeration, give the salad a good stir. This helps mix any ingredients that may have settled. If it feels dry, add a splash of lemon juice or a bit of Greek yogurt. Always check for any off smells or colors before serving. This ensures safety and quality. Enjoy your salad on whole-grain bread, in lettuce cups, or over greens for a fresh bite! You can keep avocado chicken salad in the fridge for up to three days. After that, the avocado may turn brown, and the salad can lose its freshness. To keep it longer, consider storing the avocado separately until serving. Yes, you can make this salad ahead of time. It works well for meal prep or picnics. Just mix the salad but add the avocado last to keep it fresh and green. You can use canned tuna, chickpeas, or tofu if you want a different protein. These options can still provide great flavor and texture. Absolutely! This salad is perfect for meal prep. It holds up well in the fridge and is easy to pack for lunch. Just remember to keep the dressing separate if you're worried about sogginess. This salad is packed with nutrients. Here’s a rough breakdown per serving: - Calories: 300 - Protein: 25g - Fat: 15g - Carbohydrates: 10g - Fiber: 5g For a full recipe, check out the detailed version provided earlier. Enjoy making this tasty dish! This blog post covered how to make a tasty avocado chicken salad. You learned about main ingredients, step-by-step instructions, and tips for perfecting the dish. I also shared variations and storage information to help you enjoy this meal for days. Remember, feel free to get creative with flavors and ingredients. This dish is easy to customize and fun to make. Enjoy your salad with friends or family!](https://tossedrecipes.com/wp-content/uploads/2025/05/73be14d1-6b39-46b1-abc4-b5e416fe99e7.webp)
Easy & Healthy Avocado Chicken Salad Recipe Delight
Looking for a delicious and healthy meal? You’ll love my Easy & Healthy Avocado Chicken Salad! This recipe blends creamy avocado with tender chicken and
![- Ripe peaches - Fresh blueberries - Mixed greens (arugula, spinach, baby kale) - Goat cheese - Candied pecans or walnuts - Olive oil - Balsamic vinegar - Honey - Salt and pepper This salad offers a tasty mix of flavors and good nutrition. Here’s a quick look at what you get: - Caloric Breakdown: Each serving holds about 250 calories. - Nutritional Benefits: - *Peaches*: Great source of vitamins A and C. - *Blueberries*: Packed with antioxidants and fiber. - *Mixed greens*: Loaded with vitamins and minerals. - *Goat cheese*: Provides protein and healthy fats. - *Candied nuts*: Add crunch and a bit of sweetness. This salad shines with its fresh ingredients. You gain flavor and health in each bite. For the complete recipe, check out the [Full Recipe]. 1. Start by preheating your grill or grill pan over medium-high heat. This helps to get those beautiful grill marks on your peaches. 2. Next, take your ripe peaches. Slice them in half and remove the pit. Brush the cut sides with a bit of olive oil. This small step keeps them from sticking to the grill. 3. Place the peach halves cut-side down on the grill. Cook them for about 3-4 minutes. You want to see nice grill marks and a little softness. 4. While the peaches grill, grab a large bowl. Combine the mixed greens and the fresh blueberries. This mix adds color and flavor to your salad. 5. Once your peaches are done, let them cool for a bit. Slice them into wedges and add them to the salad bowl. 6. Now, let's make the dressing. In a small bowl, whisk together the olive oil, balsamic vinegar, honey, salt, and pepper. This dressing ties all the flavors together. 7. Drizzle the dressing over the salad. Gently toss everything to make sure it’s well coated. 8. For the last touch, sprinkle crumbled goat cheese and candied pecans or walnuts on top. This adds a lovely crunch and creaminess. This Grilled Peach Blueberry Salad is now ready to impress! Enjoy the fresh flavors and beautiful colors. To get those nice grill marks, brush the peach halves with olive oil. This step stops them from sticking. Place the peaches cut-side down on a hot grill. Cook for about 3-4 minutes. Look for golden marks and slight softness. This timing gives you a great texture. This salad pairs well with grilled chicken or shrimp. You can add some bacon for extra flavor. For presentation, use a large platter. Arrange the greens, grilled peaches, and blueberries in colorful layers. Top with goat cheese and nuts. Garnish with mint for a bright touch. If you want to change the dressing, try lemon juice instead of balsamic vinegar. You can also use maple syrup for sweeter flavor. Adjust the honey to your taste. This way, you can customize the salad to match your personal style. {{image_2}} You can change up the fruits in this salad for fun. Try using apricots or strawberries instead of peaches. Both fruits add a sweet touch. They also bring a new flavor to your dish. Each fruit adds its own twist. Cheese options can also be swapped. If you want a creamier taste, try feta cheese. It works well with the sweet fruit. You can also use a vegan cheese if you prefer. This keeps the salad fresh while fitting your diet. Making this salad vegan is easy. Just skip the goat cheese and replace it with a dairy-free option. You can also use nuts for added creaminess. For gluten-free needs, check your dressing. Most ingredients are naturally gluten-free. Low-calorie adjustments are simple too. Use less olive oil in the dressing. You can also skip the candied nuts. This keeps the salad light and healthy while still being tasty. You can change the ingredients based on what's available. In summer, fresh peaches shine. In fall, think about using pears. They add a nice crunch with a different flavor. Seasonal fruits make the salad fresh year-round. For holiday twists, add spices like cinnamon or nutmeg. These spices bring warmth to the dish. You could also add cranberries for a festive touch. This keeps your salad exciting and fitting for any occasion. To keep your salad fresh, store it in the fridge. Use airtight containers to prevent moisture loss. I recommend glass containers for easy visibility and safe storage. If you can, keep the dressing separate until you are ready to eat. This helps keep the greens crisp and the flavors bright. You should not reheat the salad. It is best enjoyed cold. If you want warmth, you can grill the peaches again. Just warm them slightly without cooking them too much. This way, you maintain the sweet taste and juicy texture. The salad will stay fresh in the fridge for 3 days. Keep an eye on the peaches and greens. Signs of spoilage include wilting greens or brown spots on the fruit. If you notice these, it’s best to toss them out. Enjoy your Grilled Peach Blueberry Salad while it’s fresh for the best taste! Yes, you can make this salad ahead of time. To do this, prepare the salad ingredients separately. Keep the mixed greens, blueberries, and grilled peaches in separate containers. This helps maintain freshness. You can mix everything right before serving. For best flavor, add the dressing just before eating. This keeps the greens crisp. You can pair this salad with grilled chicken or fish. The sweet peaches and tangy dressing go well with savory proteins. Add some toasted bread on the side for crunch. Season your proteins with herbs like thyme or rosemary to enhance the flavors. You can also serve it with a light white wine. Yes, this salad is great for meal prep. Make a larger batch on the weekend. Store the salad in containers for easy lunches during the week. Keep the dressing separate to avoid sogginess. This way, you can enjoy fresh salad all week long. Just remember to eat it within three to four days for the best taste. For the full Grilled Peach Blueberry Salad recipe, check out the [Full Recipe]. This article explored the Grilled Peach Blueberry Salad, highlighting its fresh ingredients, preparation steps, and nutritional value. We discussed grilling tips, serving ideas, and how to customize the salad. Remember, you can swap ingredients or adapt the recipe to fit your diet. Keep leftovers fresh and enjoy your delicious salad for days. Making this dish is fun and rewarding. Take your time, and savor every bite. Enjoy your cooking adventure!](https://tossedrecipes.com/wp-content/uploads/2025/05/e0433cb7-ed30-4cd7-a21e-8dfcccb46a46.webp)
Grilled Peach Blueberry Salad Fresh and Flavorful Dish
Want a salad that bursts with flavor? Try this Grilled Peach Blueberry Salad! It combines juicy peaches, sweet blueberries, and greens for a perfect summer