Salads

- 1 cup diced pineapple - 1 cup diced mango - 1 cup strawberries, hulled and halved - 1 cup blueberries - 1 banana, sliced - 2 tablespoons honey - 2 tablespoons lime juice - Zest of 1 lime - 1 tablespoon fresh mint leaves, chopped To make a great fruit salad, you need fresh and colorful fruits. I love to use a mix of pineapple, mango, strawberries, blueberries, and banana. Each fruit adds a unique taste and texture. The pineapple brings a sweet burst. Mango adds a creamy vibe. Strawberries offer a juicy pop. Blueberries are small and sweet, while banana adds softness. Now, let’s talk about the dressing. I use honey for a sweet touch. The lime juice adds a zing. Zest from the lime gives an extra flavor kick. Chopped mint leaves bring freshness. This dressing brightens up the fruits. You can find the full recipe on how to combine these ingredients beautifully. Enjoy making this delightful fruit salad! First, gather your fresh fruits. I love using pineapple, mango, strawberries, blueberries, and bananas. They bring different colors and flavors. - 1 cup diced pineapple - 1 cup diced mango - 1 cup strawberries, hulled and halved - 1 cup blueberries - 1 banana, sliced In a large mixing bowl, combine the diced fruits. Toss them gently. You want to mix them without mashing. This keeps each piece whole and bright. When selecting ripe fruits, look for these signs: - Pineapple should be sweet and fragrant. - Mangoes should yield slightly when you press them. - Strawberries need to be bright red with no white spots. - Blueberries should be plump and firm. - Bananas are best when they have a few brown spots. Now, let’s make the honey lime dressing. In a small bowl, whisk together: - 2 tablespoons honey - 2 tablespoons lime juice - Zest of 1 lime Whisk until well combined. This dressing adds a sweet and tangy kick. Fresh ingredients make a big difference. Use fresh limes for juice and zest. They enhance the flavor and aroma. Next, drizzle the dressing over your fruit mixture. Sprinkle the chopped mint leaves on top. Gently toss again. You want the dressing to coat each piece of fruit evenly. Chill the fruit salad in the refrigerator for at least 15 minutes. This allows the flavors to blend. The chill also makes it refreshing to eat. For the full recipe, check the previous section. Enjoy your delicious fruit salad! To make a great fruit salad, use fresh, ripe fruits. Seasonal fruits taste best. In summer, use berries, peaches, and melons. For fall, apples and pears shine. You can mix fruits based on your taste. If you dislike bananas, try kiwi instead. If you can’t find mango, use peaches. The honey lime dressing is sweet and tangy. You can switch honey for agave or maple syrup. Both offer a unique taste. Want a little spice? Add a dash of cinnamon or ginger. This adds warmth and depth to your salad. Serve your fruit salad with yogurt or granola for crunch. Both add texture and flavor. For a stunning presentation, use a clear bowl. This lets the colorful fruits shine. Garnish with mint leaves for a pop of color. For the full recipe, check out the Tropical Paradise Fruit Salad. {{image_2}} You can make a tropical fruit salad by adding kiwi, papaya, or passion fruit. These fruits add a nice twist. When you use these fruits, you might want to change the dressing a bit. For example, you can use less honey if the fruits are super sweet. This helps keep the flavors balanced and fresh. If you love berries, try a berry blast salad. Use only berries like raspberries and blackberries. This gives your salad a vibrant look. You may want to adjust the sweetness of the dressing. You can add a bit more honey if the berries are tart. This makes each bite more enjoyable. For a citrus infusion, add oranges or grapefruits. These fruits bring a bright flavor. When using citrus, you might need to adjust the lime juice in the dressing. If the salad tastes too sour, add more honey. This will help balance the sweet and tangy notes. The options are endless! For more ideas, check the Full Recipe. To keep your fruit salad fresh, store it in an airtight container. This helps prevent air from making the fruits go bad. Place the container in the refrigerator. Your salad will stay good for about three days. After this time, the fruits may lose their crunch and flavor. Can you freeze the salad? I do not recommend freezing the whole fruit salad. The textures will change. However, you can freeze individual fruits. Cut them into small pieces and spread them on a baking sheet. Freeze them until solid, then place them in a bag. This way, they will keep well for a few months. How do you know when the fruit salad is no longer fresh? Look for signs like browning bananas or mushy strawberries. If the salad smells off or has a weird texture, it's time to toss it. Safe disposal practices include throwing it in the trash or composting the fruits if you can. Always trust your senses to keep your meals safe. You can store fruit salad in the fridge for about 2 to 3 days. The key is to keep it in an airtight container. This helps maintain freshness and flavor. After a few days, the fruit may become mushy or lose its taste. Always check for signs of spoilage before eating. Yes, you can make the honey lime dressing ahead of time. Just mix honey, lime juice, and lime zest in a bowl. Store it in the refrigerator until you're ready to use it. This makes it easier when you want to prepare the fruit salad quickly. The flavors will blend well if you let it sit for a bit. I love using fresh, seasonal fruits for my salad. Here are some great options: - Pineapple - Mango - Strawberries - Blueberries - Bananas These fruits add sweetness and color. You can also try other fruits like kiwi or oranges if you want to mix things up. To prevent bananas from browning, you can coat them with lime juice. The acid in lime juice slows down the browning process. Another trick is to add the bananas just before serving. This keeps them looking fresh and bright in your salad. Yes, you can use canned fruits in your salad. Just make sure to drain them well before adding. Canned fruits can be sweet and soft, so choose ones without added sugar. This can save time in making your fruit salad. Just keep in mind that fresh fruits often taste better. For a full recipe, check out the Tropical Paradise Fruit Salad! We explored how to create a refreshing fruit salad with fresh ingredients. You learned to prepare the fruit, make a tangy honey-lime dressing, and combine them for a tasty treat. Don't forget the tips for choosing fruit and serving suggestions to impress your friends. Whether you opt for a tropical vibe or a berry mix, you can adapt the recipe to your taste. Enjoy your delicious fruit salad and the simple joy it brings!
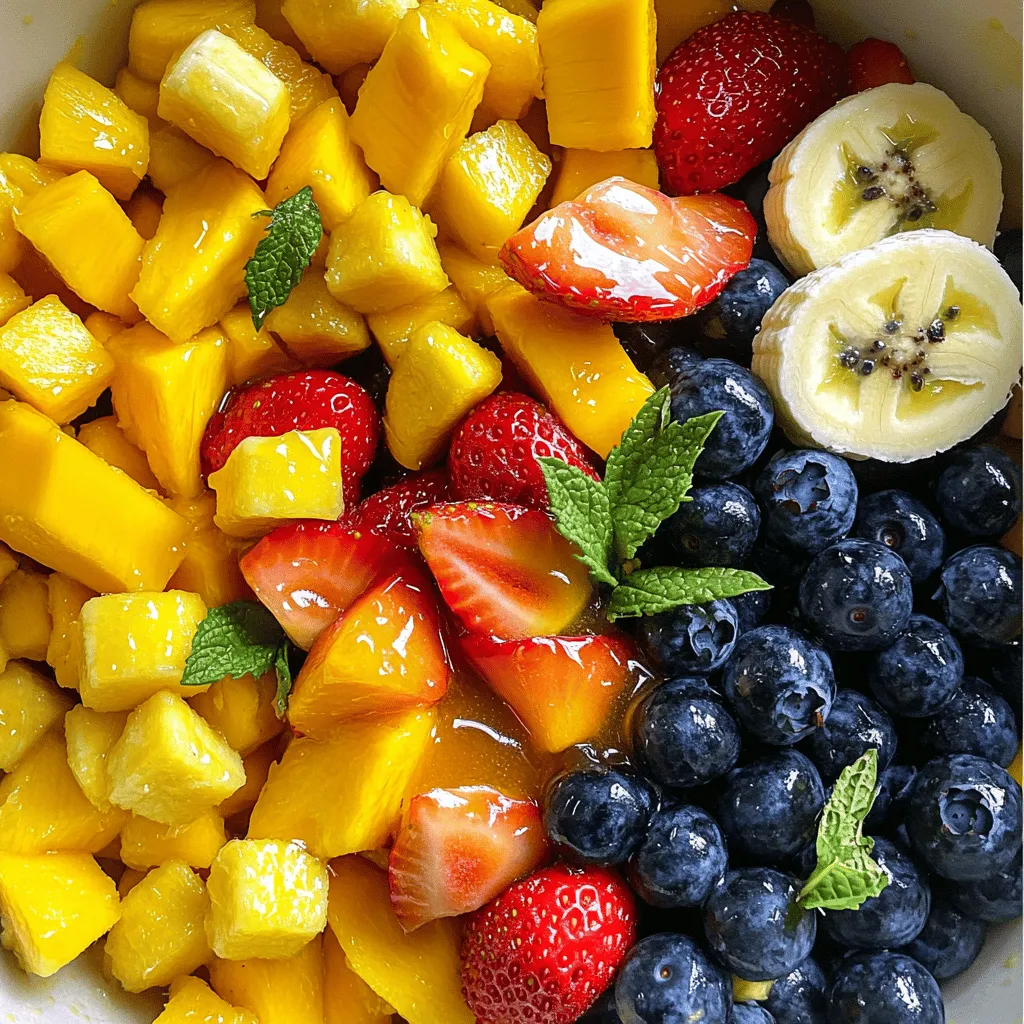
Fruit Salad with Honey Lime Dressing Delightful Recipe
Welcome to my kitchen! Today, we’re diving into a bright and refreshing treat: Fruit Salad with Honey Lime Dressing. This recipe is perfect for hot
- 4 cups green cabbage, finely shredded - 1 cup red cabbage, finely shredded - 1 large apple, cored and thinly sliced (preferably Fuji or Gala) - 1/2 cup dried cranberries - 1/2 cup shredded carrots - 1/4 cup green onions, thinly sliced - 1/2 cup plain Greek yogurt - 2 tablespoons apple cider vinegar - 1 tablespoon honey or maple syrup - Salt and black pepper to taste This recipe serves six people. If you want more, simply double the amounts. For a smaller batch, cut the ingredients in half. Adjust the dressing based on the size of your coleslaw. Remember, fresh ingredients make a big difference in taste. You can also mix in other vegetables or fruits if you like. For the best flavor, serve it cold after letting it chill for at least 30 minutes. Try the full recipe for a delightful dish that adds a fresh crunch to your table! To start, gather your ingredients. You need to shred the cabbage and carrots. I prefer using a box grater for this task. It makes nice, even shreds. Aim for fine shreds. You want them to mix well in the salad. Next, slice your apple. A sweet apple like Fuji or Gala works best. Remove the core first. Then cut the apple into thin slices. After slicing, you can chop them into smaller bits if you like. Don’t forget to slice the green onions. Just chop them into small pieces. They add a nice flavor to your coleslaw. Now, let’s combine the vegetables and fruits. In a large mixing bowl, add your shredded green and red cabbage. Toss in the sliced apple, dried cranberries, shredded carrots, and chopped green onions. Mix everything well. This step is important for even flavor. Next, we will prepare the dressing. In a separate small bowl, whisk together the Greek yogurt, apple cider vinegar, and honey. If you want a vegan option, use maple syrup instead of honey. Blend until smooth. It’s time to toss the mixture. Pour the dressing over the cabbage mixture. Stir gently to coat everything evenly. This helps each bite be packed with flavor. Now, season with salt and black pepper to taste. Adjust it to your liking. After mixing, cover the bowl with plastic wrap. Refrigerate for at least 30 minutes. This lets the flavors blend and helps the coleslaw chill. Enjoy your fresh and crunchy cranberry apple coleslaw! You can find the full recipe by following the link. Choosing the best apples When picking apples, I recommend using sweet varieties. Fuji and Gala apples work great. Their sweetness balances the tangy flavors in the coleslaw. Look for firm apples without bruises. Fresh apples give the best crunch. Types of cabbage to use For coleslaw, I prefer a mix of green and red cabbage. Green cabbage adds a mild taste and crunch. Red cabbage brings vibrant color and a slightly peppery flavor. Shred both finely for the best texture. Adding nuts or seeds To add a crunch, consider nuts or seeds. Chopped walnuts or sliced almonds enhance the flavor. Sunflower seeds are also a tasty option. They add healthy fats and a bit of texture. Mixing in additional fruits You can boost flavor by adding more fruits. Try diced pears or sliced grapes. These fruits add sweetness and juiciness to your coleslaw. Experiment with what you like best. Pairing with main dishes Cranberry apple coleslaw pairs well with many dishes. It complements grilled chicken, pork, or fish nicely. Serve it alongside sandwiches for a fresh side. The crunch balances heavier meals. Presentation ideas For a beautiful presentation, serve the coleslaw in a clear bowl. This showcases the colorful layers. You can also garnish with extra green onions or nuts on top. This adds a nice touch to your dish. If you want the full recipe, check the earlier sections! {{image_2}} You can easily make this coleslaw vegan. Just swap regular yogurt for plant-based yogurt. This keeps the creamy texture while making it dairy-free. For sweetness, try maple syrup instead of honey. This change maintains the flavor while keeping it vegan-friendly. To add depth, consider spices like cinnamon. A sprinkle can offer a warm touch. You might also add zest from an orange or lemon. This brightens the flavors and adds a fresh twist. Mixing these elements can take your coleslaw to the next level. Want to make it heartier? Add some protein like shredded chicken. This makes the coleslaw a main dish. For a delightful crunch, toss in some nuts, such as sliced almonds or walnuts. These additions not only boost flavor but also add texture. You can find the full recipe above for all the details. To keep your cranberry apple coleslaw fresh, store it in the fridge. Use a tight container to seal it well. This helps keep moisture in and prevents it from wilting. You can use glass or plastic containers. Make sure they are clean and dry before adding the coleslaw. This will help keep your salad crisp and tasty for longer. You can freeze cranberry apple coleslaw, but it may change in texture. If you want to freeze it, leave out the dressing. Pack the coleslaw in a freezer-safe bag or container. Squeeze out excess air to prevent freezer burn. When ready to enjoy, thaw in the fridge overnight. Once thawed, stir in fresh dressing before serving for the best taste. Cranberry apple coleslaw stays fresh for about 3 to 5 days in the refrigerator. You’ll know it’s still good if it looks bright and crunchy. Watch for any signs of spoilage, like a slimy texture or a sour smell. If you see these signs, it’s best to toss it out. Enjoy your coleslaw while it’s fresh for the best flavor! To make cranberry apple coleslaw, start with these key steps: - Shred 4 cups of green cabbage and 1 cup of red cabbage. - Core and thinly slice 1 large sweet apple, like Fuji or Gala. - In a big bowl, mix the shredded cabbage with the apple, 1/2 cup of dried cranberries, 1/2 cup of shredded carrots, and 1/4 cup of sliced green onions. - In another bowl, whisk together 1/2 cup of Greek yogurt, 2 tablespoons of apple cider vinegar, and 1 tablespoon of honey (or maple syrup). - Pour this dressing over the cabbage mixture and stir well. - Season with salt and black pepper, then chill for 30 minutes before serving. Yes, you can make cranberry apple coleslaw ahead of time. Here are the best practices: - Prepare the coleslaw up to a day in advance. - Keep the dressing separate until you're ready to serve. This helps keep the cabbage crunchy. - Store the mixture in an airtight container in the fridge. If you need alternatives for Greek yogurt, consider these options: - Use regular plain yogurt if you want similar texture. - Try plant-based yogurt for a vegan choice. - Silken tofu blended until smooth can work too. - Use sour cream or buttermilk for a different flavor. Cranberry apple coleslaw is not spicy at all. You can adjust the heat level by: - Adding a pinch of cayenne pepper for a mild kick. - Mixing in sliced jalapeños for more heat. - Leaving out spicy elements if you prefer a cooler taste. Cranberry apple coleslaw pairs well with many dishes. Here are some ideas: - Serve it alongside grilled chicken or fish. - It makes a great topping for pulled pork sandwiches. - Use it as a side dish for barbecues or picnics. - Pair it with tacos for a fresh crunch. For the full recipe, check out the details above. Enjoy your cooking adventure! This blog post covered the basics of making cranberry apple coleslaw. We explored fresh ingredients like cabbage, apples, and cranberries. You learned how to prepare the dressing and mix everything together. I shared tips on selecting ingredients, adding flavors, and serving suggestions. For final thoughts, making this dish is simple and enjoyable. You can adjust it to suit your taste. Whether for a meal or a snack, this coleslaw brings fresh flavors to your table. Enjoy crafting your own version!
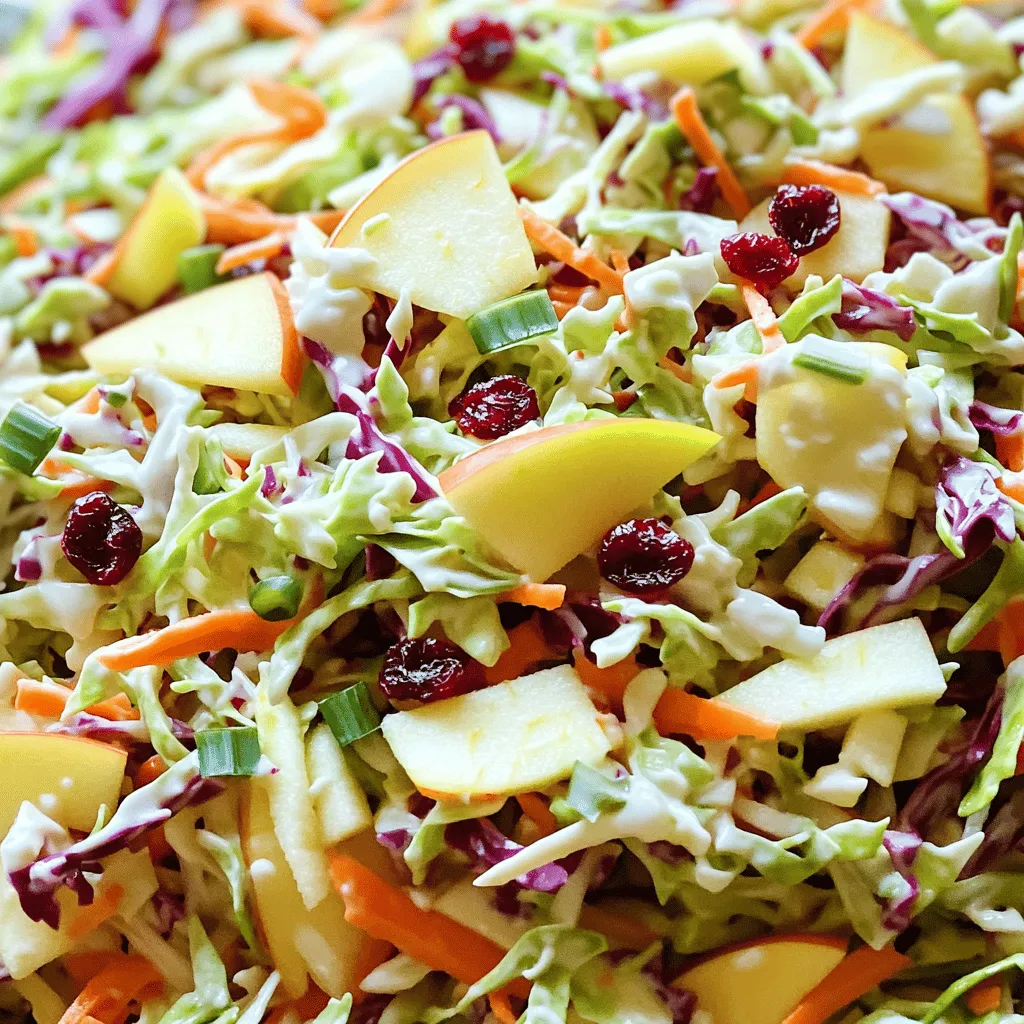
Cranberry Apple Coleslaw Fresh and Crunchy Salad
Are you ready to add a splash of color and crunch to your meals? This Cranberry Apple Coleslaw is not just a salad; it’s a
- 1 cup sushi rice - 1 lb shrimp, peeled and deveined - ½ cucumber, thinly sliced - 1 red bell pepper, julienned - 2 green onions, chopped - 2 cups water - 1 tablespoon rice vinegar - 1 teaspoon sugar - Salt to taste - 2 tablespoons vegetable oil (for frying) - 1 tablespoon sriracha sauce - 1 tablespoon lime juice - 1 clove garlic, minced - 1 teaspoon ginger, grated - Fresh cilantro - Green onions Creating crispy rice with spicy shrimp salad is all about the balance of flavors and textures. The sushi rice is essential for that perfect bite. It’s sticky and holds together well when fried. The shrimp brings a tasty punch, especially when mixed with sriracha and lime juice. Fresh veggies like cucumber and bell pepper add crunch and color. Rice vinegar and sugar are key pantry staples. They give the rice a slight tang and sweetness that balances the spice from the shrimp. You can make it even better with garnishes like fresh cilantro and green onions. They add freshness and a pop of flavor. If you want the full recipe with step-by-step instructions, check out the Full Recipe link. Enjoy making this delightful dish! - Rinsing the Sushi Rice Start by rinsing the sushi rice. Use cold water and place the rice in a bowl. Rinse until the water runs clear. This step is key. It removes extra starch. Extra starch can make the rice sticky. - Cooking the Rice Next, in a medium pot, combine the rinsed rice and two cups of water. Bring the mixture to a boil. Once it boils, cover and lower the heat. Let it simmer for about 15 minutes. When done, the rice should be tender and the water absorbed. - Cooling the Rice After cooking, remove the rice from the heat. Let it cool slightly. Stir in rice vinegar, sugar, and a pinch of salt. Spread the rice on a baking sheet to cool completely. Cooling makes the rice firm and easy to shape. - Forming and Frying the Patties Once cooled, heat vegetable oil in a large skillet over medium-high heat. With wet hands, form the cooled rice into small patties. Fry the patties until they are golden and crispy, about 3-4 minutes on each side. Drain them on paper towels after frying. - Preparing the Shrimp Mixture In a bowl, mix the shrimp with sriracha, lime juice, minced garlic, and grated ginger. Toss until the shrimp are well coated in the mixture. This adds a spicy kick to the dish. - Sautéing the Shrimp In the same skillet, add the shrimp mixture. Sauté over medium-high heat. Cook until the shrimp turn pink and are cooked through, about 4-5 minutes. This step brings all the flavors together. Now you're ready to assemble your crispy rice with spicy shrimp salad. For the complete recipe, check the Full Recipe section. To make the best crispy rice cakes, cooling the rice is key. When the rice cools, it firms up. This helps you form nice patties that hold their shape. Spread the cooked rice on a baking sheet. Let it cool for about 30 minutes. The best oil for frying is vegetable oil. It has a high smoke point, which keeps the rice cakes crispy. Use about 2 tablespoons in your skillet. Make sure the oil is hot before adding the rice patties. This will give you that golden brown color. To really boost the flavor, try adding extra seasoning. A pinch of garlic powder or onion powder can work wonders. You can also sprinkle in some smoked paprika for a subtle smokiness. For sauce variations, you can switch up the sriracha. Try adding some soy sauce or a dash of fish sauce for a richer taste. Mixing in a bit of sesame oil can add depth too. When plating, stack the crispy rice cakes for height. This makes your dish look more appealing. You can also drizzle some sauce over the top. Using colorful ingredients is a must. The red bell pepper and green onions add great color. Don't forget fresh cilantro for a pop of green. This will make your dish not just tasty but beautiful too. {{image_2}} You can switch up the protein in this dish. Chicken works well if you want a heartier option. Simply cook diced chicken breast in the same spicy sauce. For a plant-based twist, use tofu. Press the tofu to remove excess water, then marinate it in the same spicy sauce. Cook it until crispy for a tasty vegetarian version. The flavor of this dish can change with the sauce you choose. For an Asian flair, use soy sauce or hoisin sauce. These sauces add depth and umami. If you prefer heat, stick with sriracha or add chili flakes. You can also adjust the spice level to your taste. Use less sriracha for a milder dish, or add more for a fiery kick. This dish shines as both an appetizer or a main course. Serve small crispy rice cakes topped with shrimp salad as bite-sized appetizers. For a filling meal, pile the shrimp salad high on the rice cakes. You can also mix in other salads, like a crunchy slaw or a fresh herb salad. This adds freshness and texture to the dish. - Use airtight containers to keep your food fresh. - Store crispy rice and shrimp salad separately. - The shrimp salad lasts 2-3 days in the fridge. - Rice cakes stay good for up to 5 days. - To keep the rice crispy, use a skillet. - Heat the skillet over medium heat with a bit of oil. - Cook rice cakes for about 2-3 minutes on each side. - Microwaving is quick but may make rice soft. - Freeze rice cakes for later enjoyment. - Place them in a single layer on a baking sheet. - Once frozen, transfer them to a freezer bag. - Shrimp salad does not freeze well; it's best fresh. - Store any leftover shrimp in the fridge for a day. Feel free to check the Full Recipe for more details on how to prepare this delicious dish! You can boost the flavor of rice cakes with a few easy steps. Here are some suggestions: - Add seasoning to the rice before cooking. Try garlic powder or onion powder. - Mix in herbs like basil or cilantro right after cooking. - Drizzle soy sauce or sesame oil on top before serving. These small tweaks can make a big difference in taste. The rice cakes will shine with added flavors. Yes, you can use frozen shrimp for this dish. Here’s how to do it right: - Thaw the shrimp in the fridge overnight or place them in cold water for about 15 minutes. - Cook the shrimp right after thawing for the best taste. Using frozen shrimp is a great way to save time while still enjoying a tasty meal. To complement the crispy rice and spicy shrimp, consider these side dishes: - A fresh green salad with a light vinaigrette. - Steamed broccoli or asparagus for a crunchy texture. - A bowl of miso soup, which adds warmth and depth. These sides will enhance the meal and provide balance. You can find the Full Recipe for Crispy Rice with Spicy Shrimp Salad by following this link to detailed instructions and tips. To make tasty crispy rice cakes with spicy shrimp salad, use simple, fresh ingredients. We covered sushi rice, shrimp, and vegetables, plus helpful pantry staples. You learned how to cook rice, form patties, and sauté shrimp. Tips for crispy cakes and flavor enhancements were also shared. Lastly, we discussed variations, storage, and reheating options. Experiment with flavors and enjoy your dish. Enjoy the process, and make it your own!
Crispy Rice with Spicy Shrimp Salad Flavorful Delight
Get ready to dive into a dish that will wow your taste buds! In this blog post, I’ll show you how to make Crispy Rice
To create a tasty Spicy Southwest Chicken Salad, gather these simple ingredients: - 2 cups cooked chicken breast, diced - 1 cup black beans, drained and rinsed - 1 cup corn kernels, fresh or frozen - 1 red bell pepper, diced - 1 avocado, diced - 1 small red onion, finely chopped - 1 jalapeño, minced (adjust for spice level) - 1 cup cherry tomatoes, halved - 1/4 cup fresh cilantro, chopped - Juice of 2 limes - 3 tablespoons olive oil - 1 teaspoon cumin - 1 teaspoon chili powder - Salt and pepper to taste - Tortilla strips for garnish These ingredients blend well to create a fresh, colorful salad. You can easily adapt this recipe for different needs. Here are some swaps: - For a dairy-free option, skip any cheese. - Use quinoa or chickpeas instead of chicken for a vegan salad. - If you have a bean allergy, increase corn or add more veggies. - Substitute olive oil with avocado oil for a different flavor. - If you dislike spicy food, omit the jalapeño or use sweet bell pepper instead. These substitutions keep the salad delicious while meeting dietary needs. Each serving of Spicy Southwest Chicken Salad provides a nutritious meal. Here’s a quick breakdown: - Calories: 350 - Protein: 30g - Carbs: 30g - Fiber: 10g - Fat: 15g - Sugar: 3g This salad is rich in protein and fiber, helping you feel full and satisfied. Enjoy this healthy meal! For the full recipe, check out the detailed instructions. To make Spicy Southwest Chicken Salad, start with fresh ingredients. Gather your chicken, veggies, and spices. This salad comes together quickly, taking only 15 minutes. 1. Combine ingredients: In a large mixing bowl, add 2 cups of diced cooked chicken, 1 cup of black beans, and 1 cup of corn. Toss in 1 diced red bell pepper, 1 diced avocado, and 1 small finely chopped red onion. Add 1 minced jalapeño for heat and 1 cup of halved cherry tomatoes. 2. Make the dressing: In a small bowl, whisk the juice of 2 limes, 3 tablespoons of olive oil, 1 teaspoon of cumin, and 1 teaspoon of chili powder. Season with salt and pepper. 3. Dress the salad: Pour the dressing over the salad mix. Gently toss everything until well coated. 4. Taste and adjust: Try a bite and add more salt, pepper, or lime juice if needed. 5. Add herbs: Fold in 1/4 cup of chopped fresh cilantro for a burst of flavor. 6. Serve: Place the salad in bowls or on a platter. 7. Garnish: Top with crunchy tortilla strips for texture. To make your dressing pop, use fresh lime juice. Fresh juice tastes better than bottled. Whisk the olive oil slowly to help it mix well with the lime. Taste often and adjust. If you need more heat, add more jalapeño. For a brighter flavor, add more lime juice. Remember, balance is key! Enjoy this salad cold for the best taste. For the full recipe, check out the complete instructions. Start with fresh ingredients. They give the best taste. Dice the chicken into small pieces. This helps it mix well with other items. Rinse the black beans and corn. This removes extra salt or juice. Chop your veggies evenly for a nice look and texture. I love to use ripe avocados. They add creaminess and flavor. Use lime juice to brighten the salad. It brings out the flavors of all the ingredients. The cumin and chili powder add warmth. Adjust the spices to match your taste. If you like heat, add more jalapeño. Fresh cilantro also gives a burst of flavor. Mix everything gently, so you don’t squish the veggies. For a smoky touch, try adding smoked paprika. Crunch is key! Add tortilla strips right before serving. This keeps them crispy. You can also use roasted nuts for a different crunch. Make sure the veggies are crisp and not soggy. Serve the salad chilled for a refreshing bite. If you want extra creaminess, consider a dollop of sour cream. For the full recipe, check out the instructions above. {{image_2}} You can easily swap out the chicken for other proteins. Tofu works great for a vegetarian option. Just cube it and sauté until golden. Shrimp is another tasty choice. Cook shrimp until they turn pink and add them in. You can also use turkey or beef if you prefer. Each option brings a new flavor to the salad. The dressing can change the whole taste. Try using Greek yogurt instead of olive oil for a creamy texture. You can also add a bit of honey for sweetness. A splash of hot sauce can spice it up even more. Experiment with different herbs like dill or basil to give it a unique twist. Feel free to mix in seasonal ingredients. In summer, add fresh peaches or berries for sweetness. In fall, try roasted butternut squash for a warm flavor. You can also toss in seasonal greens like arugula or spinach. These changes keep the salad exciting and fresh all year round. For the full recipe, check out the Spicy Southwest Chicken Salad. To keep your Spicy Southwest Chicken Salad fresh, store it in the fridge. Place leftovers in an airtight container. This method keeps the salad crisp and tasty. Avoid adding dressing to the leftovers. This prevents sogginess and keeps flavors bright. Use glass or plastic food containers with tight lids. These containers help lock in moisture and flavor. If you have smaller amounts, use smaller containers. They are great for lunches or snacks. Mason jars also work well for easy storage. The salad stays fresh in the fridge for about 3 days. After that, the veggies may lose their crunch. Check for any off smells or changes in color. If you notice anything strange, it's best to toss it. Enjoy your salad while it’s still at its best! For the full recipe, check out the details above. Yes, you can make this salad ahead. It tastes great after chilling. Just mix the salad, but wait to add the dressing until serving time. This keeps it fresh and crunchy. Store the salad in an airtight container in the fridge. It stays good for up to two days. You can easily change the spice level to suit your taste. For mild heat, use less jalapeño or remove the seeds. For more heat, add extra jalapeño or some hot sauce. You can also try a pinch of cayenne pepper. Just remember to taste as you go. Serve this salad on its own for a light meal. You can also pair it with tortilla chips for crunch. It goes well with grilled chicken or fish too. For a heartier meal, serve it with rice or quinoa. Add lime wedges on the side for extra zing. We discussed how to create a Spicy Southwest Chicken Salad. I provided the ingredients, cooking steps, and tips for great flavor. You learned about substitutions for allergies and how to store leftovers. Don’t forget the variations to make it your own! Enjoy the mix of flavors and textures. This salad can fit any meal. With a few tweaks, it can be perfect for your dietary needs. Embrace these ideas to keep meals exciting and fresh!
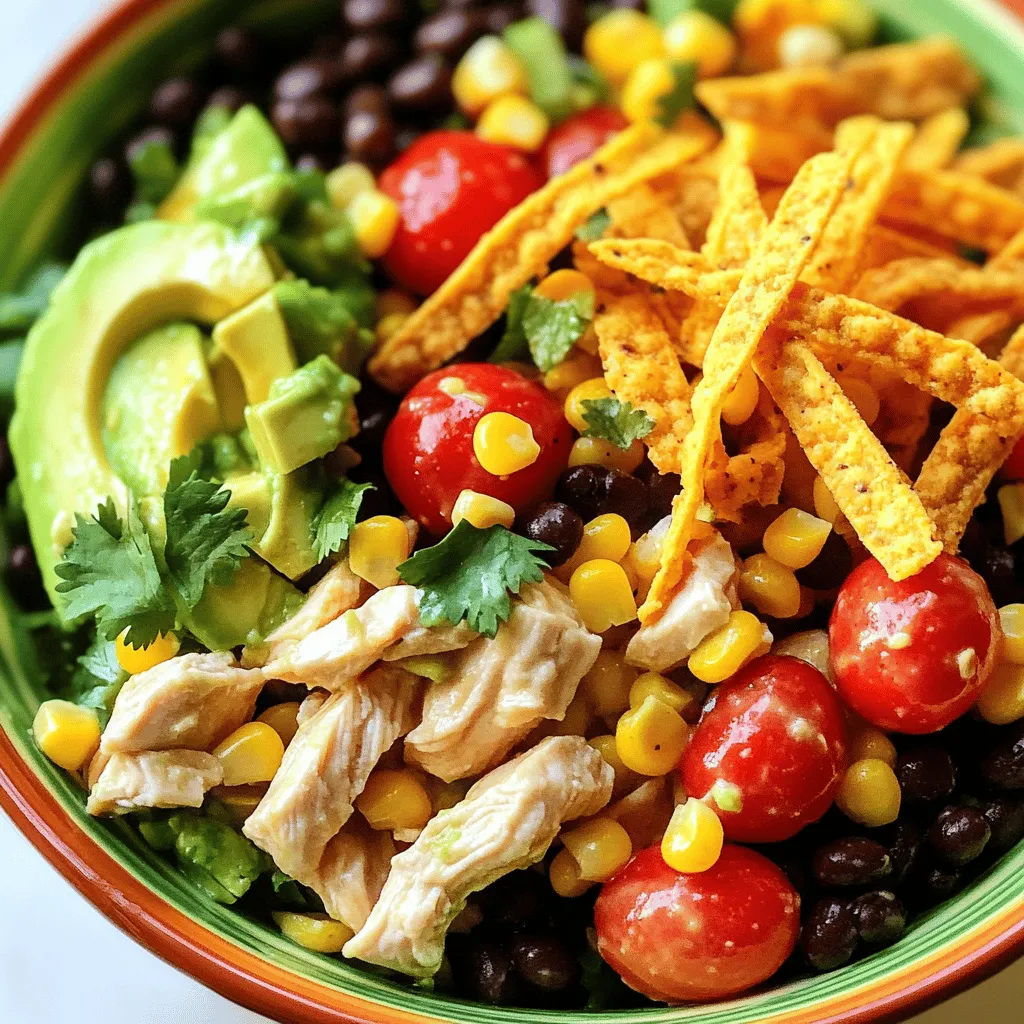
Spicy Southwest Chicken Salad Flavorful and Fresh
Welcome to your next go-to meal: Spicy Southwest Chicken Salad! This dish packs a punch with bold flavors and fresh ingredients. You’ll love how easy
- 2 cups cooked chicken, shredded - 1/4 cup honey - 2 tablespoons hot sauce (adjust to taste) - 4 cups mixed greens (arugula, spinach, romaine) - 1 cup cherry tomatoes, halved - 1/2 cup cucumber, diced - 1/4 cup red onion, thinly sliced - 1/2 cup feta cheese, crumbled - 1/4 cup sliced almonds (toasted) - Salt and pepper to taste - 2 tablespoons olive oil When I make this Honey Hot Chicken Salad, I love how easy it is to gather the ingredients. First, I shred the cooked chicken, which gives the salad its hearty base. The honey adds a touch of sweetness, while the hot sauce brings in a spicy kick. You can adjust the hot sauce to suit your taste, which makes it fun for everyone. For the salad base, I use a mix of greens. I often choose arugula, spinach, and romaine. They create a great texture and color. I add halved cherry tomatoes for freshness and diced cucumber for crunch. Thinly sliced red onion adds a nice bite, and crumbled feta cheese gives it a salty flavor. Finally, I sprinkle toasted sliced almonds on top for an extra crunch. Salt and pepper enhance the dish, and a drizzle of olive oil ties everything together. This combination of ingredients makes every bite a delightful experience. You can find the full recipe to see how it all comes together. - In a small bowl, mix honey and hot sauce until combined. - Adjust hot sauce according to spice preference. You can add more for extra heat or less for a milder taste. This step is key. It sets the tone for your salad's flavor. - Toss shredded chicken with the honey-hot sauce mixture. - Ensure the chicken is evenly coated. This helps every bite burst with flavor. You can use leftover chicken for ease. Shredded rotisserie chicken works great. - Place mixed greens in a large bowl. - Layer cherry tomatoes, cucumber, red onion, and feta on top. You can use any fresh veggies you like. - Add the coated chicken over the salad ingredients. - Drizzle olive oil over the salad and season with salt and pepper to taste. - Top with toasted sliced almonds for added crunch. This gives the salad texture. - Gently toss the salad to combine all ingredients just before serving. Make sure every bite has the delicious flavors mixed in. For the full recipe, check the recipe section above. To get the best taste from your Honey Hot Chicken Salad, try different hot sauces. Each sauce adds a unique kick. I love using a smoky chipotle sauce for depth. If you want more heat, add extra sauce. If you prefer it sweeter, adjust the honey. A little more honey can balance the spice nicely. This salad is perfect for many occasions. You can serve it for lunch, dinner, or at potlucks. It pairs well with crusty bread or pita chips for a nice crunch. You can also add a side of fruit for freshness. Everyone loves a colorful plate! Make your salad look as good as it tastes. Arrange the ingredients neatly in the bowl. Use a large platter for family-style serving. This way, everyone can help themselves. Add some fresh herbs on top for a pop of color. Your guests will love this fun and tasty dish! {{image_2}} If you want a lighter dish, use Greek yogurt instead of honey. This swap lowers the sugar while keeping it tasty. You can also use tofu or chickpeas instead of chicken for a vegetarian option. Both choices add protein and flavor without meat. You can make this salad even more fun by adding fruits. Try apple slices or dried cranberries for a sweet touch. If you like creaminess, include avocados. They add a rich flavor and a smooth texture, making every bite delightful. Seasonal vegetables can boost the taste of your salad. Bell peppers or zucchini are great options to add crunch and color. Fresh herbs like basil or cilantro also brighten the dish. These small changes keep your salad exciting all year round. Keep your Honey Hot Chicken Salad in an airtight container in the fridge. This way, it stays fresh and safe to eat. I recommend enjoying it within 2-3 days for the best taste and texture. When reheating, gently warm the chicken in the microwave or on the stovetop. This keeps the chicken moist and tasty. Avoid reheating the greens to keep them crisp and fresh. You can freeze the unassembled salad components. This means you can store the chicken and veggies separately. Remember to thaw the chicken before mixing it with the greens. Do not freeze the greens, as they will lose their crunch and texture. For the full recipe, check out my [Full Recipe]. Honey hot chicken salad blends spicy and sweet flavors with chicken and fresh veggies. You get tender chicken tossed in a sticky honey-hot sauce. The salad base is crisp and refreshing, made with greens and colorful vegetables. This dish is perfect for lunch or dinner. To lower the heat, cut back on the hot sauce in the recipe. Start with less than two tablespoons. You can always add more later if needed. This way, you can adjust the spice to suit your taste buds. Yes, you can prep this salad ahead of time. Mix the chicken and sauce first. Keep the veggies and greens separate until you are ready to serve. This keeps everything fresh and crisp. Yes, it can be gluten-free. Make sure the hot sauce and other ingredients do not contain gluten. Always check labels to be safe. This salad matches well with quinoa, bread rolls, or grilled vegetables. These sides add variety and make your meal more filling. You can mix and match for a perfect plate. For the complete recipe, check out the [Full Recipe]. This article shared a simple way to make Honey Hot Chicken Salad. You learned about the main ingredients, preparation steps, and tips for flavor. Remember, you can customize this recipe with different veggies and proteins. It’s a great dish for any meal. Enjoy the mix of sweet and spicy flavors. Try making it your own by adding your favorite ingredients. It’s a tasty and healthy option that everyone will love.
Honey Hot Chicken Salad Flavorful and Simple Meal
Craving a meal that’s both sweet and spicy? You’re in the right place! My Honey Hot Chicken Salad is simple to whip up, packed with
- Baby spinach - Ripe peaches - Fresh blueberries - Red onion When making the Blueberry Peach Feta Salad, fresh produce is key. Start with baby spinach. This leafy green adds a nice crunch and is packed with vitamins. Next, use ripe peaches. Their sweet flavor pairs well with the tangy feta. Fresh blueberries are a must, too. They bring a burst of juicy flavor. Lastly, include red onion. It adds a bit of sharpness to balance the sweetness. - Feta cheese - Pecans For the creamy element, feta cheese is perfect. Its salty flavor contrasts beautifully with the sweet fruits. I like to crumble it over the salad to spread the taste evenly. Pecans add a delightful crunch. Their nutty flavor complements the other ingredients and adds a nice texture. - Balsamic vinegar - Olive oil - Honey - Salt and pepper The dressing is where the magic happens. Start with balsamic vinegar. It brings a sweet and tangy taste to the salad. Olive oil adds richness and helps blend the flavors well. Honey is a great touch, adding a subtle sweetness. Finally, season with salt and pepper to taste. This simple dressing ties all the flavors together perfectly. For the full recipe, check out the detailed steps included. To make the dressing, I start with a small bowl. I add balsamic vinegar, olive oil, honey, salt, and pepper. Then, I whisk all the ingredients together. This step is important for blending the flavors. You want a smooth and tasty dressing. The sweetness of honey balances the tang of vinegar. Next, I grab a large salad bowl. I begin by adding fresh baby spinach as the base. This green adds color and nutrition. Then, I layer the salad with ripe peach slices. The peaches bring a juicy sweetness. After that, I sprinkle fresh blueberries over the top. Their burst of flavor adds a nice touch. Finally, I crumble feta cheese on the salad. This creamy cheese adds a salty contrast. Now for the final touches! I add thinly sliced red onion for a bit of sharpness. Then, I toss in the roughly chopped pecans for crunch. These nuts add texture and flavor. Next, I drizzle the prepared dressing over the salad. I make sure to cover everything evenly. Lastly, I toss the salad gently. This helps combine all the ingredients without squishing the fruit. I taste the salad and adjust the seasoning if needed. For the full recipe, check out the detailed steps and enjoy! Serve your salad in individual bowls for a nice touch. This makes each serving special. You can add a few extra blueberries and a sprinkle of feta on top. This garnishing adds color and makes the dish look great. To keep your salad fresh, choose ripe peaches and blueberries. Look for peaches that are slightly soft to the touch. They should smell sweet and fragrant. For blueberries, pick ones that are firm and dark blue. Avoid any that are mushy or shriveled. Fresh fruit makes a big difference in taste. You can customize the dressing to fit your taste. If you want more sweetness, add a bit more honey. For a tangier taste, increase the balsamic vinegar. You can also add herbs like basil or mint to give it a fresh twist. Mix and match until you find your favorite flavor. For the full recipe, check out the Blueberry Peach Feta Salad. {{image_2}} When summer fades and fall arrives, you can change the fruit in your salad. In summer, ripe peaches and fresh blueberries shine bright. As fall comes, switch to crisp apples and juicy pears. Both options keep your salad fresh and tasty all year long. You can also add nuts or seeds for a crunch. This change adds depth and new flavors to your dish. Not everyone can enjoy feta cheese. For a vegan option, simply leave out the feta. You can replace it with avocado for creaminess. This keeps the salad rich and delicious. If you need a gluten-free dish, rest easy. All ingredients in this salad are naturally gluten-free. Just ensure any added dressings are also gluten-free. This salad is versatile. You can add other fruits to make it your own. Strawberries and raspberries are great choices. They add a tartness that balances the sweet peaches and blueberries. Try mixing in these fruits for a colorful and tasty twist. Each fruit brings its own unique flavor, making every bite exciting. Store any leftover Blueberry Peach Feta Salad in an airtight container. This keeps the salad fresh. Make sure to add the dressing only when ready to eat. This keeps the greens crisp and tasty. In the fridge, the salad lasts about three days. The fruit may get soft after a day or two. Check for freshness before you eat it. If the salad looks or smells off, it's best to toss it. You can prep the salad in advance to save time. Wash and slice the peaches and blueberries a day ahead. Store them in separate containers. You can also mix the dressing and keep it in the fridge. Just remember to add everything together when you are ready to serve. This keeps the salad fresh and flavorful. For the full recipe, check out the Blueberry Peach Feta Salad 🥗 recipe above. You can prep the ingredients a day before. Keep the spinach separate. Slice the peaches and store them in lemon juice to stop browning. Rinse and dry the blueberries. Crumble the feta cheese and store it in an airtight container. You can also mix the dressing and keep it in the fridge. When ready to serve, combine everything in a bowl and drizzle the dressing. This way, your salad stays fresh and crisp. If you want a different cheese, try goat cheese or ricotta. For dairy-free options, use vegan feta or nut cheese. You can also skip cheese altogether for a lighter salad. Each option adds a unique flavor to the dish, so choose what you like best. You can use frozen blueberries, but they will change the salad's texture. They may be softer and juicier than fresh ones. If you use them, let them thaw in the fridge first. This helps keep the salad from getting too watery. The flavor will still be good, but fresh blueberries are best for crunch. You can try a honey mustard dressing for a sweet twist. A yogurt-based dressing adds creaminess. For a citrus flavor, mix orange juice and olive oil. A spicy vinaigrette can also give a kick. Feel free to experiment with what you have on hand to find your favorite. Check out the Full Recipe for the original dressing idea. This blog post covers a delicious Blueberry Peach Feta Salad. We explored fresh ingredients like baby spinach, ripe peaches, and blueberries. I shared steps to prepare the dressing and assemble the salad, plus tips to ensure freshness. You learned about variations for different diets and how to store leftovers. Embrace creativity with your salad-making, and don’t hesitate to adjust flavors. Enjoy fresh meals that nourish your body, no matter the season.
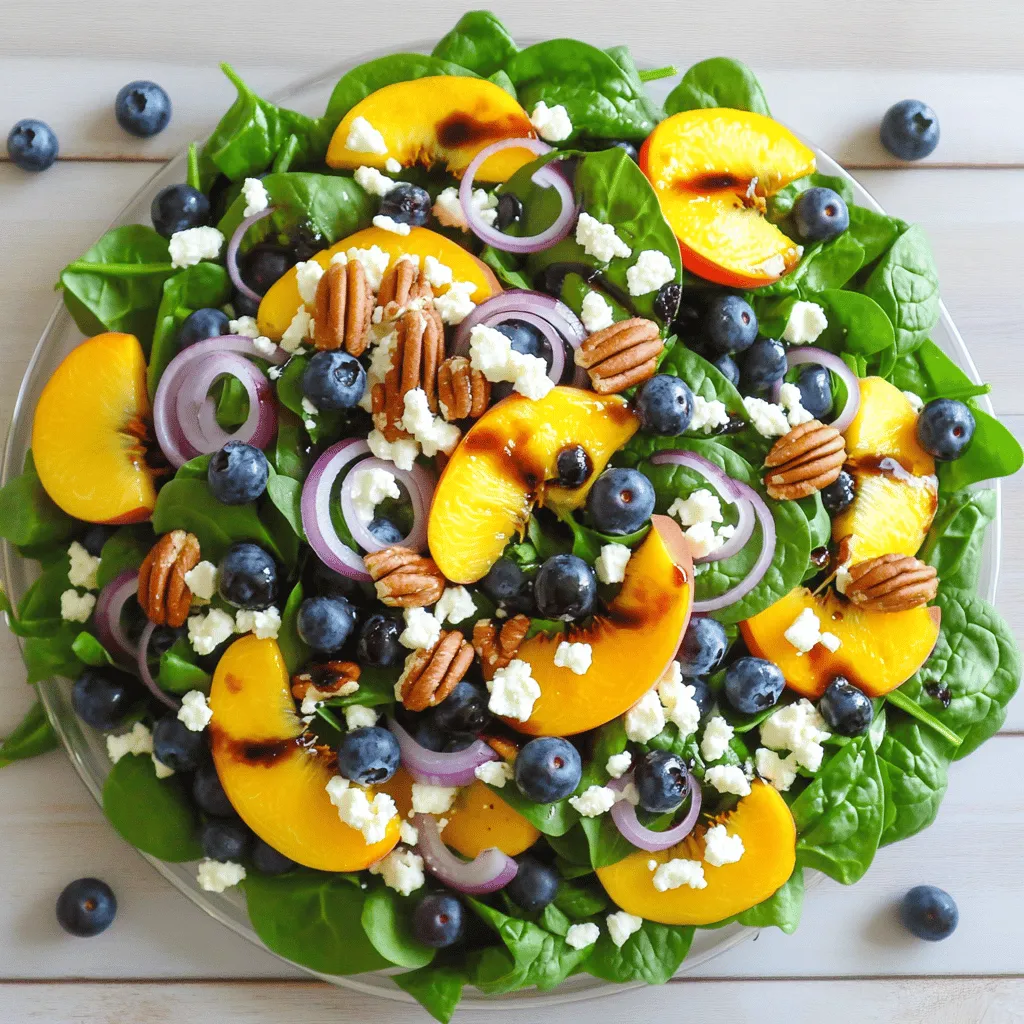
Blueberry Peach Feta Salad Fresh and Flavorful Delight
Are you ready for a fresh and tasty treat? This Blueberry Peach Feta Salad combines sweet peaches and juicy blueberries with creamy feta for a
For this tasty grilled Mexican shrimp salad, you need the following main ingredients: - 1 pound large shrimp, peeled and deveined - 4 cups mixed salad greens (like arugula, spinach, and romaine) - 1 cup cherry tomatoes, halved - 1 avocado, diced - 1 cup corn kernels, fresh or frozen (thawed) - 1/4 red onion, thinly sliced - 1/4 cup fresh cilantro, chopped These fresh ingredients form the base of your salad, making it colorful and nutritious. The right spices and seasonings bring your shrimp to life. You will need: - 1 teaspoon smoked paprika - 1 teaspoon ground cumin - 1 teaspoon garlic powder - 1 teaspoon chili powder - Salt and pepper to taste These spices add depth and flavor to the shrimp, making each bite exciting. To customize your salad, consider these optional add-ins: - Sliced jalapeños for a spicy kick - Additional herbs like parsley or chives Adding these extras can enhance flavor and give your salad a personal touch. For the complete recipe, check the Full Recipe section. To make this dish, start by marinating the shrimp. In a bowl, mix olive oil, smoked paprika, ground cumin, garlic powder, chili powder, salt, and pepper. This mix gives the shrimp great flavor. Add the shrimp to the bowl. Toss them well until they are fully coated in the spice mix. Let the shrimp sit for 15 to 20 minutes. This helps the flavors soak in. Next, thread the marinated shrimp onto skewers. I recommend using metal skewers. They hold the shrimp well and are easy to clean. Now, it's time to grill. Preheat your grill to medium-high heat. A hot grill cooks the shrimp quickly and keeps them juicy. Place the skewers on the grill. Cook the shrimp for 2 to 3 minutes on each side. You want them to turn pink and firm. Once done, remove them from the grill and set them aside. While the shrimp cools, assemble the salad. In a large bowl, combine mixed salad greens, cherry tomatoes, diced avocado, corn, sliced red onion, and chopped cilantro. Squeeze the juice of two limes over the salad. This adds a fresh taste and helps the flavors pop. Toss gently to mix everything well. Finally, top the salad with your grilled shrimp. If you like heat, add sliced jalapeños on top. Enjoy your vibrant, healthy meal! For the full recipe, check the instructions above. To get your shrimp just right, cook them for about 2-3 minutes on each side. Watch them closely. Overcooking makes them tough. You want them pink and firm. Use metal skewers for best results. They heat up well and keep shrimp in place. If you use wooden skewers, soak them in water for 30 minutes first. This prevents burning on the grill. Add toppings to make the salad pop. Fresh mango or diced pineapple brings sweetness. A sprinkle of feta cheese adds creaminess. You can also use sliced jalapeños for heat. Adjust spice levels to suit your taste. If you want more kick, add extra chili powder or hot sauce. Pair this salad with tortilla chips or grilled corn on the side. You can also enjoy it with a refreshing drink like limeade. Store leftovers in an airtight container. Keep shrimp and salad separate to maintain freshness. This way, your meal stays tasty for up to two days. For complete cooking instructions, check the Full Recipe. {{image_2}} You can easily swap shrimp for other proteins. Chicken or tofu work well too. This lets you cater to different tastes. For greens, try kale or mixed salad greens. These choices add different textures. You can also mix in other veggies like bell peppers or cucumbers. They add crunch and color. Homemade vinaigrettes are simple to make. Just mix olive oil, lime juice, and a pinch of salt. You can also try a creamy dressing. Greek yogurt with lime is a tasty option. This gives your salad a rich flavor. Experiment with different herbs in your dressings. Cilantro or parsley can give a fresh twist. Want more heat? Add chili flakes or cayenne pepper. This will make your salad stand out. You can also try different spice blends. A taco seasoning mix can work great. Mixing flavors can give you a new favorite. Don't be afraid to get creative with spices! Store the salad and shrimp separately. This helps keep the salad fresh longer. Put the shrimp in an airtight container. You can keep it in the fridge for up to three days. The salad will last about two days. Make sure to check for freshness before eating. You can freeze shrimp for later use. First, cook the shrimp fully, then cool them down. Place them in a freezer bag and remove as much air as possible. They will stay good for up to three months. For salad ingredients, avoid freezing. Freezing can change the texture of greens and tomatoes. Instead, prepare salad ingredients fresh when ready to eat. To reheat grilled shrimp, place them on a skillet over medium heat. Cook for about two minutes on each side. This keeps them juicy and tasty. Before serving the salad, refresh it. Add a little lime juice and toss gently. This brings back its fresh flavor. Enjoy your vibrant dish with these tips! For the full recipe, check out the details above. You can use either fresh or frozen shrimp. Fresh shrimp has a sweet taste and nice texture. Look for shrimp that smells like the ocean, not fishy. If you choose frozen shrimp, buy high-quality ones. Thaw them in the fridge overnight for best results. Both types work well in this grilled Mexican shrimp salad. Yes, you can prep this salad ahead of time. Cook the shrimp and store it in the fridge. The shrimp stays good for up to two days. Prepare the salad without the dressing. Mix the greens, tomatoes, corn, and avocado in a bowl. Keep the dressing separate until you are ready to serve. This keeps everything fresh and tasty. Want some heat? Add sliced jalapeños on top. You can also mix in some hot sauce. Another option is to use more chili powder in the shrimp marinade. If you like it really spicy, try adding diced serrano peppers. Adjust the heat level to match your taste. Enjoy the kick! This blog post helps you create a tasty grilled shrimp salad. You learned about main ingredients and great spices. I shared tips on grilling shrimp and assembling the salad just right. You discovered fun variations to change up the dish. Finally, I explained how to store leftovers for later use. Enjoy cooking your shrimp salad! With these tips, you can impress anyone at your next meal.
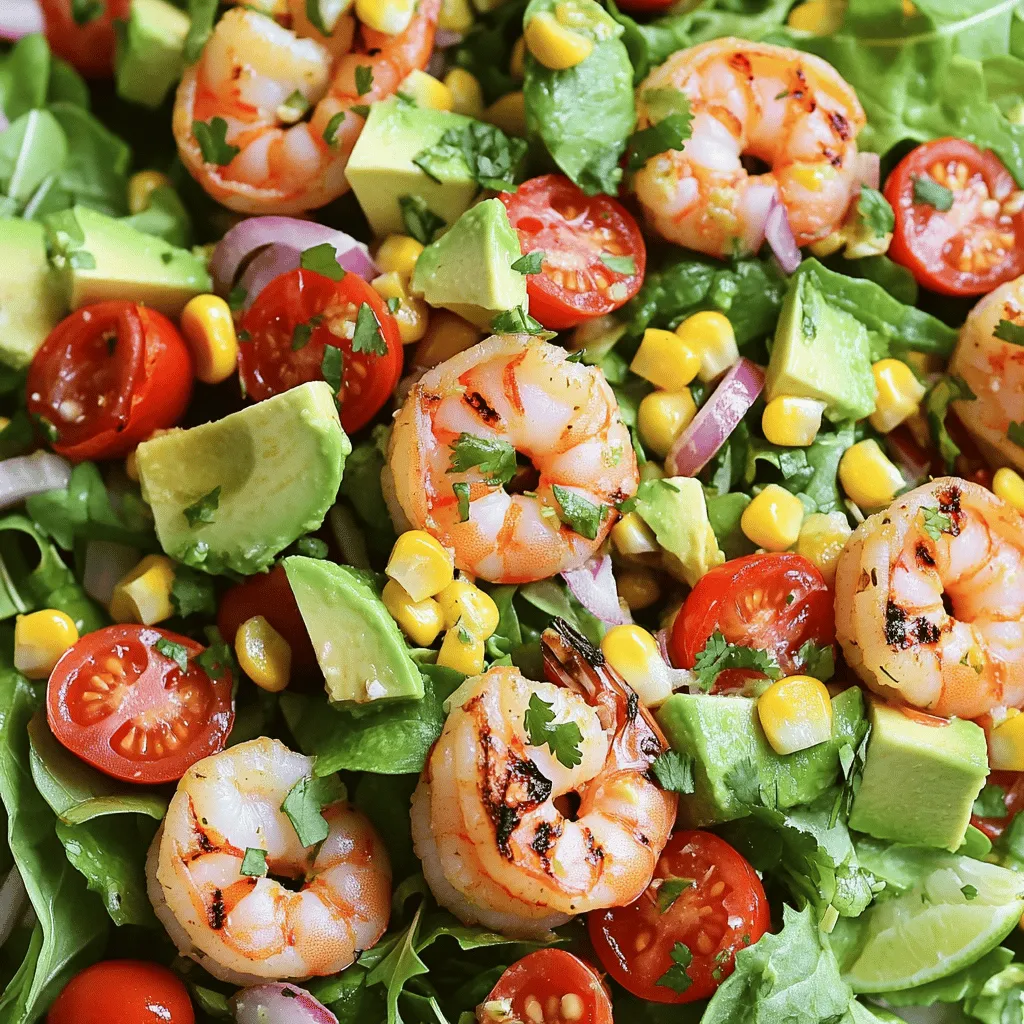
Grilled Mexican Shrimp Salad Flavorful and Fresh Dish
Are you ready to enjoy a burst of flavor with a fresh and vibrant Grilled Mexican Shrimp Salad? This dish combines large shrimp, crisp greens,
- Cherry tomatoes: 1 cup, halved - Cucumber: 1 cup, diced - Bell pepper: 1, diced (red or yellow) - Kalamata olives: 1/2 cup, pitted and halved - Artichoke hearts: 1/2 cup, quartered - Red onion: 1/4 cup, thinly sliced - Mozzarella: 1 cup, balls or cubed - Pepperoncini: 1/2 cup, sliced (optional) - Fresh basil: 1/4 cup, chopped - Italian dressing: 1/4 cup (homemade or store-bought) - Salt and pepper: to taste I love using fresh, vibrant ingredients for my antipasto salad. Each bite bursts with flavor. Cherry tomatoes add sweetness and color. Cucumber gives a nice crunch. You can pick any bell pepper you like. I often use red or yellow for brightness. Kalamata olives bring a salty kick. Artichoke hearts add a unique taste. Red onion gives a bit of sharpness. Mozzarella adds creaminess. If you want some heat, pepperoncini works well. Fresh basil adds a fragrant touch. Italian dressing ties everything together, making it zesty. Remember, adjust salt and pepper to fit your taste. This colorful dish is not just easy but also full of healthy goodness. For the full recipe, check out the detailed instructions above! - Combine the halved cherry tomatoes, diced cucumber, and diced bell pepper in a large mixing bowl. - Add Kalamata olives, artichoke hearts, and red onion to the mixture. - Incorporate mozzarella balls or cubed mozzarella into the bowl. To make this salad, start by chopping your veggies. I like to use ripe cherry tomatoes for their sweet burst. Dice the cucumber for crunch and add fresh bell pepper for color. Next, toss in Kalamata olives and artichoke hearts for a salty bite. Finally, don’t forget the red onion for a little zing! - Optional: Add pepperoncini for a spicy kick. - Sprinkle fresh basil over the top. - Drizzle with Italian dressing and gently toss. Now it’s time for the fun part! If you want some heat, add sliced pepperoncini. I love how it wakes up the dish. Then, sprinkle fresh basil on top. This adds a lovely aroma. Drizzle your favorite Italian dressing over everything. Gently toss to mix all the flavors. - Allow the salad to sit for 10 minutes before serving for enhanced flavor. - Suggestions for plating and garnishing. Let your salad sit for about 10 minutes. This lets the flavors blend nicely. Serve it in a large bowl or on individual plates. You can garnish with more basil or even some extra olives. Enjoy your fresh, flavorful antipasto salad! For the complete recipe, check out the Full Recipe section. - Use pre-sliced vegetables for faster assembly. - Chill ingredients beforehand for a refreshing salad. Getting your salad ready can be quick and easy. Start by using pre-sliced or pre-diced veggies. This way, you save time and cut down on prep work. You can find many stores that sell these options. Chilling your ingredients also helps. Cold veggies make a crisp, refreshing salad. Just put your veggies in the fridge for a bit before you mix them. - Recommended herbs and spices to add. - Suggestions for homemade dressing variations. To boost the taste of your salad, try adding fresh herbs. Basil is a great choice, but you can also use oregano or parsley. These herbs give your salad a nice touch. If you want a twist on the dressing, consider making your own. Mix olive oil, vinegar, and a bit of mustard. This adds a special flavor that you can control. You can adjust the tanginess to your liking. - Optional add-ins for dietary preferences (vegan, gluten-free). - Using seasonal vegetables to enhance freshness. You can make this salad fit your needs. For a vegan option, skip the cheese. You can add chickpeas for protein instead. If you want it gluten-free, check the dressing for gluten. Using seasonal vegetables is another smart move. Fresh, in-season produce tastes better and is often cheaper. For example, add zucchini in summer or roasted squash in fall. These small changes can make your salad even more delightful. For the full recipe, check out the Full Recipe section. {{image_2}} You can easily give your antipasto salad a Mediterranean twist. Try using different cheeses like feta or goat cheese. These cheeses add a creamy taste that blends well with the other ingredients. You can also add roasted red peppers or sun-dried tomatoes. Both options bring a burst of flavor and color to your dish. Adding protein can make your salad more filling. You can include grilled chicken or chickpeas for a hearty touch. Chickpeas add a nice crunch and are great for a plant-based option. Cold cuts like salami or prosciutto also work well. They enhance the salad's flavor and pair perfectly with the cheese and veggies. Make your antipasto salad special for holidays or parties! For a festive touch, use ingredients like cranberries or nuts during Thanksgiving. You can also try a taco-themed salad with black beans and avocado. Each theme brings a new twist to this classic dish. To keep your antipasto salad fresh, use airtight containers. These containers protect the salad from air and moisture. This helps retain crunchiness and flavor. Store your salad in the fridge right after making it. If you have extra dressing, keep it separate. This keeps the salad crisp and avoids sogginess. When stored in the fridge, your salad lasts about 3 days. After that, it may lose its taste and texture. Check for signs of spoilage like bad smells or slimy vegetables. If you see these, it’s best to toss the salad to stay safe. Antipasto salad is best served fresh, but you can use leftovers. If you store it, revitalize the flavor with a drizzle of fresh dressing. You can also add a pinch of salt and pepper before serving. This makes the salad taste bright and fresh again. Enjoy your colorful antipasto salad with confidence! For the full recipe, check out the earlier section. What is antipasto? Antipasto is an Italian term that means "before the meal." It usually includes a mix of meats, cheeses, vegetables, and olives. Antipasto can be served as a starter or as part of a salad, like our quick and easy antipasto salad. Can I make this salad ahead of time? Yes, you can make this salad ahead of time. Just prepare the ingredients and store them in the fridge. Toss the salad with dressing just before serving. This keeps it fresh and tasty. What other ingredients can I use in an antipasto salad? You can get creative with your antipasto salad. Try adding different cheeses like feta or goat cheese. You can also include roasted red peppers, salami, or even chickpeas. The options are endless! Is this recipe suitable for vegans? This salad is not vegan due to the cheese and dressing. But you can easily make it vegan. Replace the mozzarella with avocado or tofu and use a vegan dressing. How can I make it gluten-free? To make this salad gluten-free, ensure that your dressing is gluten-free. Most store-bought dressings are safe, but always check the label. All other ingredients in this salad are naturally gluten-free. Can this salad be scaled for larger gatherings? Absolutely! You can double or triple the recipe to serve more people. Just keep the same ingredient ratios for a balanced taste. Ideal serving portions for different occasions For a light lunch, this recipe serves four. If you serve it at a party, you can serve smaller portions to make it go further. Aim for about half a cup per person in that case. This salad combines fresh flavors and simple steps. You learned how to prepare an antipasto salad with cherry tomatoes, cucumbers, olives, and more. Remember the tips and variations to make it your own. Serving suggestions help boost flavor, while storage tips keep it fresh. Whether for a party or a light meal, this salad is versatile and easy. Enjoy the creativity and flavor it brings to your table!
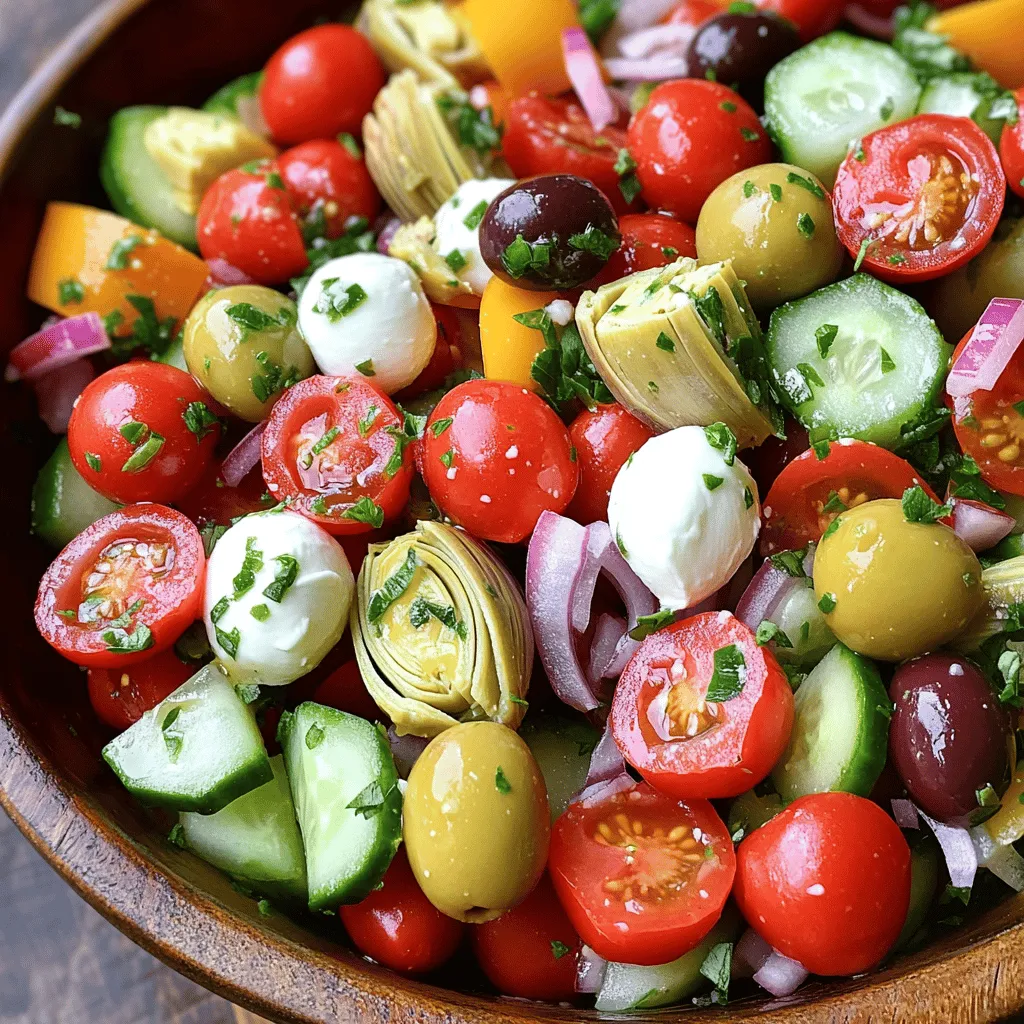
Quick and Easy Antipasto Salad Fresh and Flavorful Recipe
Looking for a fresh and tasty dish that’s quick to whip up? Let me introduce you to my Quick and Easy Antipasto Salad! Packed with
- 1 cup cherry tomatoes, halved - 8 oz fresh mozzarella balls (bocconcini) - 1 cup fresh basil leaves - 1/4 cup basil pesto (store-bought or homemade) The first step in making this salad is gathering your main ingredients. Cherry tomatoes bring a sweet burst of flavor. Halving them helps release their juices. Fresh mozzarella balls add a creamy texture. They are soft and delightful in each bite. Fresh basil leaves give your dish a fragrant touch. The basil pesto ties everything together with its rich flavor. You can use store-bought pesto for speed. If you want, you can make your own for a fresh taste. - Salt and pepper to taste - Additional fresh basil for garnish Seasoning is key for any salad. A pinch of salt can elevate the flavors. Fresh ground pepper adds a nice kick. If you want, you can add more fresh basil as a garnish. It makes the salad look pretty and adds more flavor. When you combine all this, you will have a bright and tasty dish. For the full recipe, check out the link provided. - First, take 1 cup of cherry tomatoes and cut them in half. - Next, add 8 oz of fresh mozzarella balls to your bowl. - Now, gently toss in 1 cup of fresh basil leaves. - Grab 1/4 cup of basil pesto and drizzle it over the salad. - Carefully mix everything together. Be gentle to avoid breaking the mozzarella. - Taste the salad and add salt and pepper as needed. - You can serve it right away or chill it for a better flavor. For more details on making this dish, check out the Full Recipe. To make the best Caprese pesto salad, start with ripe cherry tomatoes. Look for tomatoes that are bright and firm. They should smell sweet and fresh. This indicates they are ready to eat. For mozzarella, choose fresh mozzarella balls or bocconcini. They should feel soft and slightly springy. The taste should be mild and creamy, making your salad even more delicious. When mixing your salad, be gentle with the mozzarella balls. Use a large spoon to fold the ingredients instead of stirring. This helps keep the mozzarella intact. For serving, arrange the salad in a large bowl or on a platter. Drizzle extra pesto on top for a nice look. You can also sprinkle some fresh basil leaves for color and flavor. To add more flavor, consider toppings like pine nuts or arugula. A splash of balsamic vinegar can also brighten the dish. If you want to adjust flavors, taste the salad after mixing. You can add a pinch of salt or pepper as needed. This helps balance the flavors and makes it just right. For the full recipe, check out the details provided. {{image_2}} You can change the cheese in your salad. Feta or burrata work well. Feta adds a salty kick, while burrata offers creaminess. You can also swap cherry tomatoes for heirloom or grape tomatoes. Heirloom tomatoes bring unique flavors and colors. Grape tomatoes are sweeter and bite-sized. If you want to shake things up, try other herbs. Parsley or arugula can add fresh notes. Both herbs bring a different taste to your dish. You can also play with pesto types. Sundried tomato pesto offers a rich, tangy flavor. Switching the pesto will change the whole salad experience. Make your salad fit the season. In spring, add fresh peas or asparagus. For summer, stick with juicy tomatoes and basil. In fall, think about adding roasted squash or apples. For winter, you can use kale or spinach. These swaps keep the salad fresh and exciting year-round. To store leftovers, place the salad in an airtight container. Keep it in the refrigerator. This salad stays fresh for 1-2 days. To maintain freshness, do not mix in the pesto until serving. This way, the flavors will stay bright and tasty. You cannot freeze this salad. Freezing changes the texture of the tomatoes and mozzarella. Instead, enjoy it fresh. If you have extra ingredients, store them separately in the fridge. This helps preserve taste and texture for your next meal. Serve leftovers cold or at room temperature. If you want to refresh the salad, mix in a bit more pesto. This adds flavor and moisture. If it seems dry, a splash of olive oil can help. Enjoy your 4 Ingredient Caprese Pesto Salad with ease! Yes, you can make this salad ahead of time. To prep, wash and cut the cherry tomatoes. You can also store the mozzarella balls in the fridge. Keep the basil leaves dry to avoid wilting. Make the salad right before you serve it. This keeps the flavors fresh and the salad crisp. If you don’t have basil pesto, you have options. You can use a sun-dried tomato pesto for a rich flavor. Another option is to use a vinaigrette, like balsamic or lemon. You can even make a simple mix of olive oil and garlic. These will still give your salad a tasty twist. Yes, this salad is gluten-free. All the ingredients in the recipe are naturally gluten-free. Cherry tomatoes, mozzarella, basil, and pesto fit this diet. If you use store-bought pesto, check the label to ensure it is gluten-free. This way, everyone can enjoy it worry-free. This blog covered how to make a tasty Caprese pesto salad. It included fresh ingredients, step-by-step instructions, and tips for success. Remember to choose ripe tomatoes and quality mozzarella for the best flavor. Don’t shy away from experimenting with different ingredients or storage methods. Your salad can shine, whether served fresh or with a twist. Enjoy making and sharing this delicious dish with friends and family!
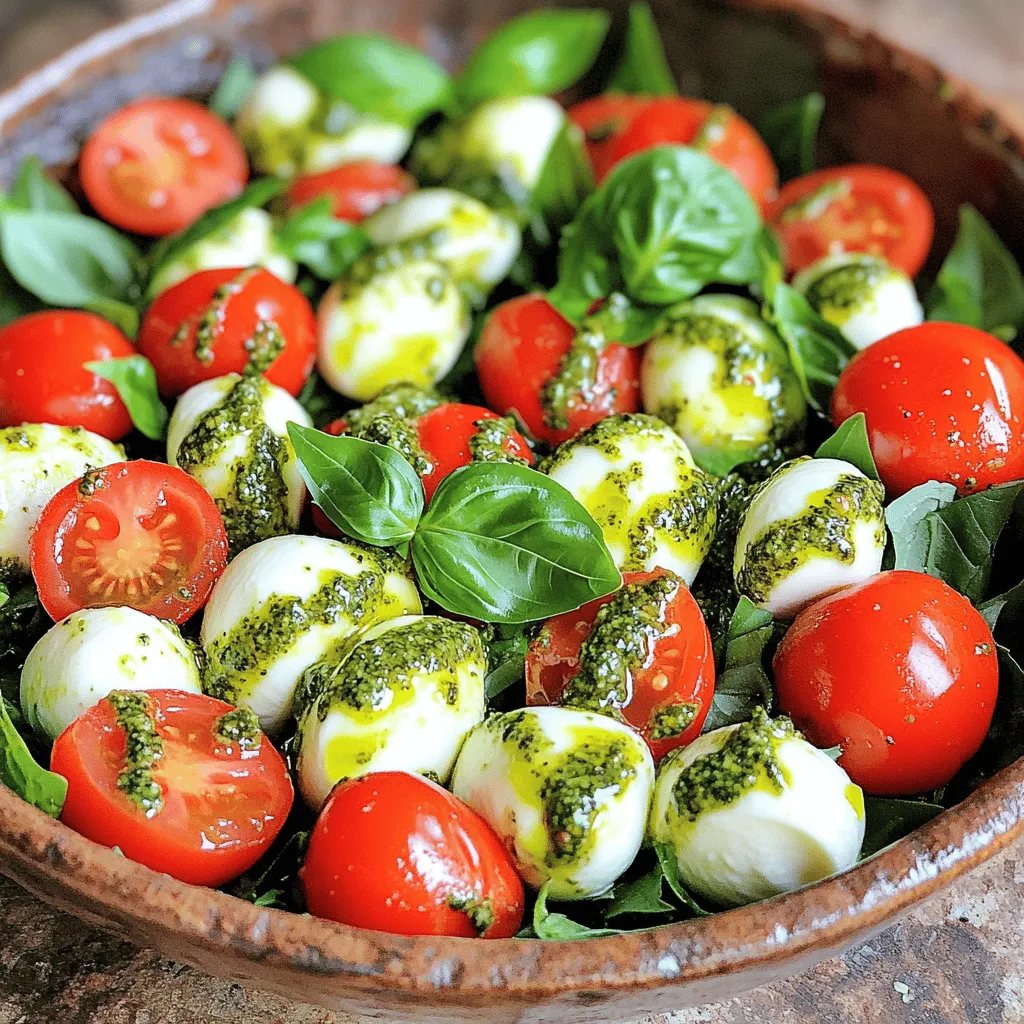
Savory 4 Ingredient Caprese Pesto Salad Recipe
Craving a fresh and tasty salad? You’ll love this Savory 4 Ingredient Caprese Pesto Salad! It’s simple to make and packed with flavor. With just
To make a great Roasted Sweet Potato Feta Salad, gather these main ingredients: - 2 medium sweet potatoes, peeled and diced - 2 tablespoons olive oil - 1 teaspoon paprika - Salt and pepper to taste - 1 cup fresh spinach leaves - 1/2 cup crumbled feta cheese - 1/4 cup toasted walnuts, roughly chopped - 1/4 cup dried cranberries - 2 tablespoons balsamic vinegar - 1 tablespoon honey These ingredients create a mix of sweet, savory, and crunchy flavors. The sweet potatoes bring warmth, while feta adds creaminess. Spinach gives a fresh taste, and walnuts give a nice crunch. You can add extra flavors to your salad if you like. Here are some optional ingredients: - Sliced red onion for a sharp bite - Avocado for creaminess - Roasted bell peppers for sweetness - Fresh herbs like parsley or basil for freshness Try these add-ins to customize your salad. Each one brings a unique twist to the dish. This salad is not just tasty; it’s also good for you. Here’s a quick look at the nutritional facts per serving: - Calories: 300 - Protein: 8g - Carbohydrates: 35g - Dietary Fiber: 7g - Sugars: 10g - Fat: 15g This salad is packed with nutrients. It gives you healthy carbs from sweet potatoes and good fats from olive oil and walnuts. Plus, it’s a great source of vitamins and minerals. You can enjoy this salad guilt-free, knowing it's both delicious and nutritious. For the full recipe, check the instructions above. Start by peeling the sweet potatoes. Use a sharp knife to cut them into small cubes. Aim for about one-inch pieces to ensure even cooking. Place the diced sweet potatoes in a large bowl. Add olive oil, paprika, salt, and pepper. Mix well until all pieces are coated. This adds great flavor to the potatoes. Preheat your oven to 400°F (200°C). Spread the sweet potatoes on a baking sheet. Make sure they are in a single layer for even roasting. Roast them for about 25-30 minutes. Stir them halfway through to help them cook evenly. Look for a tender texture and a light caramel color when they’re done. While the sweet potatoes roast, prepare the salad. In a large bowl, add fresh spinach leaves. Then, sprinkle crumbled feta cheese over the spinach. Add toasted walnuts and dried cranberries to the mix. Once the sweet potatoes cool slightly, add them to the salad. Drizzle balsamic dressing over everything and toss gently. Taste your salad and adjust the seasoning if needed. For a full recipe, refer to the earlier section. Enjoy your colorful, fresh creation! To get sweet potatoes just right, start with even-sized pieces. This helps them cook evenly. Toss them with olive oil, paprika, salt, and pepper. Use enough oil to coat every piece well. Spread them out in a single layer on the baking sheet. This prevents steaming. Roast them in a preheated oven at 400°F for about 25-30 minutes. Stir halfway through to avoid burning. You want them tender and caramelized. Sweet potatoes shine when paired with feta cheese. The salty feta balances the sweetness of the potatoes. Toasted walnuts add crunch and depth. Dried cranberries bring a nice tartness. Fresh spinach gives a green touch and adds nutrients. You can also try adding fresh herbs like parsley or mint for a burst of flavor. These pairings make each bite exciting. Serve your salad in a large wooden bowl for a warm feel. Top it with extra feta and walnuts for a beautiful look. Drizzle the balsamic dressing just before serving to keep the salad fresh. You can also add a sprinkle of fresh herbs on top for color. Make sure to serve it right after tossing to keep the textures crisp. This Roasted Sweet Potato Feta Salad is not just tasty; it also looks great on the table. {{image_2}} If you can't find feta cheese, try goat cheese or ricotta. Both add a creamy taste. You can also use a dairy-free cheese for a vegan option. It keeps the salad light while still being tasty. For protein, grilled chicken works great. It adds a savory touch. You can also use chickpeas for a plant-based option. They offer a nice texture and boost protein. Simply toss them in with the other ingredients. Feel free to mix in seasonal veggies. Butternut squash or roasted beets can add sweet notes. In spring, peas or radishes bring freshness. In summer, add bell peppers or cucumbers for crunch. Each change keeps the salad exciting and new. Enjoy experimenting with flavors! For the full recipe, visit the recipe section. To store your roasted sweet potato feta salad, place it in an airtight container. Make sure to let the salad cool down first. This will help keep it fresh. You can keep it in the fridge for up to three days. If you want to enjoy the salad later, separate the dressing. This will prevent the salad from getting soggy. When you're ready to eat the leftover sweet potatoes, I recommend reheating them gently. You can use the microwave, but a toaster oven works best. Heat them at a low temperature for about 5-10 minutes. This way, they stay soft and delicious, not dry. If you want, add a splash of olive oil before reheating to boost flavor. To keep your salad fresh, store ingredients separately if possible. Keep the sweet potatoes, greens, and dressing apart until you are ready to eat. This will help maintain the flavors and textures. If you need a quick meal, consider preparing just the sweet potatoes ahead of time. You can mix them with fresh greens and feta right before serving. Enjoy your vibrant salad fresh every time! For the Full Recipe, check out the detailed steps above. Yes, you can make this salad ahead of time. I recommend roasting the sweet potatoes first. Let them cool before adding them to the salad. You can mix the dressing and store it separately. This keeps the salad fresh. Assemble it just before serving for the best taste. If you don't have balsamic vinegar, try apple cider vinegar or red wine vinegar. Both add a nice tang. You can also use lemon juice for a fresh twist. Each option changes the flavor a bit but stays delicious. Yes, this salad is gluten-free! All the ingredients used are naturally gluten-free. Make sure to check any packaged items like feta or walnuts, just to be safe. Enjoy this healthy dish without worry. For the complete recipe, check out the Full Recipe section. Roasted Sweet Potato Feta Salad offers a tasty mix of flavors and textures. We explored key ingredients and step-by-step instructions to craft this dish. I shared tips for roasting and enhancing your salad. You can substitute feta or add proteins to suit your taste. Remember to store leftovers properly to keep them fresh. Feel free to try variations based on what you love. This salad is not just simple; it’s also healthy and satisfying! Enjoy making it your own!
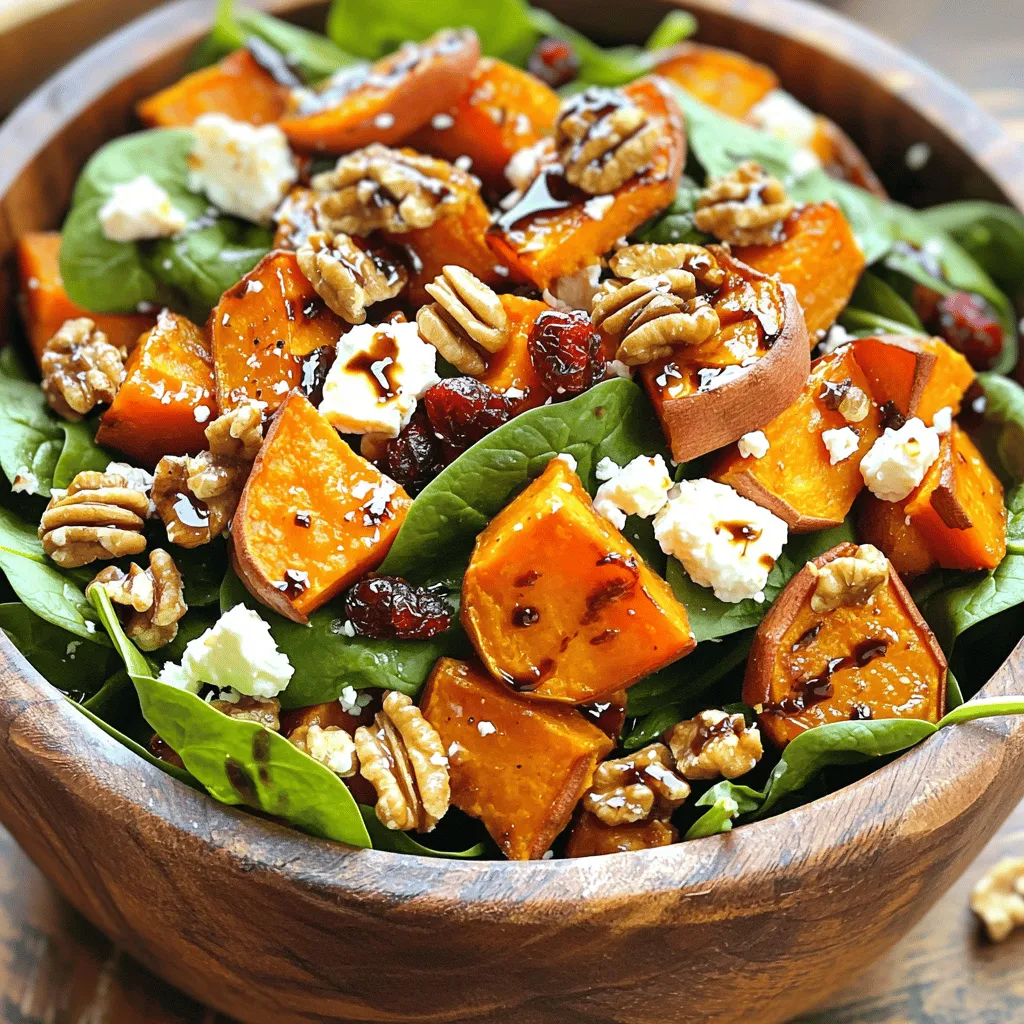
Roasted Sweet Potato Feta Salad Flavorful and Fresh
Looking for a fresh, tasty salad that packs a punch? You’ll love my Roasted Sweet Potato Feta Salad! This dish combines sweet, roasted potatoes with