
Are you ready to indulge in a warm, cheesy delight? Today, I’m sharing my easy recipe for Cheesy Garlic Butter Bombs. These savory treats combine gooey mozzarella, buttery garlic goodness, and flaky biscuit dough in a way that’s hard to resist. Perfect for parties or a cozy night in, they’re simple to make and even easier to eat. Let’s dive into the cheesy goodness that awaits!
Ingredients
Key Ingredients for Cheesy Garlic Butter Bombs
– 1 can of refrigerated biscuit dough (8 biscuits)
– 1 cup shredded mozzarella cheese
– 1/2 cup unsalted butter (1 stick), melted
– 4 cloves garlic, minced
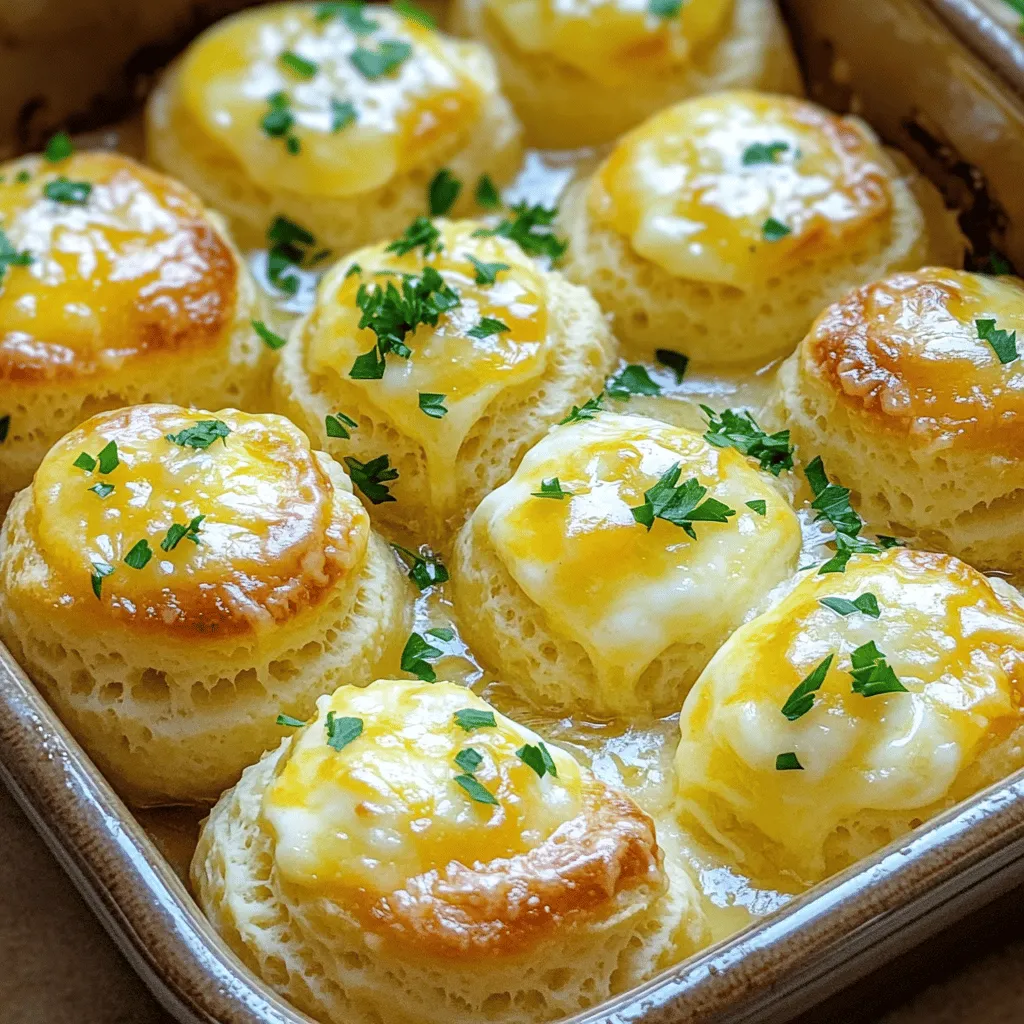
Cheesy garlic butter bombs need simple, tasty ingredients. The refrigerated biscuit dough makes them soft and fluffy. I like using shredded mozzarella cheese because it melts perfectly. Unsalted butter adds richness, while minced garlic gives a strong flavor. These four ingredients create a tasty base for our treat.
Optional Ingredients for Customization
– 1 teaspoon dried Italian herbs (oregano, basil, or thyme)
– 1/4 teaspoon red pepper flakes (optional, for a spicy kick)
– 1/4 cup fresh parsley, chopped (for garnish)
Feel free to get creative! Dried Italian herbs can add extra flavor. If you like heat, add red pepper flakes. Fresh parsley is great for a pop of color and freshness on top. These optional ingredients let you tailor the bombs to your taste.
Tools and Equipment Needed
– Baking dish or parchment paper
– Mixing bowl
– Oven
You will need a few tools for this recipe. A baking dish or parchment paper is key for easy cleanup. A mixing bowl helps combine the butter and garlic. Lastly, your oven will bake these cheesy delights to golden perfection. Using the right tools makes cooking easier and more fun.
For the full recipe, check the section on Full Recipe.
Step-by-Step Instructions
Preheating and Preparing the Oven
– Preheat the oven to 375°F (190°C).
– Grease the baking dish or line it with parchment paper.
Making the Garlic Butter Mixture
– In a small bowl, combine melted butter, minced garlic, and dried Italian herbs.
– Add red pepper flakes and salt to taste. Mix well.
Assembling the Cheesy Garlic Butter Bombs
– Open the can of biscuit dough and separate the biscuits.
– Flatten each biscuit slightly with your hands. Place a tablespoon of mozzarella cheese in the center.
– Gather the edges of the biscuit to enclose the cheese completely. Pinch to seal, ensuring no openings remain.
– Place the filled biscuits seam side down in the prepared baking dish.
Baking Instructions
– Pour the garlic butter mixture evenly over the biscuit bombs.
– Bake for 15-20 minutes until golden brown and fluffy.
– For extra crispiness, broil for 1-2 minutes at the end.
Tips & Tricks
Best Practices for Perfect Cheesy Garlic Butter Bombs
To make the best cheesy garlic butter bombs, sealing the biscuits is key. After placing cheese inside, gather the edges. Pinch them tightly to close. This step keeps the cheese from leaking during baking. If the biscuits are not sealed well, you might end up with a cheesy mess in your baking dish.
Using fresh ingredients also boosts the flavor. Fresh garlic packs a punch that dried garlic cannot match. Choose high-quality mozzarella for that gooey, stretchy texture. Fresh herbs give a bright taste that dried herbs lack. If you can, use herbs from your garden or a local market.
Serving Suggestions
These cheesy garlic butter bombs pair well with dips. Marinara sauce is a classic choice. Its tangy flavor matches the richness of the bombs. You can also try ranch dressing or a creamy garlic dip. If you want a complete meal, serve them with a fresh salad or pasta. The crispy bombs add a fun twist to any dinner.
Storage Tips
Storing leftovers is simple. Place them in an airtight container. They stay fresh in the fridge for about three days. If you want to keep them longer, you can freeze them. Just make sure they cool down first.
For reheating, the oven works best. Preheat to 350°F (175°C) and place the bombs on a baking sheet. Heat for about 10-15 minutes. This method keeps them crispy and delicious. You can also use a microwave, but they may turn soft. Enjoy your cheesy garlic butter bombs anytime!
Variations
Flavor Variations
You can mix things up with cheese. Try adding cheddar or gouda. Each cheese gives a fun twist. You can even use a blend of cheeses for more depth.
Herbs and spices can change the taste, too. Basil, thyme, and rosemary work great. You can add garlic powder, too, for extra flavor. A little cumin can also add a nice touch.
Dietary Adaptations
If you need gluten-free options, use gluten-free biscuit dough. Many brands offer great choices. Just check the label to make sure.
For vegan substitutes, use dairy-free butter and cheese. Look for plant-based mozzarella. This keeps it cheesy without the dairy. You can still enjoy all the flavors!
Creative Serving Ideas
You can turn these into an appetizer. Just pull apart each bomb for a cheesy experience. Serve with marinara sauce for dipping. It’s fun and tasty!
You can also use the filling in other dishes. Try it in pasta or as a pizza topping. The cheesy garlic mix adds flavor to many meals. Don’t be afraid to get creative!
Check out the Full Recipe for more details on making these delicious treats.
Full Recipe
Complete Recipe Reference
You can find the Full Recipe for Cheesy Garlic Butter Bombs below. This recipe is simple and packed with flavor. Here’s what you need:
– 1 can of refrigerated biscuit dough (8 biscuits)
– 1 cup shredded mozzarella cheese
– 1/2 cup unsalted butter (1 stick), melted
– 4 cloves garlic, minced
– 1 teaspoon dried Italian herbs (oregano, basil, or thyme)
– 1/4 teaspoon red pepper flakes (optional)
– 1/4 cup fresh parsley, chopped
– Salt to taste
Follow these instructions for a tasty treat:
1. Preheat your oven to 375°F (190°C). Grease a baking dish or use parchment paper.
2. Mix melted butter, minced garlic, Italian herbs, red pepper flakes, and salt in a bowl.
3. Open the biscuit dough and separate the biscuits. Flatten each biscuit and add a tablespoon of mozzarella cheese in the center.
4. Gather the edges of each biscuit around the cheese and pinch to seal. Make sure no cheese escapes.
5. Place the sealed biscuits seam side down in the baking dish.
6. Pour the garlic butter mixture over the biscuit bombs. Make sure they are well coated.
7. Bake for 15-20 minutes until golden brown and fluffy. Broil for 1-2 minutes for extra crispiness.
8. Once done, sprinkle with fresh parsley. Serve warm and enjoy!
This recipe serves 8 people. It’s quick to prep and fun to eat. Perfect for parties or a cozy night at home!
FAQs
How can I make Cheesy Garlic Butter Bombs ahead of time?
You can prepare the garlic butter bombs a few hours in advance. Make the filling and fill the biscuits. Place them in the baking dish, cover, and chill in the fridge. When you are ready, simply bake them as usual.
What can I substitute for mozzarella cheese?
If you don’t have mozzarella, you can use cheddar or gouda. Both will melt nicely and add flavor. Cream cheese can also work for a rich, creamy texture.
Can I freeze Cheesy Garlic Butter Bombs?
Yes, you can freeze them! After assembling, place the bombs on a baking sheet and freeze them. Once frozen, transfer them to a freezer bag. Bake them straight from the freezer when needed.
How do I ensure my biscuits don’t burn?
To avoid burning, keep an eye on them while baking. If they seem to brown too quickly, cover them loosely with foil. Also, make sure your oven temperature is accurate.
What are some variations for different flavor profiles?
You can switch up the herbs or add spices. Try adding some diced jalapeños for heat. For a herb flavor, use fresh basil or rosemary. Mixing in some cooked bacon bits can also add a tasty twist.
You now have a simple guide to making Cheesy Garlic Butter Bombs. We covered key ingredients like biscuit dough and mozzarella cheese. You learned step-by-step instructions to prepare and bake them perfectly. We included tips for using fresh herbs and serving suggestions. Don’t forget to explore variations, including dietary adaptations.
These cheesy bites make a great snack or appetizer. Enjoy experimenting with flavors and serving ideas. You’ll impress your friends and family with these tasty treats!
