Chocolate Peanut Butter Crunch Bars No Bake Delight

WANT TO SAVE THIS RECIPE?

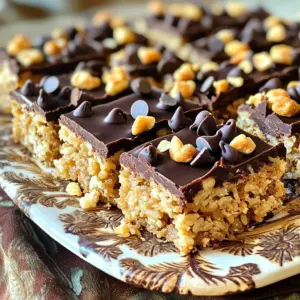
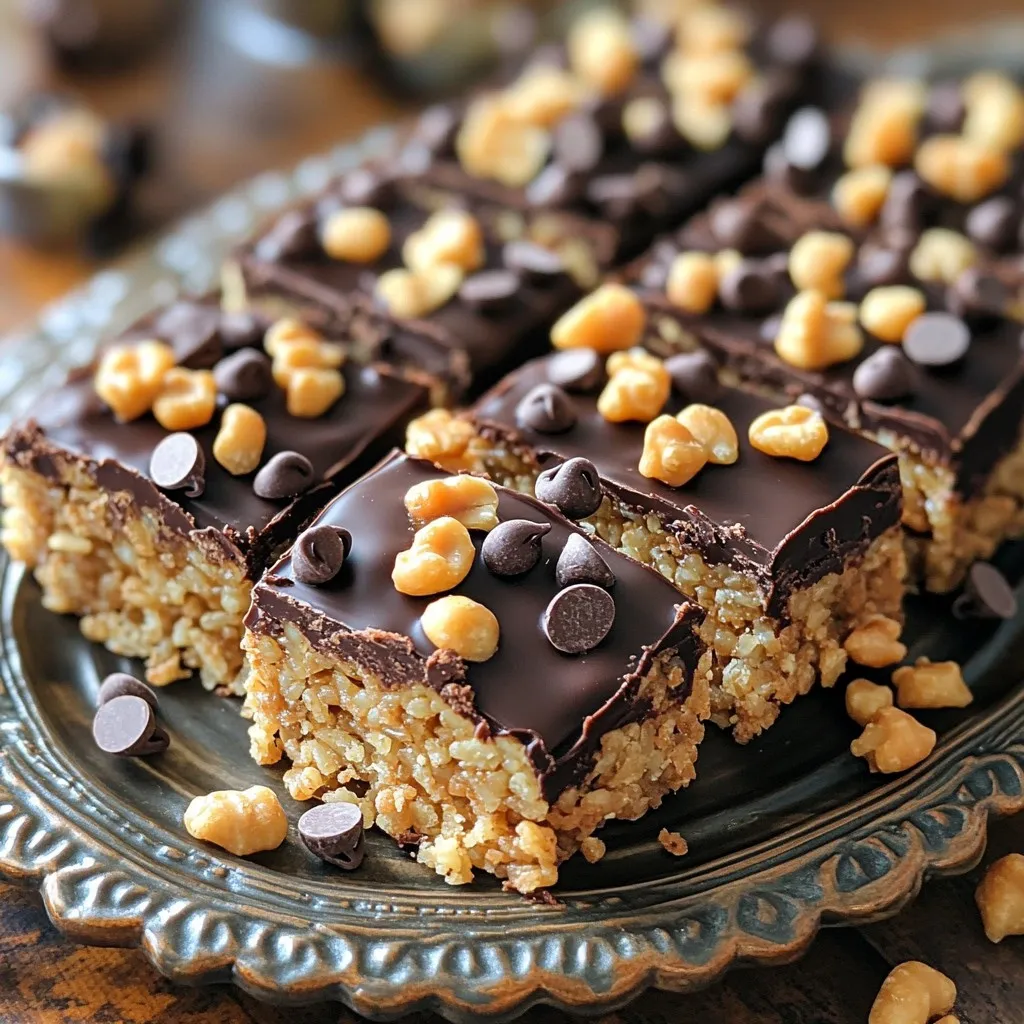
Looking for a sweet treat that’s easy to make? You’ve hit the jackpot with these no-bake Chocolate Peanut Butter Crunch Bars! With creamy peanut butter, crispy cereal, and rich chocolate, these bars pack a big flavor punch. Plus, they come together in just a few simple steps. Get ready to whip up a tasty snack that everyone will love! Let’s dive into the fun of making these delicious bars!

Ingredients

List of Ingredients

– 1 cup creamy peanut butter

– 1/2 cup honey or maple syrup

– 1 cup rolled oats

– 1 cup puffed rice cereal

– 1/2 cup dark chocolate chips

– 1/4 teaspoon salt

– 1 teaspoon vanilla extract

– 1/4 cup chopped nuts (optional)

– 1/4 cup shredded coconut (optional)

For these Chocolate Peanut Butter Crunch Bars, gather your ingredients first. Start with creamy peanut butter. It brings a rich flavor and smooth texture. You can use honey or maple syrup for sweetness. Both options taste great. Rolled oats add heartiness, while puffed rice cereal gives that fun crunch.

Dark chocolate chips add a sweet finish. Use dairy-free chips if needed. A pinch of salt balances the flavors. Lastly, vanilla extract enhances the taste. You can include optional add-ins like chopped nuts or shredded coconut for extra texture.

Always measure your ingredients carefully. This ensures a perfect mix. Enjoy the process and get ready to make these tasty bars!

Step-by-Step Instructions

Preparation Steps

Step 1: Combine peanut butter and honey

In a medium saucepan, set your heat to low. Add 1 cup of creamy peanut butter and 1/2 cup of honey. Stir gently. Heat until it becomes smooth. This step brings out the sweet and nutty flavors in the bars.

Step 2: Mix in vanilla and salt

Once it’s mixed well, take the pan off the heat. Stir in 1 teaspoon of vanilla extract and 1/4 teaspoon of salt. This adds depth and balances the sweetness. Mix until everything is combined.

Step 3: Prepare the dry ingredients

In a large mixing bowl, combine 1 cup of rolled oats and 1 cup of puffed rice cereal. If you like, add optional ingredients like 1/4 cup of chopped nuts or 1/4 cup of shredded coconut. These extras add texture and flavor.

Step 4: Combine wet and dry mixtures

Pour the warm peanut butter mix over the dry ingredients. Use a spatula to fold them together. Make sure everything is well coated. This ensures every bite is packed with flavor.

Step 5: Press mixture into baking dish

Line an 8×8 inch baking dish with parchment paper. Let some paper hang over the edges. This makes it easy to lift out later. Press the mixture into the dish firmly. Use the back of a spatula or your hands to create an even layer.

Step 6: Melt and spread chocolate

In a microwave or double boiler, melt 1/2 cup of dark chocolate chips until smooth. Once melted, spread the chocolate evenly over the pressed mixture. This adds a rich, sweet layer on top.

Step 7: Refrigerate until firm

Place the baking dish in the fridge for at least 1 hour. This helps the bars set properly. You want them firm enough to hold their shape when cut.

Step 8: Cut and serve

After the bars have set, lift them out using the parchment paper. Cut them into squares or rectangles. They are ready to be enjoyed!

Tips & Tricks

Perfecting the Recipe

Best peanut butter to use: I recommend using creamy peanut butter. It blends well and gives a smooth texture. Natural options work too but check for added sugar.

How to achieve the perfect texture: To get a great texture, mix the wet and dry ingredients carefully. You want everything coated well but not mushy. Press the mixture firmly into the pan for a good shape.

Tips for melting chocolate: Use a microwave or double boiler to melt the chocolate. If using a microwave, heat in short bursts. Stir often to avoid burning. The chocolate should be smooth and silky.

Serving Suggestions

Presentation tips for serving: Serve the bars on a nice platter. You can sprinkle extra chocolate chips or nuts on top for a fun look. For a treat, add a dollop of peanut butter on the side for dipping.

Pairing ideas for dessert time: These bars pair well with a glass of cold milk or a cup of coffee. They also taste great with fresh fruit like bananas or strawberries.

Variations

Ingredient Adjustments

You can make great changes to fit your needs. For a vegan option, swap honey for maple syrup. This keeps the bars sweet and sticky without any animal products.

If you need a nut-free treat, use sun butter or soy nut butter instead of peanut butter. This way, everyone can enjoy the bars.

To add unique flavors, try mixing in spices. A pinch of cinnamon or a dash of almond extract can transform the taste. These small changes can surprise your taste buds!

Different Textures

You can change the texture of your bars easily. Instead of puffed rice cereal, try using crispy rice, cornflakes, or even granola. Each cereal gives a different crunch that’s fun to explore.

Adding dried fruits can also give a chewy bite. Consider using raisins, cranberries, or chopped dates. These mix in well and add a nice sweetness.

Experimenting with these variations lets you create a snack that’s truly your own. Enjoy the process!

Storage Info

Storing the Bars

To keep your chocolate peanut butter crunch bars fresh, store them properly. Start by cutting them into squares after they set. Place the bars in an airtight container.

Refrigeration: Keep the bars in the fridge. This helps them stay firm and tasty. If you stack them, put parchment paper between layers to avoid sticking.

Freezing Options: You can freeze the bars too. Wrap each bar in plastic wrap, then place them in a freezer bag. This keeps them fresh for longer. To enjoy, just take one out and let it thaw.

Shelf Life

How long do these bars last? In the fridge, they can stay good for about a week. If you freeze them, they can last up to three months.

Signs of Spoilage: Look for changes in smell or color. If they seem dry or have a strange odor, it’s best to throw them away. Enjoy your delicious bars while they are fresh!

FAQs

Can I use crunchy peanut butter?

Yes, you can use crunchy peanut butter. It adds a nice texture. The bars will have bits of peanut throughout, which makes them even more delightful.

How do I make these bars gluten-free?

To make these bars gluten-free, use certified gluten-free oats. Check the label on your puffed rice cereal too. This way, everyone can enjoy them.

Can I add protein powder to the recipe?

Absolutely! Adding protein powder is a great way to boost nutrition. Mix it in with the dry ingredients before adding the wet mixture.

What can I substitute for honey?

You can use maple syrup instead of honey. It works well and keeps the bars sweet and sticky. Agave syrup is another good option if you prefer.

How can I make these bars more chocolatey?

To make the bars more chocolatey, add chocolate chips to the dry mix. You can also drizzle extra melted chocolate on top after chilling. Enjoy that rich flavor!

These easy bars use simple ingredients like peanut butter, oats, and chocolate. You learned how to mix them, chill them, and store them well. Remember, you can customize the bars to fit your taste. Adjust flavors or textures to make them your own. These ideas will make your snacks fun and tasty. Enjoy your creations and share them with others. Keep experimenting to find your favorite mix!

- 1 cup creamy peanut butter - 1/2 cup honey or maple syrup - 1 cup rolled oats - 1 cup puffed rice cereal - 1/2 cup dark chocolate chips - 1/4 teaspoon salt - 1 teaspoon vanilla extract - 1/4 cup chopped nuts (optional) - 1/4 cup shredded coconut (optional) For these Chocolate Peanut Butter Crunch Bars, gather your ingredients first. Start with creamy peanut butter. It brings a rich flavor and smooth texture. You can use honey or maple syrup for sweetness. Both options taste great. Rolled oats add heartiness, while puffed rice cereal gives that fun crunch. Dark chocolate chips add a sweet finish. Use dairy-free chips if needed. A pinch of salt balances the flavors. Lastly, vanilla extract enhances the taste. You can include optional add-ins like chopped nuts or shredded coconut for extra texture. Always measure your ingredients carefully. This ensures a perfect mix. Enjoy the process and get ready to make these tasty bars! - Step 1: Combine peanut butter and honey In a medium saucepan, set your heat to low. Add 1 cup of creamy peanut butter and 1/2 cup of honey. Stir gently. Heat until it becomes smooth. This step brings out the sweet and nutty flavors in the bars. - Step 2: Mix in vanilla and salt Once it's mixed well, take the pan off the heat. Stir in 1 teaspoon of vanilla extract and 1/4 teaspoon of salt. This adds depth and balances the sweetness. Mix until everything is combined. - Step 3: Prepare the dry ingredients In a large mixing bowl, combine 1 cup of rolled oats and 1 cup of puffed rice cereal. If you like, add optional ingredients like 1/4 cup of chopped nuts or 1/4 cup of shredded coconut. These extras add texture and flavor. - Step 4: Combine wet and dry mixtures Pour the warm peanut butter mix over the dry ingredients. Use a spatula to fold them together. Make sure everything is well coated. This ensures every bite is packed with flavor. - Step 5: Press mixture into baking dish Line an 8x8 inch baking dish with parchment paper. Let some paper hang over the edges. This makes it easy to lift out later. Press the mixture into the dish firmly. Use the back of a spatula or your hands to create an even layer. - Step 6: Melt and spread chocolate In a microwave or double boiler, melt 1/2 cup of dark chocolate chips until smooth. Once melted, spread the chocolate evenly over the pressed mixture. This adds a rich, sweet layer on top. - Step 7: Refrigerate until firm Place the baking dish in the fridge for at least 1 hour. This helps the bars set properly. You want them firm enough to hold their shape when cut. - Step 8: Cut and serve After the bars have set, lift them out using the parchment paper. Cut them into squares or rectangles. They are ready to be enjoyed! - Best peanut butter to use: I recommend using creamy peanut butter. It blends well and gives a smooth texture. Natural options work too but check for added sugar. - How to achieve the perfect texture: To get a great texture, mix the wet and dry ingredients carefully. You want everything coated well but not mushy. Press the mixture firmly into the pan for a good shape. - Tips for melting chocolate: Use a microwave or double boiler to melt the chocolate. If using a microwave, heat in short bursts. Stir often to avoid burning. The chocolate should be smooth and silky. - Presentation tips for serving: Serve the bars on a nice platter. You can sprinkle extra chocolate chips or nuts on top for a fun look. For a treat, add a dollop of peanut butter on the side for dipping. - Pairing ideas for dessert time: These bars pair well with a glass of cold milk or a cup of coffee. They also taste great with fresh fruit like bananas or strawberries. {{image_2}} You can make great changes to fit your needs. For a vegan option, swap honey for maple syrup. This keeps the bars sweet and sticky without any animal products. If you need a nut-free treat, use sun butter or soy nut butter instead of peanut butter. This way, everyone can enjoy the bars. To add unique flavors, try mixing in spices. A pinch of cinnamon or a dash of almond extract can transform the taste. These small changes can surprise your taste buds! You can change the texture of your bars easily. Instead of puffed rice cereal, try using crispy rice, cornflakes, or even granola. Each cereal gives a different crunch that’s fun to explore. Adding dried fruits can also give a chewy bite. Consider using raisins, cranberries, or chopped dates. These mix in well and add a nice sweetness. Experimenting with these variations lets you create a snack that’s truly your own. Enjoy the process! To keep your chocolate peanut butter crunch bars fresh, store them properly. Start by cutting them into squares after they set. Place the bars in an airtight container. - Refrigeration: Keep the bars in the fridge. This helps them stay firm and tasty. If you stack them, put parchment paper between layers to avoid sticking. - Freezing Options: You can freeze the bars too. Wrap each bar in plastic wrap, then place them in a freezer bag. This keeps them fresh for longer. To enjoy, just take one out and let it thaw. How long do these bars last? In the fridge, they can stay good for about a week. If you freeze them, they can last up to three months. - Signs of Spoilage: Look for changes in smell or color. If they seem dry or have a strange odor, it’s best to throw them away. Enjoy your delicious bars while they are fresh! Yes, you can use crunchy peanut butter. It adds a nice texture. The bars will have bits of peanut throughout, which makes them even more delightful. To make these bars gluten-free, use certified gluten-free oats. Check the label on your puffed rice cereal too. This way, everyone can enjoy them. Absolutely! Adding protein powder is a great way to boost nutrition. Mix it in with the dry ingredients before adding the wet mixture. You can use maple syrup instead of honey. It works well and keeps the bars sweet and sticky. Agave syrup is another good option if you prefer. To make the bars more chocolatey, add chocolate chips to the dry mix. You can also drizzle extra melted chocolate on top after chilling. Enjoy that rich flavor! These easy bars use simple ingredients like peanut butter, oats, and chocolate. You learned how to mix them, chill them, and store them well. Remember, you can customize the bars to fit your taste. Adjust flavors or textures to make them your own. These ideas will make your snacks fun and tasty. Enjoy your creations and share them with others. Keep experimenting to find your favorite mix!

Chocolate Peanut Butter Crunch Bars No Bake

Indulge in the deliciousness of Chocolate Peanut Butter Crunch Bars! These no-bake treats blend creamy peanut butter, honey, and crunchy oats for a satisfying snack. With just a few simple ingredients, you can whip up a batch in no time. Perfect for any occasion, these bars are easy to make and irresistibly tasty. Click through to discover the full recipe and treat your taste buds to a delightful experience!

Ingredients
  

1 cup creamy peanut butter

1/2 cup honey (or maple syrup for a vegan option)

1 cup rolled oats

1 cup puffed rice cereal

1/2 cup dark chocolate chips (dairy-free if needed)

1/4 teaspoon salt

1 teaspoon vanilla extract

1/4 cup chopped nuts (such as almonds or walnuts, optional)

1/4 cup shredded coconut (optional)

Instructions
 

In a medium saucepan over low heat, combine the creamy peanut butter and honey. Stir gently until the mixture is smooth and well-combined.

    Remove the saucepan from heat and stir in the vanilla extract and salt. Mix until fully incorporated.

      In a large mixing bowl, combine rolled oats, puffed rice cereal, and any optional ingredients like chopped nuts or shredded coconut.

        Pour the warm peanut butter mixture over the cereal and oats. Use a spatula to fold everything together until evenly coated.

          Line an 8x8 inch square baking dish with parchment paper, allowing some to hang over the edges for easy removal.

            Press the mixture firmly into the baking dish using the back of a spatula or your hands to create an even layer.

              Melt the dark chocolate chips in a microwave or double boiler until smooth, and then spread the melted chocolate evenly over the pressed mixture.

                Refrigerate the bars for at least 1 hour, or until firm.

                  Once set, lift the bars out using the parchment paper, and cut them into squares or rectangles.

                    Prep Time: 15 minutes | Total Time: 1 hour 15 minutes | Servings: 12 bars

                      - Presentation Tips: Arrange the bars on a decorative platter and sprinkle a few extra chocolate chips or chopped nuts on top for a finishing touch. Optionally, serve with a small dollop of extra peanut butter on the side for dipping.

                        WANT TO SAVE THIS RECIPE?