Easy Peanut Butter Spider Cookies Fun and Delightful Treat

WANT TO SAVE THIS RECIPE?

Want to bake something fun and simple? These Easy Peanut Butter Spider Cookies are perfect! You’ll love how quickly you can whip them up for parties or just a treat at home. With a few ingredients and simple steps, you can create these delightful spiders. Whether you’re a pro or a newbie, this recipe will be a hit. Let’s jump into the tasty details and start baking!

Ingredients

List of Ingredients

– 1 cup creamy peanut butter

– 1 cup brown sugar, packed

– 1 large egg

– 1 teaspoon baking soda

– 1/2 teaspoon vanilla extract

– 1 cup chocolate chips

– 1 cup pretzel sticks (for legs)

– 1 tube of black frosting (for decorating)

Measurement Details

When measuring ingredients, accuracy matters. Use a dry measuring cup for the peanut butter and sugar. Pack the brown sugar tightly to get the right amount. For liquid ingredients, like vanilla, use a measuring spoon. This ensures your cookies turn out great every time.

Substitutions and Alternatives

If you want a nut-free option, use sun butter instead of peanut butter. You can also swap brown sugar for white sugar, but this may change the texture slightly. For a healthier twist, try adding oats to the mix. If you don’t like chocolate chips, use dried fruit or nuts. These changes can make the cookies your own while keeping them fun! For the spider legs, you could use chocolate-covered pretzels instead. Each option adds a unique flavor to your Easy Peanut Butter Spider Cookies. Check the Full Recipe for all the details!

Step-by-Step Instructions

Prepping the Cookie Dough

First, gather your ingredients. You need peanut butter, brown sugar, an egg, baking soda, vanilla extract, and chocolate chips. Start by preheating your oven to 350°F (175°C). Then, line a baking sheet with parchment paper. In a mixing bowl, combine the creamy peanut butter, packed brown sugar, and egg. Stir until this mix is smooth. Next, add the baking soda and vanilla extract. Mix until everything is well blended. Finally, fold in the chocolate chips gently. Make sure they spread evenly in the dough.

Baking the Cookies

Once your dough is ready, use a tablespoon or a cookie scoop to drop dough onto the prepared baking sheet. Leave space between each scoop so they can spread out while baking. Place the sheet in your preheated oven. Bake the cookies for 10 to 12 minutes. You’ll want the edges to turn lightly brown. The centers will look soft, but they will firm up as they cool. Remove the cookies from the oven and let them cool on the baking sheet for about five minutes. After that, transfer them to a wire rack to cool completely.

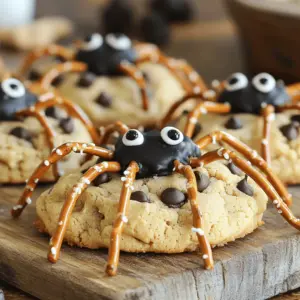
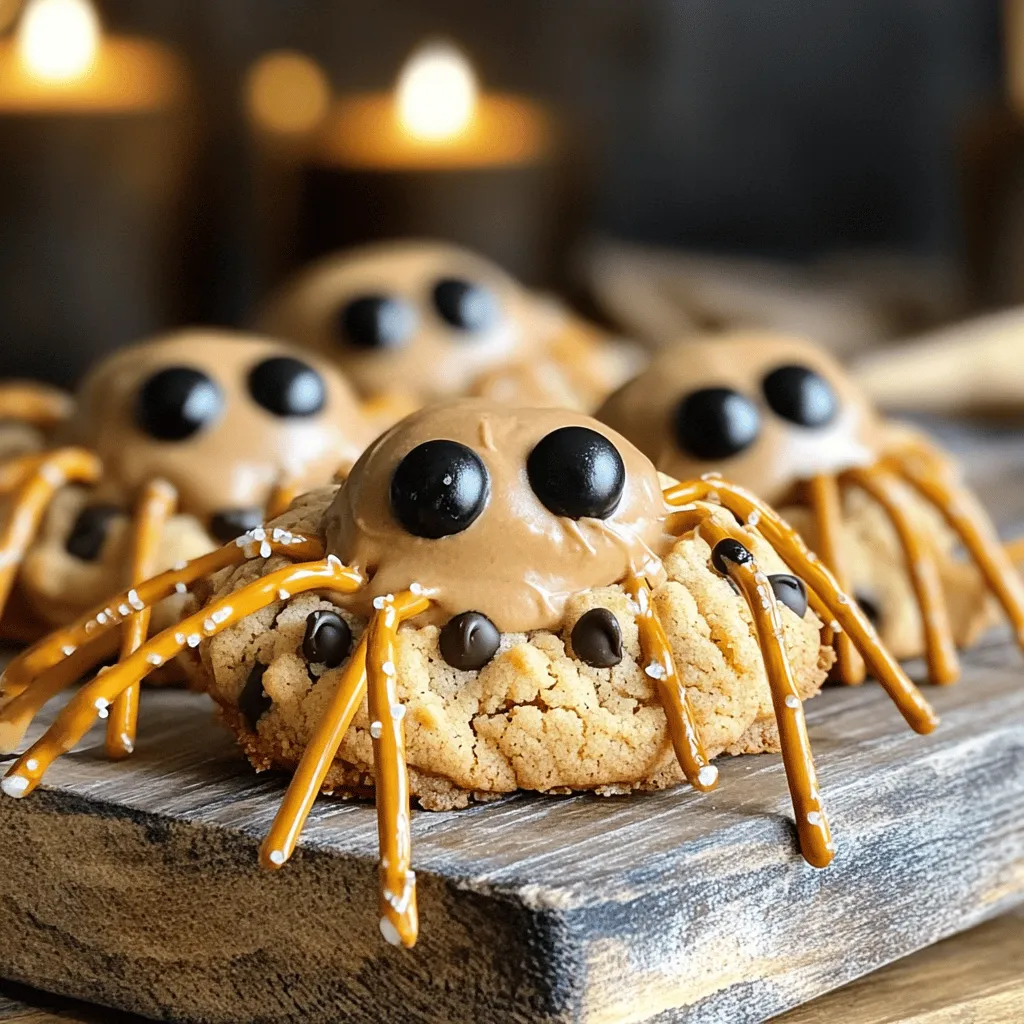
Assembling the Spider Decoration

When your cookies are cool, it’s time for the fun part! Take two pretzel sticks for each cookie. Gently press them into the sides of the cookie to look like spider legs. Use the tube of black frosting to create eyes on each cookie. You can also add more details if you like. This will turn simple cookies into spooky treats. For the full recipe, check out the complete instructions above. Enjoy your spider cookies!

Tips & Tricks

Best Baking Practices

When you bake these cookies, use room temperature ingredients. This helps the dough mix well. Make sure your oven is fully preheated. An accurate temperature is key for the best texture. Use parchment paper on your baking sheet to prevent sticking. This will keep your cookies intact when you move them.

How to Store Cookies

Store your spider cookies in an airtight container. This keeps them fresh for up to a week. You can also layer parchment paper between cookies to prevent sticking. If you want them to last longer, place them in the fridge. Just remember to let them warm up a bit before you enjoy them.

Decorating Ideas for Different Themes

You can change the look of your spider cookies for any occasion. For Halloween, add more spooky decorations like candy eyes or spooky sprinkles. For a fall theme, use orange and yellow frosting. You can also swap pretzel legs for chocolate sticks or gummy worms for a fun twist. Let your creativity shine!

Variations

Gluten-Free Options

You can make these cookies gluten-free easily. Use gluten-free flour instead of regular flour. This change keeps the cookie chewy and delicious. Make sure your baking soda is gluten-free too. All other ingredients in the Full Recipe are already gluten-free.

Using Different Types of Nut Butters

If you want to switch things up, feel free to use other nut butters. Almond butter or cashew butter works well too. Each nut butter adds its own unique flavor. Just keep the same amount as in the recipe. This way, you will still get the right texture.

Seasonal Twists for Halloween and Beyond

These cookies are perfect for Halloween. You can add candy eyes or use colored frosting to make them spooky. For fall, try adding pumpkin spice to the dough. You can even shape the cookies like leaves for Thanksgiving. These fun ideas make your treats special for any holiday.

Storage Info

Optimal Storage Conditions

To keep your Easy Peanut Butter Spider Cookies fresh, store them in an airtight container. Place parchment paper between layers to avoid sticking. Keep the container in a cool, dry place. If you want to enjoy them later, you can freeze them.

Freezing Instructions

To freeze these cookies, let them cool completely first. Then, wrap each cookie in plastic wrap or foil. Place wrapped cookies in a freezer bag. Remove as much air as possible before sealing. You can freeze them for up to three months. When you’re ready to eat, just thaw them at room temperature.

Shelf Life of Cookies

These cookies stay fresh for about one week at room temperature. If stored properly in an airtight container, they can last longer. However, for best taste and texture, enjoy them within a week. If you freeze them, they will taste great even after a few months.

FAQs

Can I use crunchy peanut butter instead of creamy?

Yes, you can use crunchy peanut butter. The cookies will have extra texture and flavor. Crunchy peanut butter adds a nice bite. Just keep in mind that the cookies may spread a bit differently. You could enjoy the crunch of the nuts in every bite!

How do I make my cookies softer?

To make your cookies softer, try a few simple tips. First, do not bake them too long. Bake until the edges are just brown. Second, add a little extra peanut butter. This will help keep them moist. Lastly, store them in an airtight container. This will keep them soft for longer.

Are these cookies suitable for a gluten-free diet?

These cookies can be made gluten-free with simple swaps. Use gluten-free flour instead of regular flour. Make sure all your other ingredients are gluten-free, too. The peanut butter and chocolate chips should be safe. Always check labels to ensure your ingredients are gluten-free. Enjoy a tasty treat without worries!

You learned the key ingredients and steps to bake delicious cookies. We discussed prepping the dough, baking, and decorating. I shared tips on storing your treats and ways to customize them. You now have ideas for gluten-free options and seasonal twists.

Overall, enjoy the process and be creative. Baking should be fun and satisfying. Use this guide to make sweet memories with your cookies. Your kitchen adventures are just beginning.

- 1 cup creamy peanut butter - 1 cup brown sugar, packed - 1 large egg - 1 teaspoon baking soda - 1/2 teaspoon vanilla extract - 1 cup chocolate chips - 1 cup pretzel sticks (for legs) - 1 tube of black frosting (for decorating) When measuring ingredients, accuracy matters. Use a dry measuring cup for the peanut butter and sugar. Pack the brown sugar tightly to get the right amount. For liquid ingredients, like vanilla, use a measuring spoon. This ensures your cookies turn out great every time. If you want a nut-free option, use sun butter instead of peanut butter. You can also swap brown sugar for white sugar, but this may change the texture slightly. For a healthier twist, try adding oats to the mix. If you don't like chocolate chips, use dried fruit or nuts. These changes can make the cookies your own while keeping them fun! For the spider legs, you could use chocolate-covered pretzels instead. Each option adds a unique flavor to your Easy Peanut Butter Spider Cookies. Check the Full Recipe for all the details! First, gather your ingredients. You need peanut butter, brown sugar, an egg, baking soda, vanilla extract, and chocolate chips. Start by preheating your oven to 350°F (175°C). Then, line a baking sheet with parchment paper. In a mixing bowl, combine the creamy peanut butter, packed brown sugar, and egg. Stir until this mix is smooth. Next, add the baking soda and vanilla extract. Mix until everything is well blended. Finally, fold in the chocolate chips gently. Make sure they spread evenly in the dough. Once your dough is ready, use a tablespoon or a cookie scoop to drop dough onto the prepared baking sheet. Leave space between each scoop so they can spread out while baking. Place the sheet in your preheated oven. Bake the cookies for 10 to 12 minutes. You'll want the edges to turn lightly brown. The centers will look soft, but they will firm up as they cool. Remove the cookies from the oven and let them cool on the baking sheet for about five minutes. After that, transfer them to a wire rack to cool completely. When your cookies are cool, it's time for the fun part! Take two pretzel sticks for each cookie. Gently press them into the sides of the cookie to look like spider legs. Use the tube of black frosting to create eyes on each cookie. You can also add more details if you like. This will turn simple cookies into spooky treats. For the full recipe, check out the complete instructions above. Enjoy your spider cookies! When you bake these cookies, use room temperature ingredients. This helps the dough mix well. Make sure your oven is fully preheated. An accurate temperature is key for the best texture. Use parchment paper on your baking sheet to prevent sticking. This will keep your cookies intact when you move them. Store your spider cookies in an airtight container. This keeps them fresh for up to a week. You can also layer parchment paper between cookies to prevent sticking. If you want them to last longer, place them in the fridge. Just remember to let them warm up a bit before you enjoy them. You can change the look of your spider cookies for any occasion. For Halloween, add more spooky decorations like candy eyes or spooky sprinkles. For a fall theme, use orange and yellow frosting. You can also swap pretzel legs for chocolate sticks or gummy worms for a fun twist. Let your creativity shine! {{image_2}} You can make these cookies gluten-free easily. Use gluten-free flour instead of regular flour. This change keeps the cookie chewy and delicious. Make sure your baking soda is gluten-free too. All other ingredients in the Full Recipe are already gluten-free. If you want to switch things up, feel free to use other nut butters. Almond butter or cashew butter works well too. Each nut butter adds its own unique flavor. Just keep the same amount as in the recipe. This way, you will still get the right texture. These cookies are perfect for Halloween. You can add candy eyes or use colored frosting to make them spooky. For fall, try adding pumpkin spice to the dough. You can even shape the cookies like leaves for Thanksgiving. These fun ideas make your treats special for any holiday. To keep your Easy Peanut Butter Spider Cookies fresh, store them in an airtight container. Place parchment paper between layers to avoid sticking. Keep the container in a cool, dry place. If you want to enjoy them later, you can freeze them. To freeze these cookies, let them cool completely first. Then, wrap each cookie in plastic wrap or foil. Place wrapped cookies in a freezer bag. Remove as much air as possible before sealing. You can freeze them for up to three months. When you're ready to eat, just thaw them at room temperature. These cookies stay fresh for about one week at room temperature. If stored properly in an airtight container, they can last longer. However, for best taste and texture, enjoy them within a week. If you freeze them, they will taste great even after a few months. Yes, you can use crunchy peanut butter. The cookies will have extra texture and flavor. Crunchy peanut butter adds a nice bite. Just keep in mind that the cookies may spread a bit differently. You could enjoy the crunch of the nuts in every bite! To make your cookies softer, try a few simple tips. First, do not bake them too long. Bake until the edges are just brown. Second, add a little extra peanut butter. This will help keep them moist. Lastly, store them in an airtight container. This will keep them soft for longer. These cookies can be made gluten-free with simple swaps. Use gluten-free flour instead of regular flour. Make sure all your other ingredients are gluten-free, too. The peanut butter and chocolate chips should be safe. Always check labels to ensure your ingredients are gluten-free. Enjoy a tasty treat without worries! You learned the key ingredients and steps to bake delicious cookies. We discussed prepping the dough, baking, and decorating. I shared tips on storing your treats and ways to customize them. You now have ideas for gluten-free options and seasonal twists. Overall, enjoy the process and be creative. Baking should be fun and satisfying. Use this guide to make sweet memories with your cookies. Your kitchen adventures are just beginning.

Easy Peanut Butter Spider Cookies

Get ready for a spooky treat with these Easy Peanut Butter Spider Cookies! Made with simple ingredients like creamy peanut butter and chocolate chips, these fun cookies are perfect for Halloween or any fun gathering. Follow our easy instructions to create adorable spider cookies that everyone will love. Don’t miss out on this delicious recipe – click through now to bring these creepy crawlers to life in your kitchen!

Ingredients
  

1 cup creamy peanut butter

1 cup brown sugar, packed

1 large egg

1 teaspoon baking soda

1/2 teaspoon vanilla extract

1 cup chocolate chips

1 cup pretzel sticks (for legs)

1 tube of black frosting (for decorating)

Instructions
 

Preheat your oven to 350°F (175°C) and line a baking sheet with parchment paper.

    In a mixing bowl, combine the peanut butter, brown sugar, and egg. Stir until the mixture is smooth and well-blended.

      Add in the baking soda and vanilla extract, continuing to mix until fully incorporated.

        Gently fold in the chocolate chips, ensuring they are evenly distributed in the cookie batter.

          Using a tablespoon or cookie scoop, drop scoops of dough onto the prepared baking sheet, leaving some space between each cookie to allow for spreading.

            Bake in the preheated oven for 10-12 minutes, or until the edges are lightly browned. The centers will look soft, but they'll firm up as they cool.

              Remove from the oven and let them cool on the baking sheet for about 5 minutes before transferring them to a wire rack to cool completely.

                Once cooled, take two pretzel sticks and gently press them into each cookie to resemble spider legs. Use the black frosting to add eyes and any additional detailing to complete the spider look.

                  Prep Time: 15 min | Total Time: 30 min | Servings: 12 cookies

                    WANT TO SAVE THIS RECIPE?