
Looking for a tasty snack that’s both healthy and easy to make? Frozen Peanut Butter Yogurt Bites are your answer! Smooth Greek yogurt and creamy peanut butter unite to create a snack that’s rich in protein. With a touch of honey, vanilla, and optional toppings, these bites promise to satisfy your cravings. Join me as I share the simple steps to whip up this delightful treat!
Ingredients
Main Ingredients
– 1 cup plain Greek yogurt
– 1/2 cup creamy peanut butter
– 2 tablespoons honey or maple syrup
– 1 teaspoon vanilla extract
– A pinch of sea salt
To make the base of these frozen peanut butter yogurt bites, you need a few simple ingredients. First, grab one cup of plain Greek yogurt. It gives a creamy texture and tangy flavor. Next, measure out half a cup of creamy peanut butter. This adds richness and protein. Then, you will need two tablespoons of honey or maple syrup for sweetness. A teaspoon of vanilla extract brings warm notes. Finally, add a pinch of sea salt to enhance all the flavors.
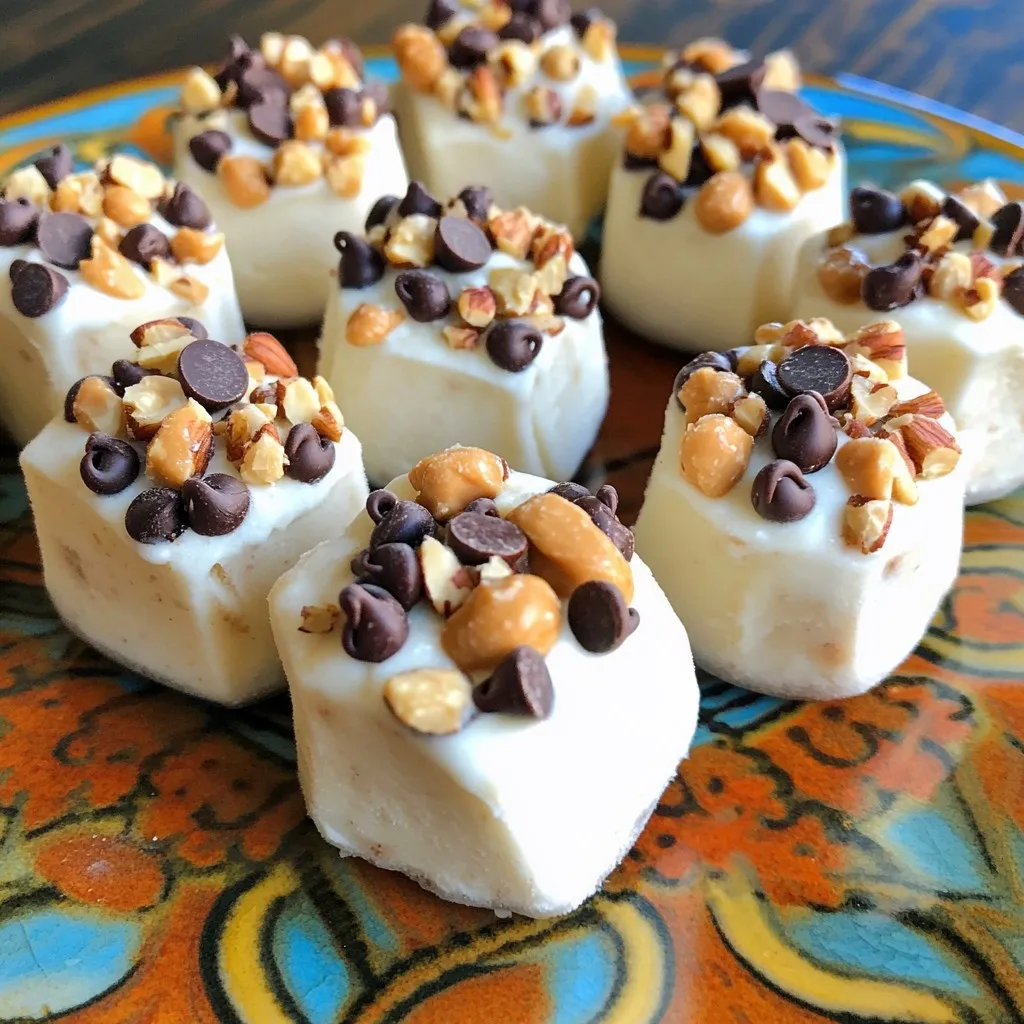
Topping Options
– Mini chocolate chips
– Chopped nuts
To make your bites even more fun, consider adding toppings. Mini chocolate chips give a sweet crunch. They melt slightly when frozen, adding a delightful surprise. Alternatively, chopped nuts can offer a satisfying bite and extra nutrition. You can mix and match these toppings based on your taste.
Step-by-Step Instructions
Preparation Steps
Mixing the Ingredients
To start, grab a mixing bowl. Add 1 cup of plain Greek yogurt and 1/2 cup of creamy peanut butter. Next, pour in 2 tablespoons of honey or maple syrup. Add 1 teaspoon of vanilla extract and a pinch of sea salt. Mix all these ingredients together until they are smooth and well-blended. It should look creamy and tasty.
Preparing the Tray
Now, it’s time to prepare your tray. You can use a mini muffin tin, silicone ice cube tray, or mini cupcake liners. Line the tray with parchment paper. This will help you remove the bites easily later. Make sure every cup is ready for the yummy mix.
Freezing and Serving
Filling the Cups
Using a spoon, fill each cup with the yogurt mixture. Aim to fill them about 3/4 full. This gives enough space for toppings and freezing. Make sure to leave some room so they don’t overflow.
Adding Toppings
Here comes the fun part! Sprinkle mini chocolate chips or chopped nuts on top of each filled cup. This adds flavor and texture. You can even get creative with your toppings if you like.
Freezing Duration
Now, place the tray in the freezer. Let the bites freeze for at least 2 to 3 hours, or until they are solid. Once they are frozen, carefully remove them from the tray. If you used a muffin tin, run a butter knife around the edges to help pop them out. Enjoy your tasty frozen treats!
Tips & Tricks
Perfecting Your Bites
Ensuring a Smooth Mix
To make your Frozen Peanut Butter Yogurt Bites great, you must mix well. Start with Greek yogurt and creamy peanut butter. Add honey or maple syrup, vanilla extract, and sea salt. Use a whisk or spoon to blend until it’s smooth. The goal is a homogenous mix without lumps. This will help your bites freeze evenly and taste yummy.
Tips for Easy Removal
Removing the frozen bites can be tricky if the tray is not prepped right. I suggest lining your muffin tin with parchment paper or using mini cupcake liners. This makes it easier to pop the bites out. If you use a muffin tin, gently run a butter knife around the edges after freezing. This helps loosen each bite.
Serving Suggestions
Creative Plating Ideas
Presentation is key. Serve your bites on a fun, colorful plate. You can also use a cupcake box for a cheerful touch. This makes them look special and inviting. Arrange them in a circle or stack them high for visual impact. Adding fresh mint leaves can also boost the look.
Pairing with Fresh Fruits
For an extra treat, serve these bites with fresh fruits. Slices of banana, strawberries, or blueberries work well. The fruit adds brightness and flavor. You can create a mini fruit platter next to your yogurt bites. This combo makes for a healthy and tasty snack that everyone will love.
Variations
Different Flavor Options
You can make these frozen peanut butter yogurt bites even more fun with flavors!
– Using Flavored Yogurt: Swap plain Greek yogurt for flavored yogurt. Try strawberry or vanilla for a sweet twist. These flavors add a new layer of taste without changing much.
– Alternative Nut Butters: You can switch peanut butter for almond or cashew butter. Each nut butter brings its own flavor. Almond butter gives a nutty taste, while cashew butter is smooth and creamy.
Dietary Adjustments
You can also change the recipe to fit your diet.
– Low-Sugar Versions: Use less honey or maple syrup. You can also add a sugar substitute like stevia. This keeps the bites tasty but lowers the sugar.
– Dairy-Free Alternatives: For a dairy-free option, try coconut yogurt. It has a creamy texture and a hint of coconut flavor. It’s a great choice for those who avoid dairy products.
These variations let you enjoy frozen peanut butter yogurt bites your way!
Storage Info
Freezing Guidelines
– Best Practices for Freezing: Always use an airtight container. This keeps air out and prevents freezer burn. You can also use freezer bags, but make sure to squeeze out all the air. Label the container with the date. This helps you keep track of freshness.
– Duration for Quality: Frozen Peanut Butter Yogurt Bites stay tasty for up to two weeks. After that, they may lose flavor or texture. I recommend enjoying them within this time for the best taste.
Thawing and Reusing
– How to Thaw Safely: To thaw, take out only what you need. Let the bites sit at room temperature for about 10 minutes. If you want them faster, place them in the fridge for 30 minutes. Avoid microwaving, as it can change their texture.
– Reusing Leftovers: If you have leftover bites, store them back in the container. Just make sure they are not thawed before putting them back. They can be refrozen, but it’s best to eat them fresh for the best flavor.
FAQs
Common Questions
How long do Frozen Peanut Butter Yogurt Bites last?
Frozen Peanut Butter Yogurt Bites last up to two weeks in the freezer. Seal them in an airtight container to keep them fresh. After two weeks, they might lose texture or flavor.
Can I use alternate sweeteners?
Yes, you can use other sweeteners. Try agave syrup or stevia. Adjust the amount to match your taste. This keeps the bites sweet and enjoyable.
Is this recipe suitable for kids?
Absolutely! This recipe is great for kids. The bites are fun, tasty, and easy to make. They are also a healthier snack choice compared to candy or cookies.
Preparation Inquiries
What kitchen tools do I need?
You need a mixing bowl, a spoon, and a muffin tin or silicone tray. Parchment paper or mini cupcake liners help with easy removal. These tools make the process smooth and fun.
Can I make these without a muffin tin?
Yes, you can! If you don’t have a muffin tin, use an ice cube tray. Just be sure to line it for easy removal. You can also use small cups or silicone molds.
You now have a simple and tasty recipe for frozen peanut butter yogurt bites. We covered the key ingredients and prep steps. You learned about toppings, variations, and storage tips.
These bites are easy to make and fun to eat. Change the flavors to keep things fresh. Store them well for later enjoyment. With this guide, you can whip up a delicious treat any time. Enjoy making and sharing these bites with friends and family!
