If you crave warm, fresh bread but dread the kneading, you’re in luck! This no-knead rosemary skillet bread is easy to make and full of flavor. With just a few simple ingredients, you can create a delicious loaf that will impress your family and friends. Let’s dive into this simple recipe that will have your kitchen smelling amazing in no time!
Ingredients
Main Ingredients
– 3 cups all-purpose flour
– 1 ½ teaspoons salt
– 1 teaspoon instant yeast
– 1 tablespoon chopped fresh rosemary
Additional Ingredients
– 1 ½ cups warm water
– 2 tablespoons olive oil (for greasing)
– Coarse sea salt (for topping)
In this recipe, I use simple ingredients to create tasty bread. The all-purpose flour forms the base. Salt adds flavor, while instant yeast helps the dough rise. Fresh rosemary gives a wonderful aroma and taste. Warm water combines everything into a sticky dough. Olive oil greases the skillet for easy bread release. Coarse sea salt tops the bread for a nice crunch.
When I select ingredients, I focus on freshness. Fresh rosemary makes a big difference in flavor. If you can, choose high-quality olive oil. This adds richness to the bread. Always measure your ingredients carefully for best results. Accurate measurements keep your bread light and fluffy.
Make sure your warm water isn’t too hot. If it’s too hot, it can kill the yeast. A good temperature is about 110°F (43°C). This helps the yeast activate and rise well.
Feel free to explore different herbs or toppings. Thyme or oregano can work well too. You can even add garlic for an extra kick. These little changes make the recipe yours. Enjoy the process and the delicious results!
Step-by-Step Instructions
Mixing the Dough
Start by gathering your dry ingredients. Measure out 3 cups of all-purpose flour, 1 ½ teaspoons of salt, 1 teaspoon of instant yeast, and 1 tablespoon of chopped fresh rosemary. Use a large mixing bowl. Whisk these dry ingredients together well. This helps mix in the yeast and rosemary evenly.
Next, it’s time to stir in the warm water. Measure 1 ½ cups of warm water. Gradually add the water to the dry mix. Use a wooden spoon to combine everything. You want a shaggy dough that is sticky but well-mixed.
Rising the Dough
Now, cover the bowl with plastic wrap or a damp kitchen towel. Let the dough rest at room temperature. It needs to rise for 12 to 18 hours. This long rise time helps develop flavor. After a few hours, check the dough. You should see bubbles on the surface. The dough will also double in size, showing it’s ready for the next step.
Baking the Bread
Before baking, preheat your oven to 450°F (230°C). Place your cast-iron skillet or heavy oven-safe pot inside to heat for about 30 minutes. This gives a nice crust.
While the skillet heats, lightly flour a clean surface. Gently turn out the dough onto the surface. Use floured hands to shape it into a rough ball. Remember, no kneading needed here!
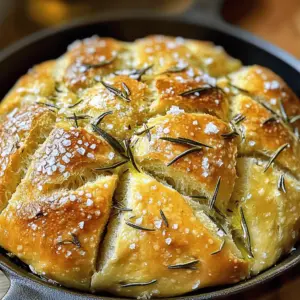
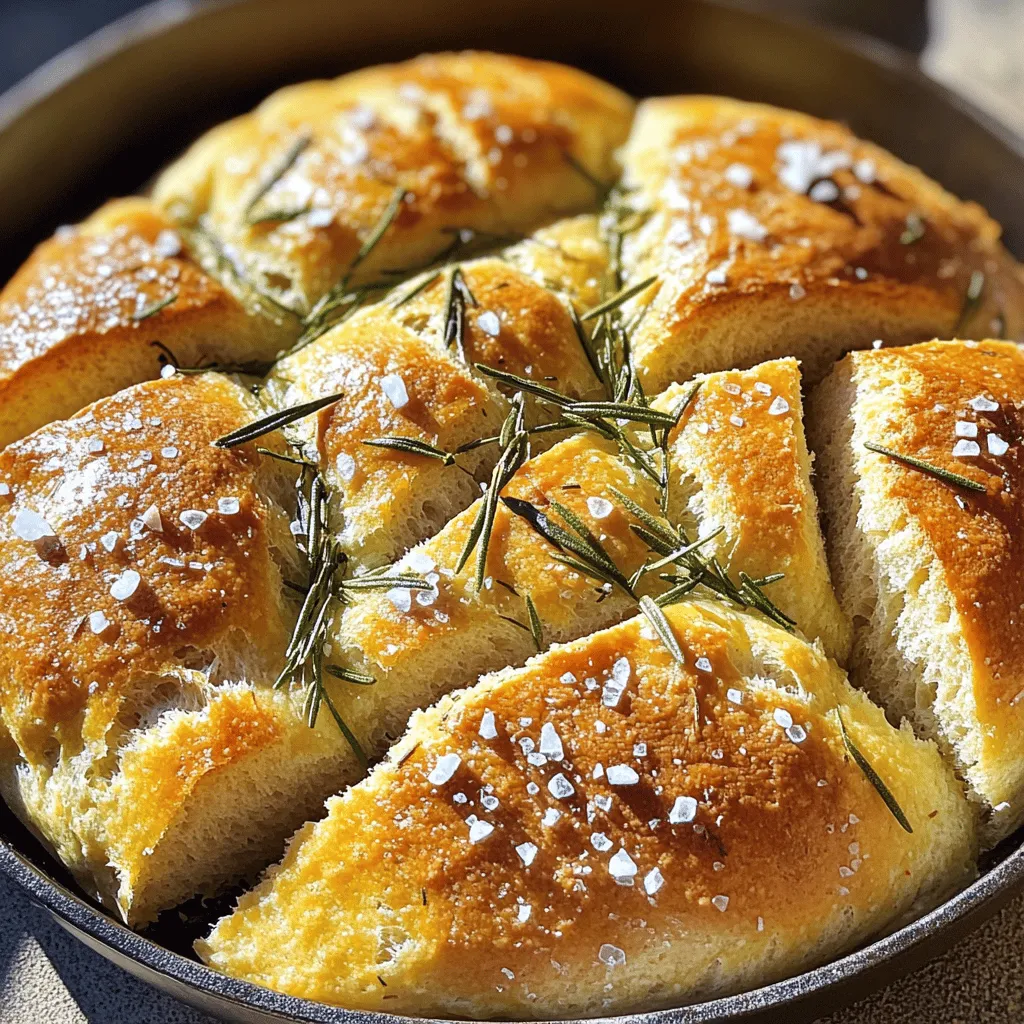
Carefully remove the hot skillet from the oven. Drizzle 2 tablespoons of olive oil inside to coat the surface. Place the dough in the center of the skillet. Sprinkle coarse sea salt and more rosemary on top for added flavor.
Cover the skillet with a lid or aluminum foil. Bake for 30 minutes. After that, uncover and bake for another 15 minutes. The bread should turn golden brown and crusty. Once baked, let it cool for about 10 minutes. Then, transfer it to a wire rack to cool completely before slicing.
Tips & Tricks
Perfecting the Recipe
– Using fresh ingredients for best flavor: Fresh rosemary adds a bright taste. Always use fresh herbs when possible. The flavor difference is clear. Fresh flour and yeast also help the bread rise well. Check dates on packages before you start.
– Proper resting time for dough: Let the dough rest for 12 to 18 hours. This long rise helps develop flavor. The dough will grow and bubble, showing it’s ready. Patience is key here for a tasty bread.
Handling the Dough
– Tips for sticky dough: No-knead means sticky. Don’t worry! Use floured hands when shaping your dough. If it sticks too much, add a bit more flour. Work quickly to keep the dough from drying out.
– Techniques for shaping: Gently turn out the dough onto a floured surface. Shape it into a rough ball. Don’t knead it; just fold it over on itself. This forms a nice shape while keeping air inside.
Ensuring Optimal Baking
– Importance of a hot skillet: Preheat your skillet for 30 minutes. A hot surface helps create a crusty bottom. This step is non-negotiable for great texture. It makes your bread rise up nicely in the oven.
– Adjustments for oven variations: Ovens can vary, so keep an eye on your bread. If yours runs hot, check it a few minutes early. If it’s slower, it might need more time. Use a toothpick to test for doneness; it should come out clean.
Variations
Herb Alternatives
You can switch up the herbs in this recipe. Fresh thyme or oregano both work well. They add a nice twist to the flavor. You can also add garlic or onion for extra taste. Simply chop them finely and mix them into the dough. This gives your bread a savory kick that pairs perfectly with soups and salads.
Cheese Additions
Cheese brings a delightful richness to no-knead bread. You can mix shredded cheese into the dough before baking. Cheddar, mozzarella, or even feta adds great flavor. For a fun twist, try topping the bread with cheese before the last baking step. This creates a tasty, melty layer on top of your golden crust.
Gluten-Free Adaptation
If you need a gluten-free option, you can substitute the all-purpose flour. Use a gluten-free all-purpose flour blend. Make sure it contains xanthan gum for the best texture. You may need to adjust the water amount slightly. Keep the dough slightly sticky for the best results. This will help you achieve a nice rise and a soft interior.
Storage Info
Storing Leftover Bread
To keep your no-knead rosemary skillet bread fresh, wrap it tightly in plastic wrap. You can also place it in a paper bag. This helps keep the crust crisp while keeping the inside soft. Store it at room temperature for up to three days. After that, the bread may start to dry out.
Reheating Instructions
To reheat your bread, the oven works best. Preheat the oven to 350°F (175°C). Place the bread directly on the oven rack for about 10 minutes. This method helps maintain the crustiness. If you prefer, you can wrap it in foil to prevent it from getting too hard.
Freezing Bread
To freeze your bread, let it cool completely first. Wrap it tightly in plastic wrap, then in aluminum foil. This double wrapping prevents freezer burn. You can freeze it for up to three months. To thaw, take it out and leave it at room temperature for a few hours. If you want it warm, pop it in the oven for 10 minutes at 350°F (175°C).
FAQs
How do I know when the dough has risen enough?
You can tell the dough has risen when it has doubled in size. Look for bubbles on the surface. The dough should feel light and airy. If it’s very sticky, that’s normal. Just make sure it has that nice puffy look before you bake it.
Can I use other types of flour?
Yes, you can use other flours! Whole wheat flour adds a nutty flavor. Bread flour gives more chewiness. You can also try spelt flour for a different taste. Just remember that each flour type may change the bread’s texture a bit.
How do I make the bread crustier?
To get a crusty bread, preheat your skillet well. A hot skillet helps form a nice crust. You can also add steam by placing a pan with water in the oven. This keeps the bread moist while baking, making the crust crispy.
This guide covers all you need to make delicious bread at home. You learned about the main and additional ingredients. We went through easy steps for mixing, rising, and baking the dough. I shared useful tips and variations to suit your taste. Finally, we discussed storage and reheating methods.
With these insights, you can make bread that delights everyone. Get ready to experiment and enjoy fresh, homemade bread!