Pickled Cherry Tomatoes Flavorful and Simple Recipe

WANT TO SAVE THIS RECIPE?

Are you ready to add a burst of flavor to your meals? In this blog post, I’ll show you how to make pickled cherry tomatoes that are simple and delicious. With just a few ingredients and some easy steps, you’ll transform fresh tomatoes into a tangy treat. Whether you’re looking to spice up salads or enjoy them straight from the jar, this recipe is perfect for you. Let’s dive into the fun world of pickling!

Ingredients

List of Ingredients

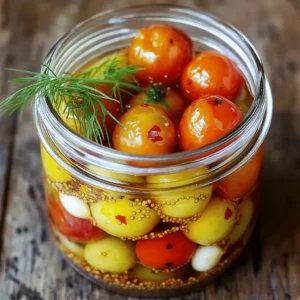
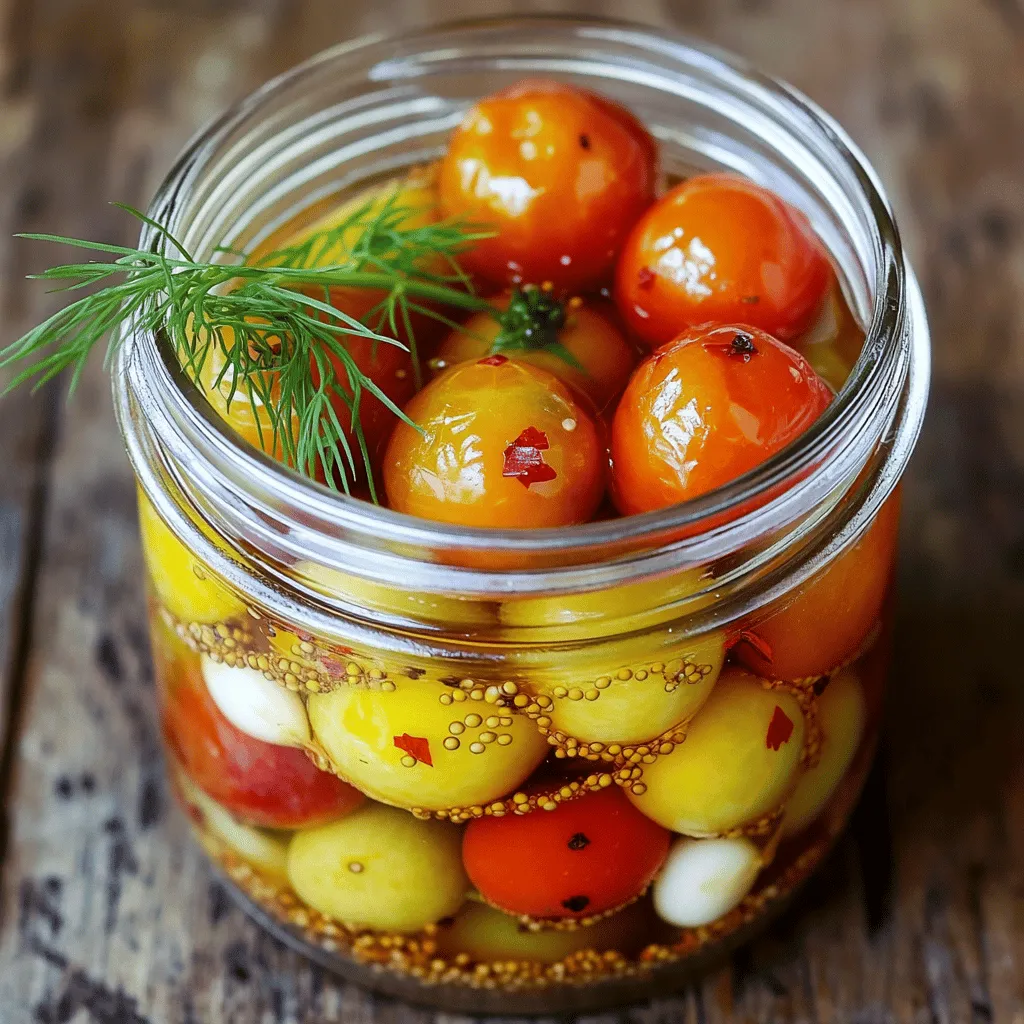
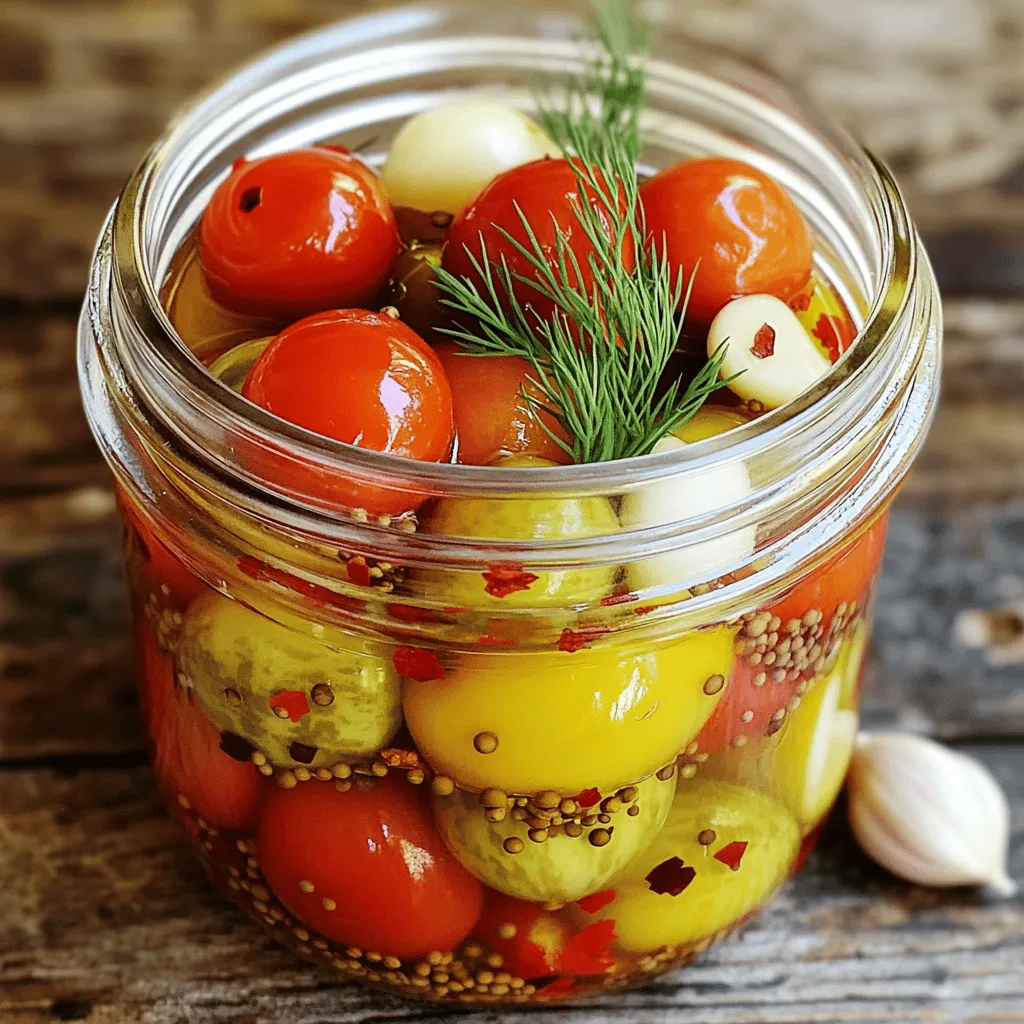
– 1 pint cherry tomatoes, rinsed and stems removed

– 1 cup water

– 1 cup apple cider vinegar

– 2 tablespoons sea salt

– 2 tablespoons sugar

– 1 teaspoon mustard seeds

– 1 teaspoon coriander seeds

– 1 teaspoon red pepper flakes

– 2 garlic cloves, smashed

– 1 sprig fresh dill (or 1 teaspoon dried dill)

To make pickled cherry tomatoes, you need fresh, ripe cherry tomatoes. They should be firm and bright in color. Rinse them well and remove the stems. The key to flavor lies in the brine. You will mix water with apple cider vinegar for a tangy kick. Adding sea salt and sugar balances the sourness and adds sweetness.

Mustard seeds and coriander seeds give a nice crunch and flavor. Red pepper flakes add heat, but you can adjust this to your taste. Smashed garlic cloves add depth to the brine. Fresh dill gives a fragrant touch, and dried dill works well if fresh isn’t available.

This list keeps it simple and gives you all the flavors you need for a delicious snack. Remember, the quality of ingredients matters a lot. Fresh, high-quality items make the best pickles. For the full recipe, check out the instructions that follow.

Step-by-Step Instructions

Preparation of Jar

To start, you need to sterilize your glass jar. This step is very important to keep your pickles safe. You can wash the jar in hot soapy water and rinse it well. If you prefer, you can run it through the dishwasher. Clean jars help prevent bacteria from ruining your pickles.

Making Brine

Next, we will make the brine for the pickles. In a medium saucepan, mix together one cup of water, one cup of apple cider vinegar, two tablespoons of sea salt, and two tablespoons of sugar. Heat the mixture on medium heat. Stir until both the salt and sugar dissolve completely. Once done, take it off the heat and let it cool a bit. This cooling process is key for the brine to blend well.

Packing the Jar

Now, it’s time to pack the jar with cherry tomatoes. Take your rinsed cherry tomatoes and gently pack them into the sterilized jar. Leave some space at the top for the brine. After that, add in the flavor! Toss in the mustard seeds, coriander seeds, red pepper flakes, and smashed garlic cloves. Don’t forget to add the fresh dill or dried dill too. These spices will give your pickles a wonderful taste.

Sealing and Storing

Finally, pour the cooled brine over the tomatoes. Make sure the tomatoes are fully submerged. Leave about half an inch of space at the top. Seal the jar tightly with a lid. Let it cool to room temperature. After it cools, place the jar in the fridge. Wait at least 24 hours before you enjoy your pickled cherry tomatoes. The flavors will get better the longer you wait. Enjoy the taste of summer, even in the cold months! For the full recipe, click here.

Tips & Tricks

Selecting Cherry Tomatoes

When you pick cherry tomatoes, go for the sweet, round ones. The best types for pickling are the small, firm varieties. Look for colors that shine, like bright red, yellow, or even orange.

To check ripeness, squeeze the tomato gently. It should feel firm but not hard. Good quality tomatoes have no blemishes or spots. Fresh tomatoes taste better and give your pickles a great flavor.

Customizing Your Pickles

You can make your pickled tomatoes unique by adding spices. Consider using dill, garlic, or mustard seeds for a punch. If you like heat, add more red pepper flakes.

You can also adjust the sweetness. Use more sugar for a sweeter taste or less for a tangy bite. This way, you create pickles that fit your taste perfectly.

Perfecting the Flavor

For the best taste, let your tomatoes pickle for at least 24 hours. The longer they sit, the more flavor they soak up. I recommend waiting a week if you can.

To enhance flavor infusion, make sure the brine covers all tomatoes. When you pack them tightly, they mix better with the spices. A little extra time can transform simple tomatoes into a tasty treat.

Try the Full Recipe for a delightful experience!

Variations

Other Vegetables to Pickle

You can pickled all sorts of veggies! Here are some tasty options:

– Cucumbers

– Carrots

– Bell peppers

– Cauliflower

– Radishes

Quick pickling is fast and easy. You prepare the brine, then soak the veggies for a short time. Traditional pickling takes longer but gives deeper flavors. It often involves canning and sealing jars for storage.

Recipe Integrations

Pickled cherry tomatoes add a burst of flavor to many dishes. Try these ideas to use them:

– Toss them into salads for a zesty kick.

– Add them to sandwiches for extra crunch.

– Use them as a topping on tacos or nachos.

You can also mix them into unique recipes, like:

– Pasta salad with pickled tomatoes, basil, and mozzarella.

– Risotto topped with pickled tomatoes for a tangy twist.

– A simple bruschetta with pickled tomatoes, garlic, and olive oil.

These ideas can elevate your meals and impress your guests. Check the Full Recipe for more details on pickling!

Storage Info

How to Store Pickled Cherry Tomatoes

To store your pickled cherry tomatoes, keep them in the fridge. This keeps them fresh and tasty. Use a clean, airtight jar. Ensure the tomatoes are submerged in the brine. This helps prevent spoilage. Homemade pickles last about 2 to 3 weeks in the fridge.

Once opened, consume them within a week for the best taste. If you want to store them longer, try canning. However, this requires more steps and careful sealing.

Signs of Spoilage

Check your pickled tomatoes for signs of spoilage. Look for any changes in color or texture. If the tomatoes feel mushy or slimy, it’s time to toss them. Also, smell the jar. If it has an off or bad smell, do not eat them.

Always trust your senses. If you have doubts about their safety, it’s best to throw them out. Safety first! Enjoy your pickled cherry tomatoes while they are fresh and safe to eat.

FAQs

How long do pickled cherry tomatoes last?

Pickled cherry tomatoes can last up to two months in the fridge. Make sure to keep them in a sealed jar. Always check for any off smells or signs of spoilage before eating.

Can I use regular tomatoes instead of cherry tomatoes?

Yes, you can use regular tomatoes. However, they will not have the same bite. Cherry tomatoes are sweeter and more flavorful. They also hold their shape better during pickling.

Are pickled cherry tomatoes healthy?

Yes, pickled cherry tomatoes are healthy. They are low in calories and packed with vitamins. They contain antioxidants, which help fight free radicals. The brine can also provide probiotics if not heated too much.

Where can I buy pickled cherry tomatoes?

You can find pickled cherry tomatoes at many grocery stores. Look in the condiment aisle or at specialty shops. Local farmers’ markets may also have them fresh and homemade.

What is the best way to enjoy pickled cherry tomatoes?

You can enjoy pickled cherry tomatoes in many ways. Serve them on a charcuterie board with cheese and crackers. They also make a great salad topping or sandwich garnish. For a unique dish, try them in pasta or rice salads. For the full recipe, check out the details above!

You now know how to pickle cherry tomatoes step by step. We covered ingredients, jar preparation, and brine-making. Remember, cleanliness is key for safe pickling. You can customize flavors and even pickle other veggies. Store your jars well and watch for signs of spoilage. Enjoying these pickles adds a tasty twist to many dishes. Try your hand at making them, and you’ll delight your taste buds! Happy pickling!

- 1 pint cherry tomatoes, rinsed and stems removed - 1 cup water - 1 cup apple cider vinegar - 2 tablespoons sea salt - 2 tablespoons sugar - 1 teaspoon mustard seeds - 1 teaspoon coriander seeds - 1 teaspoon red pepper flakes - 2 garlic cloves, smashed - 1 sprig fresh dill (or 1 teaspoon dried dill) To make pickled cherry tomatoes, you need fresh, ripe cherry tomatoes. They should be firm and bright in color. Rinse them well and remove the stems. The key to flavor lies in the brine. You will mix water with apple cider vinegar for a tangy kick. Adding sea salt and sugar balances the sourness and adds sweetness. Mustard seeds and coriander seeds give a nice crunch and flavor. Red pepper flakes add heat, but you can adjust this to your taste. Smashed garlic cloves add depth to the brine. Fresh dill gives a fragrant touch, and dried dill works well if fresh isn’t available. This list keeps it simple and gives you all the flavors you need for a delicious snack. Remember, the quality of ingredients matters a lot. Fresh, high-quality items make the best pickles. For the full recipe, check out the instructions that follow. To start, you need to sterilize your glass jar. This step is very important to keep your pickles safe. You can wash the jar in hot soapy water and rinse it well. If you prefer, you can run it through the dishwasher. Clean jars help prevent bacteria from ruining your pickles. Next, we will make the brine for the pickles. In a medium saucepan, mix together one cup of water, one cup of apple cider vinegar, two tablespoons of sea salt, and two tablespoons of sugar. Heat the mixture on medium heat. Stir until both the salt and sugar dissolve completely. Once done, take it off the heat and let it cool a bit. This cooling process is key for the brine to blend well. Now, it's time to pack the jar with cherry tomatoes. Take your rinsed cherry tomatoes and gently pack them into the sterilized jar. Leave some space at the top for the brine. After that, add in the flavor! Toss in the mustard seeds, coriander seeds, red pepper flakes, and smashed garlic cloves. Don’t forget to add the fresh dill or dried dill too. These spices will give your pickles a wonderful taste. Finally, pour the cooled brine over the tomatoes. Make sure the tomatoes are fully submerged. Leave about half an inch of space at the top. Seal the jar tightly with a lid. Let it cool to room temperature. After it cools, place the jar in the fridge. Wait at least 24 hours before you enjoy your pickled cherry tomatoes. The flavors will get better the longer you wait. Enjoy the taste of summer, even in the cold months! For the full recipe, click here. When you pick cherry tomatoes, go for the sweet, round ones. The best types for pickling are the small, firm varieties. Look for colors that shine, like bright red, yellow, or even orange. To check ripeness, squeeze the tomato gently. It should feel firm but not hard. Good quality tomatoes have no blemishes or spots. Fresh tomatoes taste better and give your pickles a great flavor. You can make your pickled tomatoes unique by adding spices. Consider using dill, garlic, or mustard seeds for a punch. If you like heat, add more red pepper flakes. You can also adjust the sweetness. Use more sugar for a sweeter taste or less for a tangy bite. This way, you create pickles that fit your taste perfectly. For the best taste, let your tomatoes pickle for at least 24 hours. The longer they sit, the more flavor they soak up. I recommend waiting a week if you can. To enhance flavor infusion, make sure the brine covers all tomatoes. When you pack them tightly, they mix better with the spices. A little extra time can transform simple tomatoes into a tasty treat. Try the Full Recipe for a delightful experience! {{image_2}} You can pickled all sorts of veggies! Here are some tasty options: - Cucumbers - Carrots - Bell peppers - Cauliflower - Radishes Quick pickling is fast and easy. You prepare the brine, then soak the veggies for a short time. Traditional pickling takes longer but gives deeper flavors. It often involves canning and sealing jars for storage. Pickled cherry tomatoes add a burst of flavor to many dishes. Try these ideas to use them: - Toss them into salads for a zesty kick. - Add them to sandwiches for extra crunch. - Use them as a topping on tacos or nachos. You can also mix them into unique recipes, like: - Pasta salad with pickled tomatoes, basil, and mozzarella. - Risotto topped with pickled tomatoes for a tangy twist. - A simple bruschetta with pickled tomatoes, garlic, and olive oil. These ideas can elevate your meals and impress your guests. Check the Full Recipe for more details on pickling! To store your pickled cherry tomatoes, keep them in the fridge. This keeps them fresh and tasty. Use a clean, airtight jar. Ensure the tomatoes are submerged in the brine. This helps prevent spoilage. Homemade pickles last about 2 to 3 weeks in the fridge. Once opened, consume them within a week for the best taste. If you want to store them longer, try canning. However, this requires more steps and careful sealing. Check your pickled tomatoes for signs of spoilage. Look for any changes in color or texture. If the tomatoes feel mushy or slimy, it’s time to toss them. Also, smell the jar. If it has an off or bad smell, do not eat them. Always trust your senses. If you have doubts about their safety, it's best to throw them out. Safety first! Enjoy your pickled cherry tomatoes while they are fresh and safe to eat. Pickled cherry tomatoes can last up to two months in the fridge. Make sure to keep them in a sealed jar. Always check for any off smells or signs of spoilage before eating. Yes, you can use regular tomatoes. However, they will not have the same bite. Cherry tomatoes are sweeter and more flavorful. They also hold their shape better during pickling. Yes, pickled cherry tomatoes are healthy. They are low in calories and packed with vitamins. They contain antioxidants, which help fight free radicals. The brine can also provide probiotics if not heated too much. You can find pickled cherry tomatoes at many grocery stores. Look in the condiment aisle or at specialty shops. Local farmers' markets may also have them fresh and homemade. You can enjoy pickled cherry tomatoes in many ways. Serve them on a charcuterie board with cheese and crackers. They also make a great salad topping or sandwich garnish. For a unique dish, try them in pasta or rice salads. For the full recipe, check out the details above! You now know how to pickle cherry tomatoes step by step. We covered ingredients, jar preparation, and brine-making. Remember, cleanliness is key for safe pickling. You can customize flavors and even pickle other veggies. Store your jars well and watch for signs of spoilage. Enjoying these pickles adds a tasty twist to many dishes. Try your hand at making them, and you'll delight your taste buds! Happy pickling!

Pickled Cherry Tomatoes

Discover the delicious world of pickled cherry tomatoes! This easy recipe transforms simple ingredients into a burst of flavor perfect for salads, snacks, or charcuterie boards. With just a few steps, you'll learn how to create crunchy, tangy treats that are sure to impress. Ready to elevate your culinary experience? Click through for the full recipe and tips to make your pickled cherry tomatoes a hit!

Ingredients
  

1 pint cherry tomatoes, rinsed and stems removed

1 cup water

1 cup apple cider vinegar

2 tablespoons sea salt

2 tablespoons sugar

1 teaspoon mustard seeds

1 teaspoon coriander seeds

1 teaspoon red pepper flakes

2 garlic cloves, smashed

1 sprig fresh dill (or 1 teaspoon dried dill)

Instructions
 

Begin by sterilizing a glass jar (or jars) for the pickling process. Wash it in hot soapy water and rinse well, or run it through the dishwasher.

    In a medium saucepan, combine the water, apple cider vinegar, sea salt, and sugar. Heat over medium heat, stirring until the salt and sugar are fully dissolved. Remove from heat and let it cool slightly.

      While the brine is cooling, pack the cherry tomatoes into the sterilized jar, leaving some space at the top.

        Add the mustard seeds, coriander seeds, red pepper flakes, smashed garlic cloves, and dill to the jar with the tomatoes.

          Carefully pour the slightly cooled brine over the tomatoes until they are fully submerged, making sure to leave about half an inch of headspace at the top of the jar.

            Seal the jar tightly with a lid and let it cool to room temperature.

              Once cooled, refrigerate the jar for at least 24 hours before consuming to allow the flavors to develop (the longer, the better!).

                Prep Time, Total Time, Servings: 15 minutes | 24 hours (for pickling) | 1 pint (about 4 servings as a snack)

                  - Presentation Tips: Serve the pickled cherry tomatoes on a charcuterie board alongside cheeses and crackers, or use them as a vibrant garnish for salads and sandwiches.

                    WANT TO SAVE THIS RECIPE?