Go Back
- 1 large cucumber (about 10-12 inches), sliced into spears or rounds - 4 cloves garlic, smashed - 1 tablespoon dill seeds or 1-2 fresh dill sprigs - 1 teaspoon black peppercorns - 1 teaspoon red pepper flakes (optional for heat) - 2 cups water - 1 cup white vinegar - 2 tablespoons granulated sugar - 2 tablespoons salt You can switch the white vinegar for apple cider vinegar. This gives a fruity twist. Rice vinegar is also an option. It adds a lighter flavor. For spices, feel free to use mustard seeds or coriander. These can add unique notes to your pickles. Garlic is a superstar in health. It can boost your immune system. It may help reduce blood pressure too. Dill, on the other hand, is rich in antioxidants. It may aid digestion and has anti-inflammatory properties. Adding these ingredients not only flavors your pickles but also packs them with health benefits. Slice your cucumber into even pieces. You can cut it into spears or rounds. A sharp knife helps make clean cuts. This ensures each piece brines well. Uniform slices absorb the brine evenly. Aim for about half an inch thick for the best crunch. Start with a clean jar. Place smashed garlic at the bottom first. Follow with dill seeds or fresh dill sprigs. Then, add black peppercorns and red pepper flakes if you like heat. Layering helps flavors mix well. Make sure to pack the cucumbers tightly. This keeps them submerged in the brine. In a saucepan, mix water, white vinegar, sugar, and salt. Heat it over medium heat. Stir until sugar and salt dissolve completely. This should take just a few minutes. You want the brine hot but not boiling. Once ready, pour it over the layered ingredients in the jar. Let the jar cool for about 30 minutes at room temperature. Cover it tightly and place it in the fridge. The pickles will start tasting great after a few hours. For the best flavor, let them sit for at least 24 hours. This marinating time is key for full flavor. Enjoy your pickles as a snack or side dish! For the full recipe, check out the detailed instructions above. To get that perfect crunch in your garlic dill pickles, start with fresh, firm cucumbers. The best types to use are Kirby cucumbers or pickling cucumbers. They have a thick skin and a great texture. Look for cucumbers that are dark green, heavy for their size, and free from soft spots. You can boost the flavor of your pickles by adding more herbs and spices. Consider adding mustard seeds, coriander seeds, or even a bay leaf. Fresh herbs like tarragon or thyme also add a lovely twist. Just remember, a little goes a long way. Avoid common mistakes to make your pickles shine. Don’t skip the salt; it helps with crispness and flavor. Always sterilize your jars to keep your pickles safe. Lastly, let your pickles marinate for at least 24 hours. This ensures they soak up all the yummy flavors. For the complete recipe, check out the Full Recipe. {{image_2}} To make spicy garlic dill pickles, add red pepper flakes or fresh chili. I love using a mix of heat and tang. Start with one teaspoon of red pepper flakes. If you want more heat, add more to taste. This small change makes a big difference. The spicy flavor pairs well with garlic and dill. It adds a new layer of taste to the crunchy pickles. You can create sweet garlic dill pickles by adjusting the sugar. To make them sweeter, increase the sugar to three tablespoons. This change creates a nice balance with the vinegar. Sweet garlic dill pickles taste great as a snack. They also work well in salads and sandwiches. Garlic dill pickles have many global variations. For example, in Germany, they add mustard seeds and bay leaves. In Russia, they include horseradish for a unique taste. Each country brings its own twist to the classic recipe. Experimenting with these flavors can be fun. You might find a new favorite! Try the full recipe to start your pickling journey. To keep your garlic dill pickles fresh, sealing the jars is key. Use clean, airtight jars to store your pickles. After pouring in the brine, let the jars cool. Once cool, seal the lids tightly. Store the jars in the fridge right away. This helps slow down spoilage. Homemade garlic dill pickles can last up to two months in the fridge. They taste best within the first month. After that, their crunch and flavor may fade. Always check for freshness before eating. Before you munch on your pickles, look for signs of spoilage. If the pickles smell off or appear cloudy, toss them. Mold is another clear sign they are bad. If the color changes or if they feel slimy, it’s best to throw them away. Always trust your senses when it comes to food safety. Garlic dill pickles need at least 24 hours to marinate for the best flavor. If you wait longer, the taste will deepen. I like to let mine sit for about two to three days. This extra time helps the flavors blend well. You can taste them after a few hours, but they won't be fully developed yet. You can find garlic dill pickles at most grocery stores. Look for popular brands like Claussen and Mt. Olive. These brands offer a good crunch and flavor. Specialty stores may have local options that are also tasty. Don’t forget to check farmer’s markets for fresh, homemade pickles too. Yes, you can reuse the brine for another batch of pickles. Make sure to strain it first to remove bits of garlic and spices. However, the flavor may not be as strong. Always check for any signs of spoilage before reusing. If it smells off or looks cloudy, it's best to make a fresh batch. Making garlic dill pickles at home is fun and rewarding. You learned about essential ingredients and healthy options. Our step-by-step guide helped you through preparation, brining, and storage. You also discovered tips for crispness and tasty variations. Remember, pickling is an art, not a science. Try different spices and flavors to make your pickles unique. Enjoy your homemade pickles, and share your delicious creations with others!

Garlic Dill Pickles

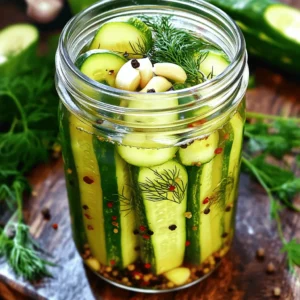
Discover the crunchy delight of homemade Garlic Dill Pickles with this easy recipe! Learn how to pickle cucumbers using fresh garlic, aromatic dill, and a perfect balance of vinegar and spices. This simple method yields delicious pickles in just one day. Perfect for snacking or as a side dish, these Garlic Dill Pickles will add flavor to your meals. Click to explore the full recipe and elevate your pickle game today!

Ingredients
  

1 large cucumber (about 10-12 inches), sliced into spears or rounds

4 cloves garlic, smashed

1 tablespoon dill seeds or 1-2 fresh dill sprigs

1 teaspoon black peppercorns

1 teaspoon red pepper flakes (optional for heat)

2 cups water

1 cup white vinegar

2 tablespoons granulated sugar

2 tablespoons salt

Instructions
 

Begin by preparing the cucumbers. If using large cucumbers, slice them into spears or rounds, ensuring that they are evenly cut for uniform brining.

    In a clean jar or container, layer the smashed garlic, dill seeds (or fresh dill), black peppercorns, and red pepper flakes if you are using them.

      In a saucepan, combine the water, white vinegar, sugar, and salt. Heat over medium heat, stirring until the sugar and salt are fully dissolved.

        Once the brine is ready, pour it hot over the layered ingredients in the jar, ensuring that the cucumbers are fully submerged.

          Allow the jar to cool at room temperature for about 30 minutes. Cover the jar and place it in the refrigerator.

            The pickles will start to develop flavor after a few hours, but for the best taste, let them marinate in the fridge for at least 24 hours before consuming.

              Prep Time: 15 minutes | Total Time: 1 day (includes marinating) | Servings: 4

                - Presentation Tips: Serve the pickles as a refreshing snack or appetizer, arranged on a platter with herbal garnishes, or alongside a charcuterie board.