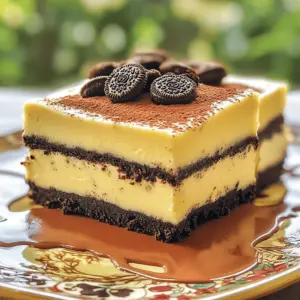
Go Back
To make No Bake Oreo Cheesecake Bars, you need: - 24 Oreo cookies, crushed - 4 tablespoons unsalted butter, melted - 16 oz cream cheese, softened - 1 cup powdered sugar - 1 teaspoon vanilla extract - 1 cup whipped cream (store-bought or homemade) - 8-10 Oreo cookies, coarsely chopped (for topping) Choose fresh ingredients for the best taste. Look for cream cheese that is smooth and soft. Check the expiration date on the package. For the whipped cream, pick one with no added sugars to keep it light. When selecting Oreos, make sure the package is sealed well. Fresh cookies will crush better and taste great. You can change some ingredients if needed. If you are dairy-free, use a dairy-free cream cheese. Coconut cream can be a good swap for whipped cream. For those who can’t eat gluten, choose gluten-free cookies. Always check labels for allergens. If you have nut allergies, ensure your whipped cream is nut-free. First, gather your ingredients. You need 24 crushed Oreo cookies and 4 tablespoons of melted unsalted butter. In a mixing bowl, combine these two ingredients. Mix until it looks like wet sand. This texture is key for a solid crust. Next, take a lined 9x9-inch baking dish. Press the Oreo mixture firmly into the bottom. Use the back of a measuring cup to pack it tightly. Make sure it is even across the dish. This step gives you a strong base for your cheesecake. In a separate bowl, beat 16 ounces of softened cream cheese with an electric mixer. Mix until it is creamy and smooth. Then, add in 1 cup of powdered sugar and 1 teaspoon of vanilla extract. Keep mixing until everything is well blended. Now, gently fold in 1 cup of whipped cream. This will give your filling a light and airy texture. Make sure not to overmix; you want to keep that fluffy feel. Pour the creamy cheesecake filling over the crust in the baking dish. Use a spatula to spread it evenly. Next, take 8 to 10 coarsely chopped Oreo cookies and sprinkle them on top. Press them down slightly to make sure they stick. Cover the dish with plastic wrap. Place it in the refrigerator for at least 4 hours. This helps the cheesecake layer set well. Once set, cut it into bars and serve chilled. Enjoy your rich and creamy Oreo cheesecake bars! To get the best texture in your cheesecake bars, ensure your cream cheese is soft. Take it out of the fridge an hour before mixing. When you beat it, mix until it's creamy. Adding the whipped cream gently keeps the mix light. This helps create a rich and airy filling. Store your leftover bars in an airtight container. This keeps them fresh and prevents drying out. Place a piece of wax paper between layers to avoid sticking. You can also cover them tightly with plastic wrap. They last up to five days in the fridge. For a stunning look, serve the bars on a nice platter. Drizzle chocolate sauce over the top for flair. You can also add extra whipped cream on the side. Sprinkle some crushed Oreos for a fun touch. These small details make your dessert pop! {{image_2}} You can change the flavor of your cheesecake bars easily. Here are some ideas to try: - Peanut Butter: Mix in ½ cup of creamy peanut butter with the cream cheese for a nutty twist. - Mint: Add 1 teaspoon of mint extract to the cream cheese for a refreshing taste. - Chocolate: Stir in ½ cup of melted chocolate to the filling for a rich chocolate flavor. These add-ins let you customize the bars to your taste. Feel free to experiment and find your favorite! The toppings make your cheesecake bars fun and tasty. Here are some fun options: - Chocolate Drizzle: Melt chocolate and drizzle it over the top for extra sweetness. - Caramel Sauce: Add caramel sauce for a rich, sweet flavor. - Fresh Berries: Top with strawberries or raspberries for a fruity touch. These toppings not only add flavor, but they also look great. Get creative with your choices! If you want to make mini versions, it’s easy! Just follow these steps: 1. Use a mini muffin tin and line each cup with liners. 2. Press the Oreo crust into the bottom of each cup. 3. Fill them with the cheesecake mixture. 4. Top with chopped Oreos and refrigerate until set. These mini bars are perfect for parties or snacks. They are cute and easy to eat! To keep your No Bake Oreo Cheesecake Bars fresh, store them in the fridge. Use an airtight container to prevent any odors from ruining the taste. You can also cover the dish tightly with plastic wrap. Make sure the bars are fully chilled before sealing them. The cold helps maintain their rich and creamy texture. You can freeze these bars for later enjoyment. Cut them into squares before freezing. Wrap each piece in plastic wrap and place them in a freezer-safe container. Label the container with the date. They will stay fresh for up to three months. When ready to eat, thaw them in the fridge overnight. In the refrigerator, these cheesecake bars last about five days. If you follow the freezing instructions, they can last for three months. Always check for any signs of spoilage before serving. If you see any changes in color or smell, it’s best to discard them for safety. Yes, you can make these bars a day or two ahead of time. They taste great when chilled and allow the flavors to mix well. Just cover them tightly with plastic wrap and store them in the fridge. This way, you save time on the day you want to serve them. If you want to swap out cream cheese, try using Greek yogurt or mascarpone cheese. Both options give a creamy texture. Greek yogurt adds a bit of tang, while mascarpone is rich and smooth. Choose based on your taste and what you have at home. You can tell the cheesecake layer is set when it feels firm to the touch. After chilling for at least four hours, check the edges first. They should feel solid and not jiggle too much in the center. If you press gently, it should feel like a soft pillow rather than liquid. You learned about tasty Oreo cheesecake bars today. We covered ingredients, step-by-step instructions, and tips for storing. Remember to choose quality ingredients for the best results. You can also try fun variations to make them your own. Lastly, keep your bars fresh with proper storage. I hope you enjoy making and sharing these delicious treats!

No Bake Oreo Cheesecake Bars

Indulge in the ultimate dessert with these No Bake Oreo Cheesecake Bars! This easy recipe combines crushed Oreos with a creamy cheesecake filling, topped with more cookies for a delicious treat. Perfect for any occasion, these bars require just a few simple ingredients and minimal prep time. Ready in just 20 minutes plus chilling, they’re sure to impress! Click through for the full recipe and make your dessert dreams come true!

Ingredients
  

24 Oreo cookies, crushed

4 tablespoons unsalted butter, melted

16 oz cream cheese, softened

1 cup powdered sugar

1 teaspoon vanilla extract

1 cup whipped cream (store-bought or homemade)

8-10 Oreo cookies, coarsely chopped (for topping)

Instructions
 

In a mixing bowl, combine the crushed Oreo cookies and melted butter. Mix until well combined and the mixture resembles wet sand.

    Press the Oreo mixture firmly into the bottom of a lined 9x9-inch baking dish to create a crust layer. Use the back of a measuring cup to ensure it’s packed tightly and evenly.

      In a separate bowl, beat the softened cream cheese with an electric mixer until creamy and smooth.

        Gradually add in the powdered sugar and vanilla extract, and continue mixing until fully incorporated and smooth.

          Gently fold in the whipped cream until the mixture is well combined and airy.

            Pour the cheesecake filling over the prepared crust, spreading it evenly with a spatula.

              Sprinkle the coarsely chopped Oreo cookies on top of the cheesecake layer, pressing them in slightly to secure them in place.

                Cover the dish with plastic wrap and refrigerate for at least 4 hours, or until the cheesecake is set.

                  Once set, cut into bars and serve chilled.

                    Prep Time: 20 min | Total Time: 4 hr 20 min | Servings: 12 bars

                      - Presentation Tips: Serve on a platter with an additional drizzle of chocolate sauce or garnished with extra whipped cream for an elegant touch.