Go Back
To make No-Bake Pumpkin Pie Cheesecake Cups, you need some simple ingredients. Here’s what you’ll need: - 1 cup pumpkin puree - 8 oz cream cheese, softened - 1/2 cup powdered sugar - 1 teaspoon vanilla extract - 1 teaspoon pumpkin pie spice - 1/2 cup heavy whipping cream - 1 cup crushed graham crackers - 4 tablespoons melted butter - 2 tablespoons brown sugar - Whipped cream for topping - Ground cinnamon for sprinkling Each ingredient plays a key role. The pumpkin puree gives a rich flavor and color. Cream cheese adds a creamy texture and sweetness. Powdered sugar sweetens the mix without graininess. Vanilla extract enhances overall taste. Pumpkin pie spice brings warmth and a classic fall flavor. Heavy cream ensures a light and fluffy filling. The graham crackers form a crunchy base, while melted butter helps bind it. Brown sugar adds extra depth. Finally, whipped cream and cinnamon make for a lovely finishing touch. Now that you have the ingredients, you’re ready to create a tasty treat that’s perfect for any occasion! 1. In a medium bowl, combine the crushed graham crackers, melted butter, and brown sugar. Mix until it looks like wet sand. 2. Divide this mixture into your serving cups. Press it down firmly to create a nice crust layer. 1. In a large bowl, beat the softened cream cheese with an electric mixer until it's smooth and creamy. 2. Add in the pumpkin puree, powdered sugar, vanilla extract, and pumpkin pie spice. Mix until everything blends well and is smooth. 1. Spoon or pipe the pumpkin cheesecake mixture over the graham cracker crust in each cup. Fill them about three-quarters full. 2. Chill the cups in the refrigerator for at least 4 hours or until they are set. This helps the flavors meld and the texture firm up. To whip cream well, start with a cold bowl. Use cold heavy cream too. Beat it until you see stiff peaks. This helps the filling stay light and airy. Chilling is key. After you fill the cups, let them chill for at least four hours. This helps the flavors blend and the texture set. You can garnish these cups in many ways. A dollop of whipped cream adds a nice touch. A sprinkle of ground cinnamon makes it look fancy. Pair these cups with a warm cup of cider or coffee. The flavors blend perfectly, and it makes a great dessert drink combo. One big mistake is overmixing the filling. Mix just until smooth. Overmixing can make it heavy. Also, make sure to press the crust firmly in the cups. A loose crust will crumble and make a mess when you serve. Keep these tips in mind for a perfect treat! {{image_2}} You can add fun flavors to your no-bake pumpkin pie cheesecake cups. Adding chocolate or caramel can make them extra special. Just drizzle chocolate or caramel sauce on top before serving. You can also mix in chocolate chips for a sweet surprise. Using different spices can change the vibe too. Try adding nutmeg or ginger to bring out more warmth. These little changes can take your dessert to a new level. If you need gluten-free options, use almond flour or gluten-free graham crackers for the crust. This way, everyone can enjoy the treat. For a dairy-free version, swap cream cheese with a dairy-free cream cheese. You can use coconut cream in place of heavy cream for the filling. These swaps keep the flavor while fitting different diets. Presentation matters! Use fun cups like mason jars or fancy glasses. This adds charm to your dessert. Layering the pumpkin filling and crust can make it look even better. You can alternate layers of crust and filling for a pretty effect. Don’t forget to top with whipped cream and a sprinkle of cinnamon for a beautiful finish. To keep your no-bake pumpkin pie cheesecake cups fresh, store them in the refrigerator. Use an airtight container to block moisture and odors. If you plan to eat them later, use plastic wrap or a sealed jar. This helps maintain their creamy texture and flavor. For freezing, these cheesecake cups can stay fresh for up to three months. Make sure they are fully set before freezing. Wrap each cup tightly with plastic wrap and then place them in a freezer bag. This keeps them from getting freezer burn. When you want to enjoy them, move them to the fridge to thaw overnight. The shelf life of your cheesecake cups is about four to five days in the fridge. Always check for signs of spoilage. If you see any mold or if the texture has changed, it’s best to discard them. Signs of spoilage include an off smell or separation of the filling. If the whipped cream has turned watery, that is also a sign. Keep these tips in mind to enjoy your tasty treats longer! Yes, you can make these cups ahead of time. I suggest making them a day before you plan to serve. This gives the flavors time to blend. Plus, the cheesecake will set better. Yes, you can use fresh pumpkin. Start with about 1 1/4 cups of fresh pumpkin. First, roast the pumpkin until soft, then puree it. This will add a nice fresh flavor to your cups. You can tell when they are set by looking for a firm texture. The tops should not jiggle when you gently shake them. They should feel cool and firm to the touch. This blog covers how to make delicious pumpkin cheesecake cups. You learned about the ingredients, step-by-step instructions, and useful tips. Remember to chill the cheesecake for the best texture and to avoid common mistakes like overmixing. Feel free to explore variations, like adding chocolate or making gluten-free options. Store them right in the fridge or freezer for longer freshness. With these easy steps, you can impress friends and family with a tasty fall dessert. Enjoy making these delightful cups!

No-Bake Pumpkin Pie Cheesecake Cups

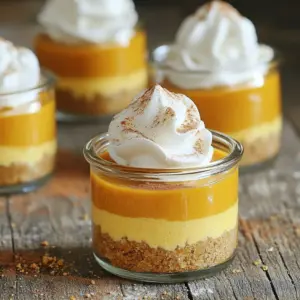
Indulge in the delightful flavors of fall with these No-Bake Pumpkin Pie Cheesecake Cups! This easy recipe combines creamy pumpkin, fluffy whipped cream, and a crunchy graham cracker crust for a perfect dessert. Great for gatherings or a sweet treat at home, these cups require just 20 minutes of prep and chilling time. Click through to explore the full recipe and impress your friends and family with this tasty autumn treat!

Ingredients
  

1 cup pumpkin puree

8 oz cream cheese, softened

1/2 cup powdered sugar

1 teaspoon vanilla extract

1 teaspoon pumpkin pie spice

1/2 cup heavy whipping cream

1 cup crushed graham crackers

4 tablespoons melted butter

2 tablespoons brown sugar

Whipped cream for topping

Ground cinnamon for sprinkling

Instructions
 

In a medium bowl, combine the crushed graham crackers, melted butter, and brown sugar. Mix until the mixture resembles wet sand.

    Divide the graham cracker mixture evenly into the bottom of serving cups or jars, pressing it down firmly to create a crust layer.

      In a separate large bowl, beat the softened cream cheese with an electric mixer until smooth and creamy.

        Add in the pumpkin puree, powdered sugar, vanilla extract, and pumpkin pie spice to the cream cheese. Mix until well combined and smooth.

          In another bowl, whip the heavy cream until stiff peaks form. Gently fold the whipped cream into the pumpkin mixture until fully incorporated.

            Spoon or pipe the pumpkin cheesecake mixture over the graham cracker crust in each cup, filling them about three-quarters full.

              Chill the cups in the refrigerator for at least 4 hours or until set.

                Before serving, top each pumpkin cheesecake cup with a dollop of whipped cream and a sprinkle of ground cinnamon for garnish.

                  Prep Time: 20 minutes | Total Time: 4 hours 20 minutes | Servings: 6